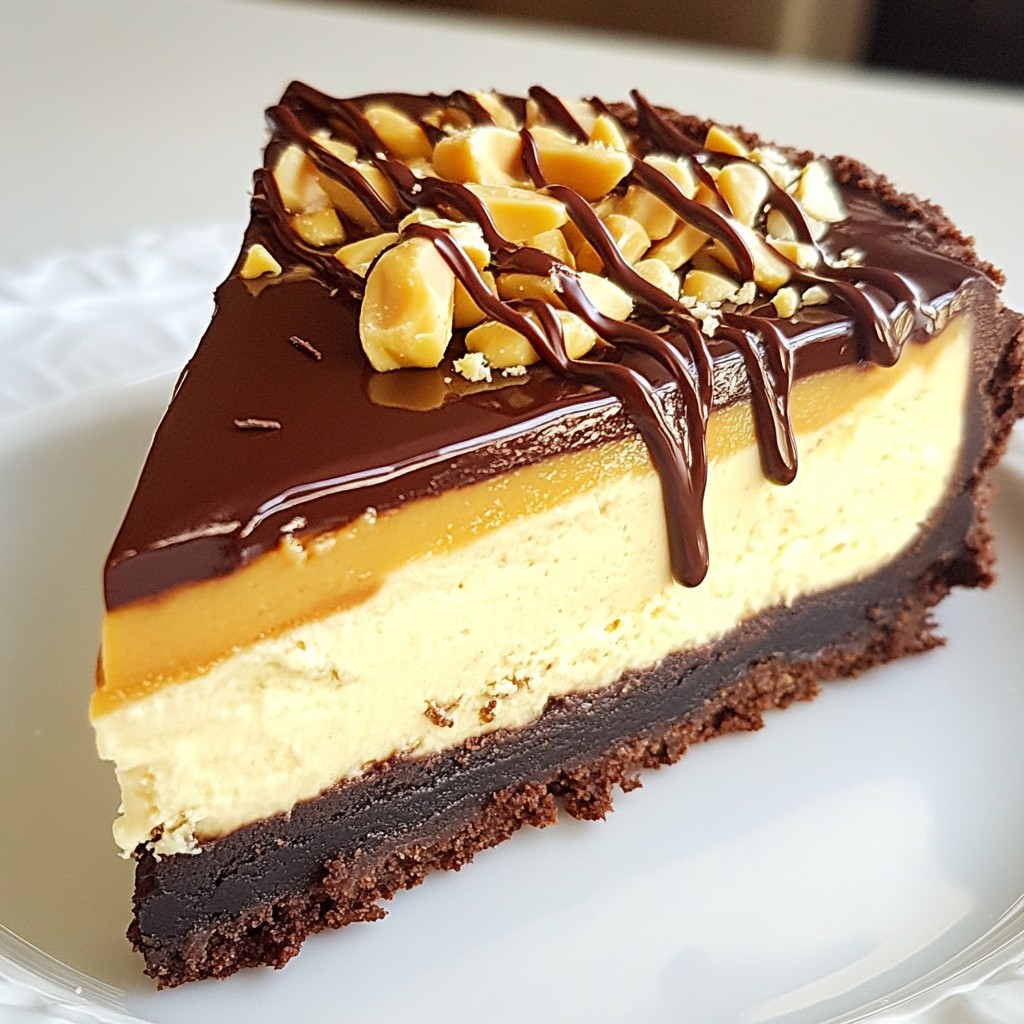
If you're craving a treat that combines rich chocolate and creamy peanut butter, you're in the right place! My Chocolate Peanut Butter Cheesecake is a dessert lover's dream. This no-bake delight is easy to make and perfect for any occasion. With simple ingredients and step-by-step instructions, you'll have a show-stopping dessert in no time. Let’s dive into the sweet details and create this indulgent masterpiece together!
Why I Love This Recipe
- Irresistible Flavor Combination: The rich chocolate pairs perfectly with creamy peanut butter, creating a dessert that's both indulgent and satisfying.
- Decadent Texture: This cheesecake boasts a smooth and creamy filling, complemented by a crunchy chocolate cookie crust, making every bite a delight.
- Easy to Make: With straightforward steps and minimal effort, this cheesecake is accessible for bakers of all skill levels.
- Perfect for Any Occasion: Whether it’s a celebration or a casual gathering, this cheesecake is sure to impress your guests and leave them wanting more.
Ingredients
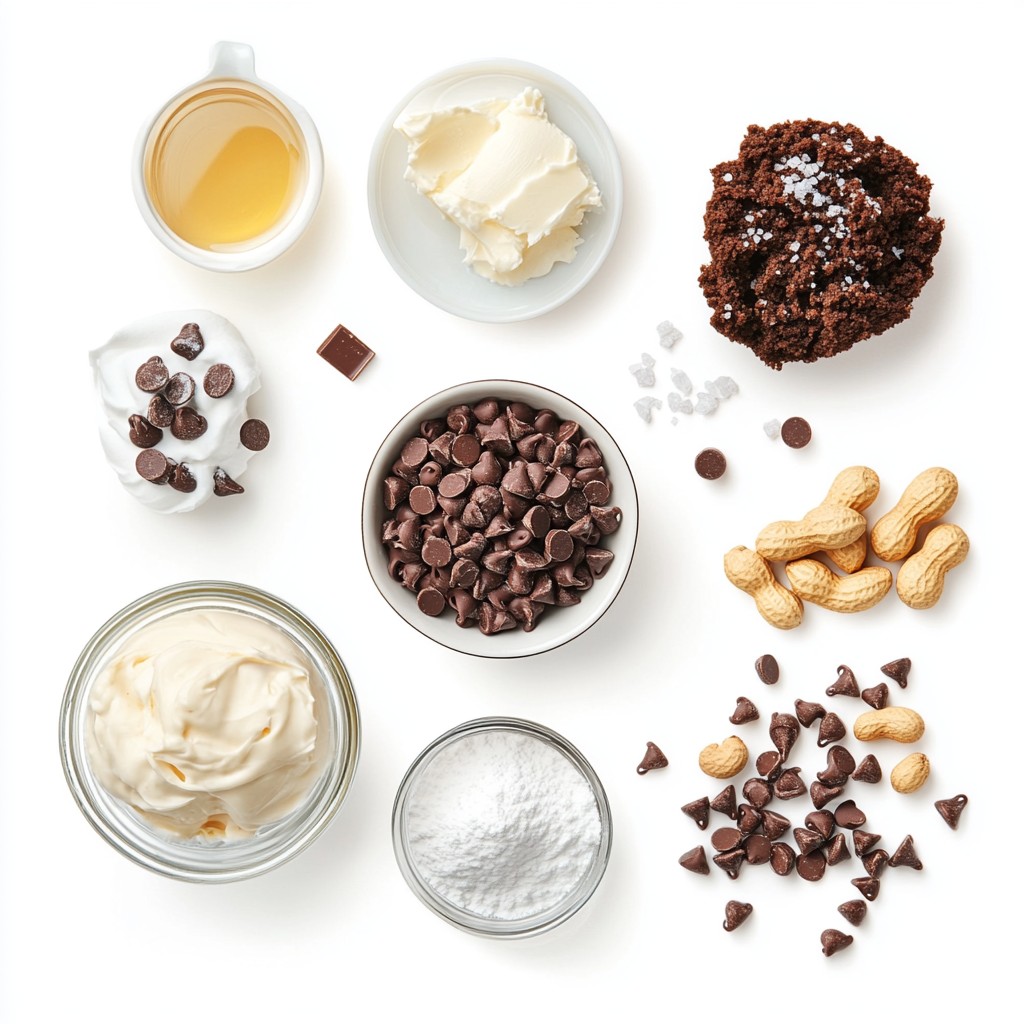
List of Necessary Ingredients
- 1 ½ cups chocolate cookie crumbs
- ½ cup unsalted butter, melted
- 16 oz cream cheese, softened
- 1 cup creamy peanut butter
- 1 cup powdered sugar
- 1 cup whipped cream (store-bought or homemade)
- ½ cup dark chocolate chips, melted
- 1 teaspoon vanilla extract
- ¼ cup chopped salted peanuts (for garnish)
- A pinch of salt
To make this chocolate peanut butter cheesecake, gather your ingredients first. The chocolate cookie crumbs create a sweet crust that balances the rich filling. Melt your unsalted butter and mix it with the crumbs. This step makes the crust firm and tasty.
Next, we move to the creamy filling. You need softened cream cheese and creamy peanut butter. They give that smooth texture we love. Add powdered sugar to sweeten it. The pinch of salt enhances all the flavors.
For a nice touch, melt dark chocolate chips and mix them in. It adds a deep, rich taste. A splash of vanilla extract brings warmth to the cheesecake. Finally, fold in whipped cream. This makes the filling light and airy.
Don’t forget the chopped salted peanuts! They add a nice crunch on top. This cheesecake is rich and delicious, perfect for any dessert table.
Step-by-Step Instructions
Preparation of the Crust
1. Start by preheating your oven to 325°F (160°C). This step is key for a good crust.
2. In a medium bowl, mix 1 ½ cups of chocolate cookie crumbs with ½ cup of melted unsalted butter. Stir until it looks like wet sand.
3. Press the crumb mixture into the bottom of a 9-inch springform pan. Make it as even as you can. Bake the crust for 10 minutes. Remove it and let it cool.
Making the Cheesecake Filling
1. In a large bowl, beat 16 oz of softened cream cheese and 1 cup of creamy peanut butter. Use an electric mixer for a smooth blend.
2. Gradually add in 1 cup of powdered sugar and a pinch of salt. Keep mixing until it’s fully combined.
3. Next, gently fold in ½ cup of melted dark chocolate and 1 teaspoon of vanilla extract. Mix until the chocolate is evenly spread.
Combining and Setting the Cheesecake
1. Carefully fold in 1 cup of whipped cream. This step makes the filling light and fluffy.
2. Pour the cheesecake filling over the cooled crust. Spread it evenly across the top.
3. Smooth the surface and refrigerate for at least 4 hours. Overnight chilling is best for a firm set.
Tips & Tricks
Perfecting the Cheesecake Texture
To get the best cheesecake, use room temperature ingredients. This means letting your cream cheese and peanut butter sit out for about 30 minutes. Soft ingredients blend better. They create a smooth filling without lumps.
Whipped cream is key to a light texture. It adds air and makes the cheesecake fluffy. Instead of mixing it in too hard, gently fold it. This keeps the air in and helps the cheesecake hold its shape.
Serving Suggestions
Presentation makes a big difference. Serve slices on pretty plates. Drizzle each slice with melted chocolate for a rich look. Sprinkle chopped peanuts on top for that extra crunch.
Pair your cheesecake with coffee or dessert wine. The flavors blend well, and they enhance the dessert. Try serving with a scoop of vanilla ice cream for added creaminess.
Common Baking Mistakes to Avoid
One mistake is overmixing the filling. This can make your cheesecake dense. Mix just until everything is smooth.
Another mistake is not allowing enough chilling time. Chilling helps the cheesecake set properly. Aim for at least 4 hours, but overnight is best. This way, you get a firm, perfect slice every time.
Pro Tips
- Use Room Temperature Ingredients: Make sure your cream cheese and peanut butter are at room temperature before mixing. This helps achieve a smooth and creamy texture without lumps.
Variations
Different Flavor Profiles
You can change the flavor of your cheesecake with simple swaps. Adding extracts like almond or coffee gives a nice twist. Just one teaspoon will do. If you want to switch nut butters, almond or cashew butter can work too. Each nut butter has its own taste, so be ready for a new flavor adventure!
Dietary Adjustments
If you need gluten-free options, use gluten-free cookie crumbs for the crust. They work great and still taste amazing. For a vegan version, swap out the cream cheese for cashew cream or tofu. Use maple syrup instead of powdered sugar. Your cheesecake will still be rich and tasty, but now it fits different diets!
Special Occasion Enhancements
Want to impress? Try making a layered cheesecake. Add layers of chocolate and peanut butter for a stunning look. You can also top your cheesecake with seasonal treats. Fresh berries in summer or caramel in fall make it extra special. Just add them right before serving for that wow factor!
Storage Info
Proper Storage Techniques
To keep your chocolate peanut butter cheesecake fresh, follow these tips:
- Refrigeration tips: Always store the cheesecake in the fridge. This keeps it cool and firm. It helps preserve the rich flavors.
- Best containers for storage: Use an airtight container. If you don’t have one, cover the cheesecake tightly with plastic wrap. This will help avoid any odors from the fridge.
How Long Does It Last?
This cheesecake can stay fresh for a good amount of time:
- Shelf life of the cheesecake in the fridge: You can enjoy it for up to five days. After that, it may lose its taste and texture.
- Freezing tips and guidelines: If you want to keep it longer, freeze it! Wrap it well in plastic wrap, then foil. This helps prevent freezer burn. It can last up to three months in the freezer.
Thawing and Serving After Freezing
When you're ready to eat your frozen cheesecake, thaw it properly:
- Best methods for thawing: Place it in the fridge overnight. This keeps it from getting too soft.
- Texture changes to expect: The texture may become a bit denser after freezing, but it will still taste delicious. Just remember to let it chill before serving for the best experience.
FAQs
What can I use instead of cream cheese?
You can use Greek yogurt. It gives a creamy texture and a tangy taste. Another option is silken tofu. It blends smoothly and works well in desserts. You might also try mascarpone cheese. It is rich and adds a nice flavor.
Can I make this cheesecake ahead of time?
Yes, you can! Make the cheesecake a day or two before serving. This allows the flavors to blend well. Just store it in the fridge. Cover it tightly with plastic wrap to keep it fresh.
What’s the best way to cut cheesecake?
Use a warm knife for clean slices. Dip the knife in hot water, then dry it before cutting. This helps to reduce sticking. Wipe the knife between cuts for the best results.
How do I prevent cracks in my cheesecake?
To avoid cracks, mix the batter gently. Do not overbeat the cream cheese. Bake at a lower temperature. A water bath helps keep the cheesecake moist. Let it cool slowly in the oven after baking.
Is it necessary to use a springform pan?
A springform pan is great for cheesecakes. It lets you remove the sides easily. If you don’t have one, use a regular pan. Just line it with parchment paper for easy removal. However, it may be harder to serve without a springform pan.
This blog post covered all you need for a perfect cheesecake. You learned the key ingredients, how to create a smooth filling, and tips for a great texture. I shared variations to suit different diets and occasions.
Remember to store your cheesecake properly for the best taste. Avoid common mistakes to ensure success every time. Enjoy making this treat, and do not hesitate to get creative with it!