Indulge your sweet tooth with my rich and decadent Chocolate Salted Caramel Tart. This dessert combines a crispy crust, smooth salted caramel, and luscious chocolate ganache. Perfect for any occasion, it's a treat that impresses everyone. In this post, you’ll find easy step-by-step instructions, handy tips, creative variations, and storage information. Let's dive into the delicious world of this tart that will surely delight your taste buds!
Why I Love This Recipe
- Decadent Flavor: The combination of rich chocolate, creamy caramel, and a hint of salt creates an indulgent dessert that’s hard to resist.
- Perfect Balance: The sweetness of the caramel is beautifully balanced by the slight bitterness of the dark chocolate ganache, making every bite a delight.
- Impressive Presentation: This tart looks stunning on any dessert table, making it a showstopper for gatherings and celebrations.
- Customizable: You can easily adjust the level of salt or chocolate to suit your taste, allowing for a personalized touch to each tart.
Ingredients
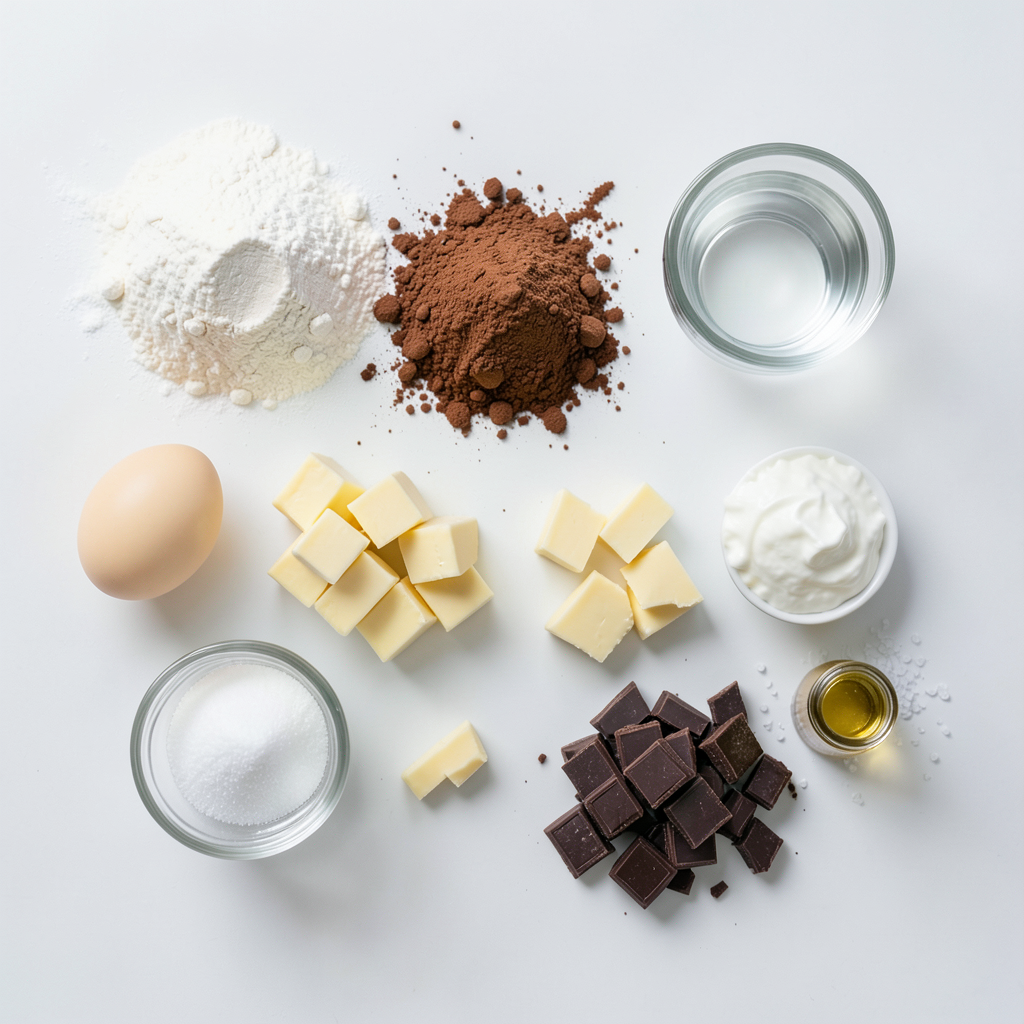
Ingredients for the Crust
- 1 ½ cups all-purpose flour
- ½ cup unsweetened cocoa powder
- ⅓ cup powdered sugar
- ½ cup cold unsalted butter, cubed
- 1 large egg yolk
- 2-3 tablespoons cold water
Ingredients for the Salted Caramel Filling
- 1 cup granulated sugar
- 6 tablespoons unsalted butter, cut into pieces
- ½ cup heavy cream
- 1 teaspoon sea salt
Ingredients for the Chocolate Ganache
- 8 ounces dark chocolate, chopped
- 1 cup heavy cream
- 1 teaspoon vanilla extract
- Additional sea salt for garnish
Gather these ingredients before you start. This will make the process smoother. Each part of this tart plays a key role in creating that rich flavor. The crust offers a chocolatey base, while the salted caramel adds depth. Finally, the chocolate ganache brings it all together. Enjoy making this treat!
Step-by-Step Instructions
How to Make the Crust
To start, grab a mixing bowl. Add 1 ½ cups of all-purpose flour, ½ cup of cocoa powder, and ⅓ cup of powdered sugar. Mix these dry ingredients well. Next, add ½ cup of cold, cubed unsalted butter. Mix until the mixture looks crumbly. Then, stir in 1 large egg yolk. Add 2-3 tablespoons of cold water to form a dough. Shape it into a disk, wrap it in plastic, and chill in the fridge for 30 minutes.
Preparing the Salted Caramel
Now, let’s make the salted caramel. In a medium saucepan, pour in 1 cup of granulated sugar. Heat over medium heat. Stir it often until it melts into a golden liquid. Quickly add 6 tablespoons of unsalted butter, stirring until it melts. Carefully whisk in ½ cup of heavy cream. The mixture will bubble, so watch out! After it combines, remove it from the heat. Add 1 teaspoon of sea salt and let it cool. Once cooled, pour it into the crust that you made earlier.
Assembling the Tart
After the caramel sets in the fridge for about 30 minutes, it's time to make the ganache. In a new saucepan, heat 1 cup of heavy cream until it simmers. Pour this hot cream over 8 ounces of chopped dark chocolate in a bowl. Let it sit for a few minutes. Stir it until it becomes smooth. Add 1 teaspoon of vanilla extract for flavor. Now, pour this chocolate ganache over the cooled salted caramel layer in the tart shell. Spread it evenly. Chill the tart in the fridge for at least 1 hour. Before serving, sprinkle some sea salt on top for a nice finish.
Tips & Tricks
Best Practices for a Perfect Crust
To make a great crust, use cold butter. This helps keep your crust flaky. Mix the flour, cocoa, and sugar well before adding the butter. You want a crumbly texture. When you add the egg yolk and water, mix just enough to form a dough. Overworking it makes the crust tough. Chill the dough before rolling it out. This step is key for easy handling.
How to Avoid Sugar Crystallization in Caramel
When making caramel, use a heavy-bottomed pan. It heats evenly and helps prevent burning. Stir the sugar frequently but gently. If it starts to clump, don’t panic. Just keep stirring until it melts. Once it turns golden, add the butter quickly. Then, carefully whisk in the cream. Be cautious—the mixture bubbles up. If you see crystals forming, you can brush the sides of the pan with a wet pastry brush.
Ensuring Smooth Chocolate Ganache
To make smooth ganache, heat the cream until it simmers. Pour it over the chopped chocolate and let it sit. This step allows the chocolate to melt gently. After a few minutes, stir until the mixture is smooth. If it looks grainy, you can warm it slightly and stir more. Adding a bit of vanilla enhances the flavor. For a shiny finish, avoid overcooking the ganache.
Pro Tips
- Chill Your Ingredients: Ensure your butter and heavy cream are cold when making the crust and ganache for a firmer texture and better flavor integration.
- Caramel Consistency: For the perfect caramel, keep stirring the sugar until it reaches a deep amber color, but be careful not to burn it.
- Let It Set: Allow each layer to cool completely before adding the next to prevent them from mixing and ensure distinct layers.
- Garnish with Sea Salt: A sprinkle of flaky sea salt on top of the ganache enhances the chocolate flavor and adds a beautiful finishing touch.
Variations
Alternative Crust Recipes
You can change the crust if you want a new taste. Try using almond flour for a nutty flavor. You can blend it with cocoa powder. A graham cracker crust adds a sweet crunch. Just crush the crackers, mix with butter, and press into the pan.
Flavoring Options for Caramel
You can add fun flavors to your caramel. A splash of vanilla extract gives warmth. For a fruity twist, add orange zest or lemon juice. Want a spicy kick? Try a pinch of cayenne pepper. Each option adds a unique layer to the sweet taste.
Creative Toppings for Garnish
Toppings make your tart look and taste amazing. Crushed nuts add crunch and flavor. Consider using sea salt flakes for a salty bite. Fresh berries like raspberries or strawberries give a bright color. You could also drizzle melted chocolate for an extra touch.
Storage Info
How to Store the Tart
To keep your Chocolate Salted Caramel Tart fresh, store it in the fridge. Use an airtight container or cover it tightly with plastic wrap. This helps prevent it from drying out or absorbing other smells.
Shelf Life and Freezing Tips
The tart lasts about 3-4 days in the fridge. If you want to save some for later, freeze it. Wrap it well in plastic wrap and foil before placing it in the freezer. It can last up to 2 months. Just remember to label it with the date!
Reheating Guidelines
You don’t need to reheat the tart, as it’s best served cold. If you prefer it warm, gently warm individual slices in the microwave for about 10-15 seconds. Be careful not to heat it too long, or the chocolate may melt too much. Enjoy each bite as it is!
FAQs
Can I use different types of chocolate for the ganache?
Yes, you can use different chocolates for the ganache. Dark, milk, or white chocolate all work. Each type brings a unique flavor. Dark chocolate gives a rich taste, while milk chocolate adds sweetness. If you choose white chocolate, the ganache will be creamy and sweet. Just adjust the amount of sugar in the tart as needed.
What can I substitute for heavy cream?
If you need a substitute for heavy cream, use coconut cream or full-fat milk. Coconut cream adds a nice flavor, while full-fat milk gives a lighter texture. For a vegan option, almond milk works too, but the ganache might not be as rich. You can also use silken tofu blended until smooth for a creamy texture.
How do I make this tart gluten-free?
To make this tart gluten-free, use a gluten-free flour blend. Many blends work well in baking. just replace the all-purpose flour in the crust with the gluten-free option. Ensure that the cocoa powder and other ingredients are also gluten-free. This way, you can enjoy the same rich flavor without gluten.
This blog post covered making a delicious tart, starting with the crust, salted caramel, and chocolate ganache. You learned step-by-step how to prepare each part. I shared tips to perfect the crust and avoid sugar issues. You can also explore fun variations and storage methods. Remember, practice makes perfect. With your new skills, you can impress anyone with this tart. Enjoy creating it and share it with friends!