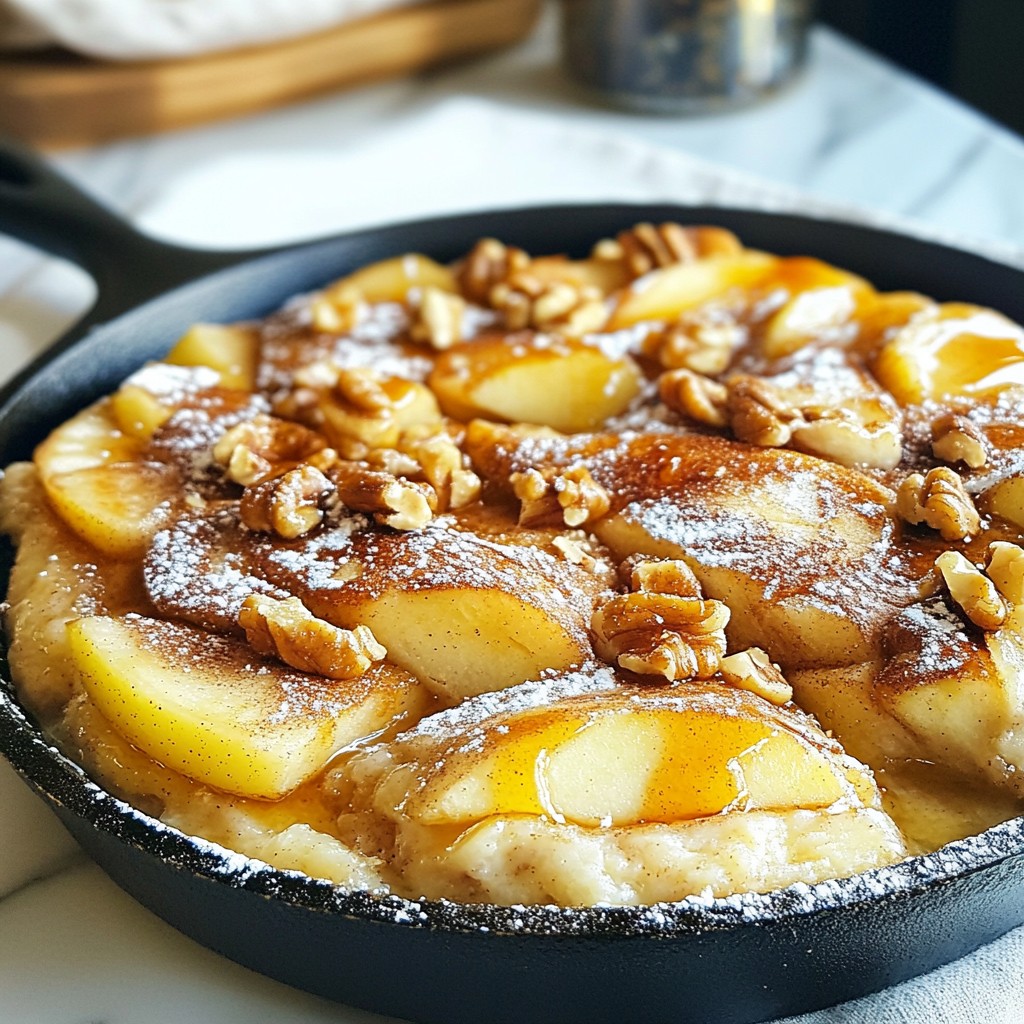
Are you ready to whip up something delicious that combines comfort and ease? My Cinnamon Apple Pancake Skillet is the perfect dish for cozy mornings or brunch gatherings. You'll love how this recipe brings tart apples and warm spices together in a fluffy pancake. Let's dive into how to create this tasty delight, full of helpful tips and simple steps to make it a hit every time!
Why I Love This Recipe
- Delicious Flavor Combination: The blend of sweet apples and warm cinnamon makes every bite a delight.
- Easy to Make: This skillet pancake comes together quickly, perfect for busy mornings or brunch gatherings.
- One-Pan Wonder: Cooking everything in one skillet means less cleanup, allowing you to enjoy your meal without the hassle.
- Customizable: Add nuts, berries, or even chocolate chips to make this recipe your own!
Ingredients
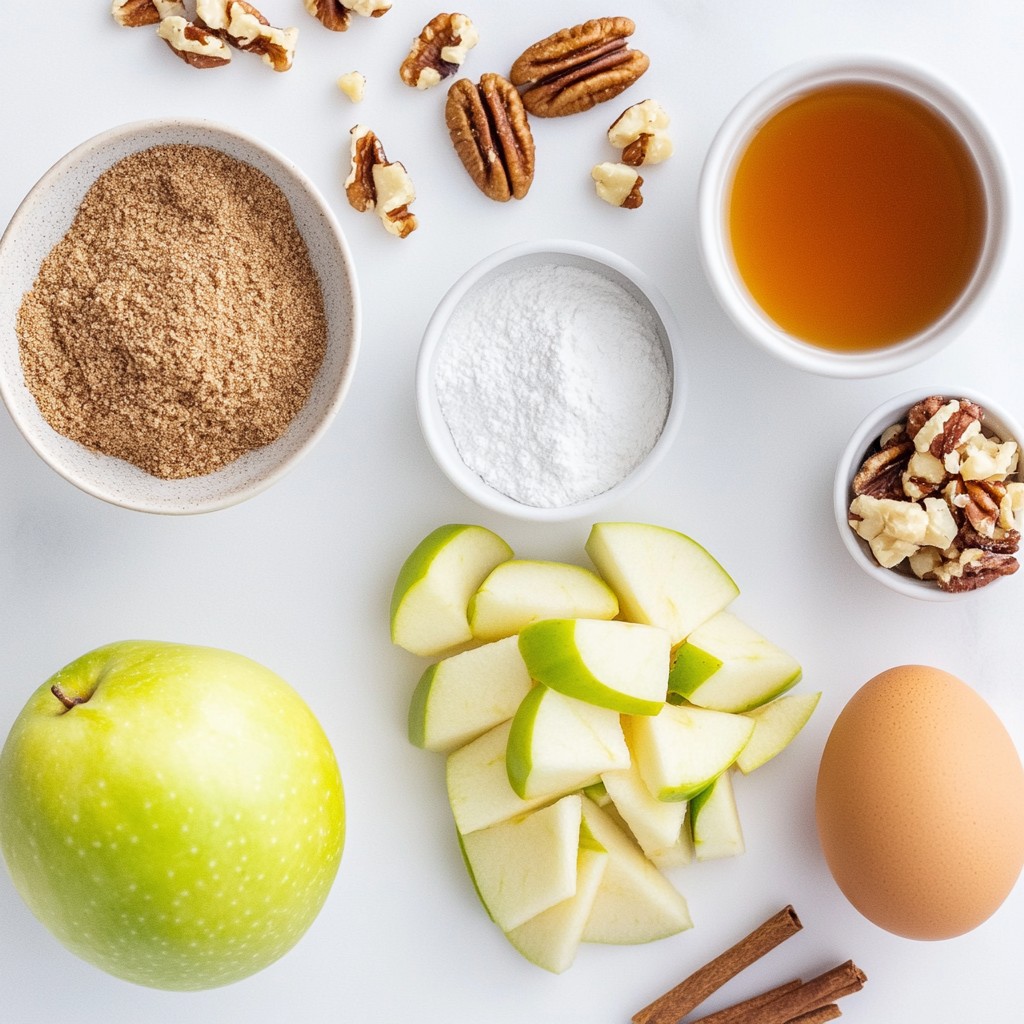
List of Ingredients
- 2 medium apples (like Granny Smith or Honeycrisp), peeled, cored, and sliced
- 1 teaspoon ground cinnamon
- 2 tablespoons brown sugar
- 1/2 cup all-purpose flour
- 1 teaspoon baking powder
- 1/2 teaspoon baking soda
- 1/4 teaspoon salt
- 1 cup buttermilk (or regular milk mixed with 1 tablespoon lemon juice)
- 1 large egg
- 2 tablespoons melted butter (plus more for the skillet)
- Maple syrup, for serving
- Optional: Chopped walnuts or pecans for garnish
Ingredient Substitutions
You can swap the apples for pears or peaches if you want. Use coconut milk or almond milk if you need a dairy-free option. For a lower sugar dish, try using honey instead of brown sugar. You can also use whole wheat flour for a healthier option.
Tips for Selecting Apples
Choose firm apples that are not bruised. Granny Smith apples add tartness, while Honeycrisp gives sweetness and crunch. Always smell the apples; fresh apples smell sweet and fruity. Select apples that have rich colors, as this often indicates good flavor.
Step-by-Step Instructions
Prepping the Skillet
First, heat your oven to 400°F (200°C). Next, grab a 10-inch cast-iron skillet. Place it on the stovetop over medium heat. Add 1 tablespoon of butter to the skillet. Let the butter melt fully. This step helps to keep the pancake from sticking.
Mixing the Ingredients
In a medium bowl, slice and peel 2 medium apples. I like using Granny Smith or Honeycrisp apples. Toss the apple slices with 1 teaspoon of ground cinnamon and 2 tablespoons of brown sugar. Set this mixture aside. Let it sit for a few minutes. This helps the apples absorb the flavors.
In another large bowl, whisk together 1/2 cup of all-purpose flour, 1 teaspoon of baking powder, 1/2 teaspoon of baking soda, and 1/4 teaspoon of salt. In a separate bowl, mix 1 cup of buttermilk, 1 large egg, and 2 tablespoons of melted butter. Combine these wet ingredients well.
Pour the wet mixture into the dry ingredients. Stir gently until just combined. Do not overmix; the batter should be a bit lumpy.
Baking the Pancake Skillet
Once your butter is melted and the skillet is hot, pour the apple mixture into the skillet. Spread the apple slices evenly across the bottom. Now, pour the pancake batter over the apples. Use a spatula to smooth it out if needed.
Carefully transfer the skillet to the preheated oven. Bake for 15-20 minutes. The pancake should puff up and turn lightly golden. Check if it’s done by inserting a toothpick into the center. It should come out clean.
After baking, take the skillet out of the oven. Let it rest for a few minutes before slicing. This dish is best served warm, drizzled with maple syrup. Enjoy the warm, sweet, and spicy aroma!
Tips & Tricks
Achieving the Perfect Texture
To get a fluffy pancake, mix the batter gently. If you overmix, it can become tough. Leave small lumps; they help keep the pancake light. The key is to use fresh ingredients. Fresh buttermilk makes a big difference. It gives a nice rise to the pancake.
Best Temperature for Baking
Set your oven to 400°F (200°C). This temperature helps the pancake puff up. Before pouring the batter, make sure your skillet is hot. A hot skillet gives a nice crust. Melt some butter in the skillet first. This adds flavor and helps with sticking.
Serving Suggestions
Serve the pancake warm from the skillet. Drizzle some maple syrup on top. For added crunch, sprinkle chopped walnuts or pecans. You can also add a dollop of whipped cream. This makes it a treat! Enjoy it with fresh fruit on the side for a colorful plate.
Pro Tips
- Choose the Right Apples: Use tart apples like Granny Smith or sweet ones like Honeycrisp for the best flavor contrast in your pancake skillet.
- Don’t Overmix the Batter: Mixing the batter until just combined keeps the pancakes fluffy; a few lumps are perfectly fine!
- Adjust Cooking Time for Your Oven: Oven temperatures can vary; keep an eye on the pancake and adjust baking time as needed for a perfect golden finish.
- Add a Twist with Spices: Experiment with adding nutmeg or vanilla extract to the batter for an extra layer of flavor.
Variations
Dietary Adjustments (Gluten-Free, Vegan)
You can easily change this dish to fit your needs. For gluten-free pancakes, swap the all-purpose flour with a gluten-free blend. Make sure it includes xanthan gum for the best texture. For a vegan version, use plant-based milk instead of buttermilk. Replace the egg with a flax egg, which is made by mixing one tablespoon of flaxseed meal with three tablespoons of water. Let it sit for a few minutes until it thickens.
Flavor Enhancements (Nuts, Spices)
You can add more flavor by mixing in chopped nuts or spices. Chopped walnuts or pecans give a nice crunch and nutty taste. If you want a little kick, try adding a pinch of nutmeg or ginger to the cinnamon. You can also mix in some vanilla extract for a sweet aroma. This can make your pancake skillet even more special.
Different Fruit Options
While apples are great, you can use other fruits too. Pears are a nice choice and add a soft texture. Bananas can bring a sweet creaminess, while berries offer a tartness that balances the dish. Just remember to adjust the sugar based on the fruit's sweetness. Experimenting with different fruits can lead to exciting new flavors!
Storage Info
How to Store Leftovers
To store leftovers, let the pancake cool first. Then, cut it into slices. Place the slices in an airtight container. Keep the container in the fridge. The pancake stays fresh for up to three days.
Reheating Instructions
To reheat, you can use the oven or a microwave. If using the oven, preheat it to 350°F (175°C). Place the slices on a baking sheet. Warm for about 10 minutes, or until hot. For the microwave, heat each slice for 30-45 seconds. This keeps the pancake soft and moist.
Freezing the Pancake Skillet
You can freeze the pancake skillet for later use. Cut it into slices as before. Wrap each slice in plastic wrap. Place the wrapped slices in a freezer bag. Make sure to remove as much air as possible. The pancake can last for up to two months in the freezer. To enjoy, thaw it in the fridge overnight and reheat as needed.
FAQs
Can I use regular milk instead of buttermilk?
Yes, you can use regular milk. Just add 1 tablespoon of lemon juice to 1 cup of milk. This mix will mimic buttermilk's tangy taste. It will still work great in your pancake skillet.
How do I know when the pancake is done?
The pancake is done when it's puffed and golden. Insert a toothpick into the center. If it comes out clean, your pancake is ready. This should take about 15 to 20 minutes in the oven.
Can I make this recipe in advance?
Yes, you can prepare the apple mixture ahead. Mix the apples with cinnamon and sugar, then store them in the fridge. You can also mix the dry and wet ingredients but hold off on combining them until you're ready to bake. This way, your pancake will taste fresh and fluffy!
This blog post covered the key steps to making a delicious pancake skillet. We explored the ingredients, how to prepare, and bake. I shared tips for selecting the best apples and achieving the perfect texture. Variations for diet needs and flavor boosts were also discussed. Proper storage and reheating help you enjoy leftovers.
In closing, making a pancake skillet is easy and fun. Now you can impress others with your tasty creations! Enjoy every bite and feel proud of your cooking skills.