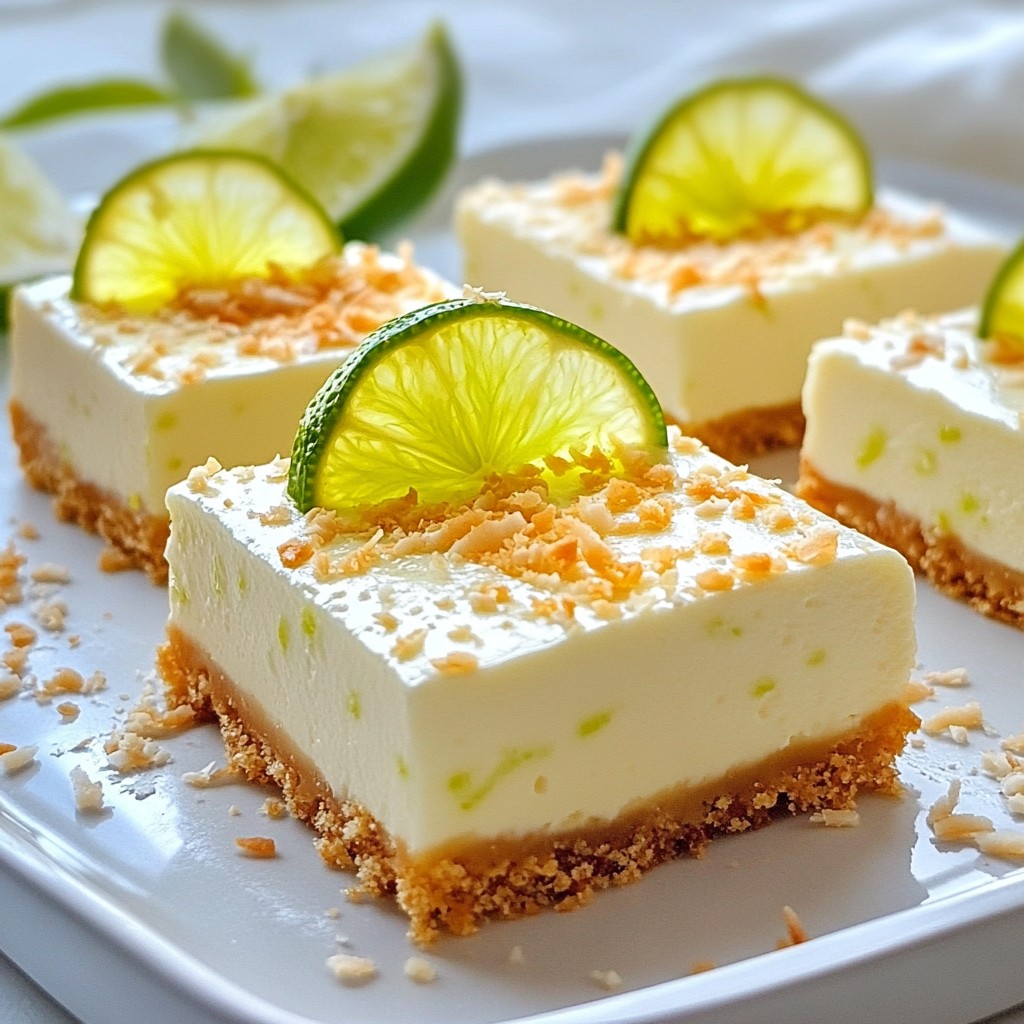
Are you ready to dive into a fun summer treat? These Coconut Lime Cheesecake Bars are the perfect way to enjoy the warm weather. You get a creamy filling made from cream cheese and sweetened condensed milk, all on a crunchy graham cracker crust. With a zesty punch of lime, this dessert is refreshing and easy to make. Let’s whip up something delicious that will impress your friends and family!
Error: Connection error.
Ingredients
Main Ingredients
- 16 oz cream cheese, softened
- 1 cup sweetened condensed milk
- 1/4 cup fresh lime juice
These three main ingredients create a creamy and smooth filling. The cream cheese gives it a rich texture. Sweetened condensed milk adds sweetness and a hint of caramel flavor. Lime juice brings a bright, zesty taste that balances the richness.
Crust Components
- 1 cup crushed graham crackers
- 1/4 cup unsweetened shredded coconut
- 1/2 cup unsalted butter, melted
The crust is simple yet flavorful. Crushed graham crackers provide a crunchy base. Shredded coconut adds a tropical touch. The melted butter binds it all together, making it easy to press into the pan.
Flavor Enhancers
- Zest of 2 limes
- 1 teaspoon vanilla extract
- 1/4 cup granulated sugar
- A pinch of salt
These flavor enhancers lift the dish. Lime zest intensifies the citrus flavor. Vanilla extract adds warmth and depth. Granulated sugar sweetens the mix, while a pinch of salt balances all the flavors.
This combination of ingredients makes Coconut Lime Cheesecake Bars a perfect summer treat. Each bite bursts with flavor, making it a delight for any gathering.

Step-by-Step Instructions
Preparing the Crust
First, preheat your oven to 350°F (175°C). Gather your ingredients for the crust:
- 1 cup crushed graham crackers
- 1/4 cup unsweetened shredded coconut
- 1/4 cup granulated sugar
- 1/2 cup unsalted butter, melted
In a medium bowl, mix the crushed graham crackers, shredded coconut, granulated sugar, and melted butter. Stir until the mixture looks like wet sand. Next, press this mixture firmly into the bottom of an 8x8 inch baking dish. Bake the crust for 10 minutes. After that, take it out and let it cool.
Making the Cheesecake Filling
Now, let’s make the cheesecake filling. In a large mixing bowl, beat 16 oz of softened cream cheese until it is smooth. Add in:
- 1 cup sweetened condensed milk
- 1/4 cup fresh lime juice
- Zest of 2 limes
- 2 large eggs
- 1 teaspoon vanilla extract
- A pinch of salt
Mix these ingredients together until the batter is creamy and well combined.
Baking the Bars
Next, pour the cheesecake mixture over the cooled crust. Spread it evenly. Bake the bars in the preheated oven for 25-30 minutes. Look for the edges to be set with a slight jiggle in the center. Once baked, remove the dish from the oven. Let the bars cool at room temperature for about 1 hour. After cooling, refrigerate them for at least 4 hours or overnight. This helps the cheesecake set well. When ready, lift the bars out using parchment paper, if used. Cut them into squares and enjoy!
Tips & Tricks
Perfecting Your Cheesecake Bars
To make great cheesecake bars, pay attention to the mix. Use softened cream cheese for a smooth texture. Beat it well to avoid lumps. If the batter is too thick, it can lead to cracks. Make sure to mix gently when adding eggs. This keeps air from entering too much.
Watch the baking time closely. If you bake too long, the bars become dry. Look for set edges and a slight jiggle in the center. This means it’s just right. Let them cool completely before cutting. This helps with clean edges.
Serving Suggestions
Presentation makes a big difference. Dust the tops with extra shredded coconut for a tropical look. Add lime slices for a pop of color. Use a sharp knife to cut even squares. Serve the bars chilled for the best taste.
Try placing them on a colorful plate. It adds to the fun vibe of summer treats. You can also serve them with a scoop of lime sorbet. This makes a refreshing pairing for your guests.
Enhancing Flavor
You can easily play with flavors in these bars. Try adding a splash of coconut extract for more coconut taste. Mix in some crushed pineapple for a fun twist. You can also swap lime juice for lemon juice. This gives a different zest that many will love.
For toppings, consider whipped cream or a drizzle of chocolate sauce. Fresh fruit like berries makes a nice addition too. These options can change the whole vibe of your dessert.
Error: Connection error.
Variations
Flavor Variations
You can switch up the flavors for your Coconut Lime Cheesecake Bars. Try using different fruits like mango, passionfruit, or pineapple. These fruits pair well with lime and add a tropical twist. You can also use lemon instead of lime for a zesty change. If you love berries, mix in some blueberries or raspberries for a burst of color and taste. Just remember to adjust the sugar if the fruits are sweet.
Dietary Adjustments
If you need gluten-free options, use gluten-free graham crackers for the crust. For a dairy-free version, swap cream cheese with a dairy-free cream cheese alternative. Use coconut cream instead of sweetened condensed milk to keep the coconut flavor strong. These swaps keep the delicious taste while meeting dietary needs.
Serving Style Options
You can change how you serve these bars. For fun bites, cut them into smaller squares. This makes them great for parties. You can also transform them into cupcakes by pouring the filling into lined muffin tins. Bake them for about 20 minutes. This gives you perfect little treats that everyone can enjoy.
Storage Info
Refrigeration Guidelines
To store your coconut lime cheesecake bars, first let them cool completely. If you used parchment paper, lift the bars out and place them on a cutting board. Cut them into squares. Use a clean, airtight container to keep them fresh. Place a piece of wax paper between layers to avoid sticking. Store them in the fridge for the best taste and texture.
Freezing Instructions
You can freeze these cheesecake bars for later enjoyment. Wrap each square tightly in plastic wrap. Then, place them in a freezer-safe bag or container. Make sure to remove as much air as possible. When you are ready to enjoy, take them out and let them thaw in the fridge overnight. This keeps them creamy.
Shelf Life
In the fridge, these cheesecake bars can last up to five days. If you freeze them, they can last up to three months. However, for the best taste, I recommend enjoying them within the first month. Always check for any changes in smell or texture before eating.
FAQs
Can I use low-fat cream cheese?
Yes, you can use low-fat cream cheese. However, it will change the texture. Low-fat cream cheese may make your bars less creamy and smooth. The flavor might also be less rich. If you want a lighter option, consider using a mix of low-fat and full-fat cream cheese. This keeps some creaminess while lowering the fat content.
How long do these cheesecake bars need to cool?
After baking, let the bars cool at room temperature for about 1 hour. This helps them set a bit. Then, refrigerate them for at least 4 hours. For the best results, chill overnight. This wait time helps the bars firm up and makes them easier to cut.
Can I make this recipe ahead of time?
Yes, you can make these cheesecake bars ahead of time. They are perfect for parties or gatherings. Just prepare and chill them a day in advance. Store the bars in the fridge. This ensures they stay fresh and tasty when you need them.
In this post, we explored the delicious world of cheesecake bars. We covered essential ingredients like cream cheese and lime juice and shared how to prepare the crust. Step-by-step instructions guided you through making, baking, and serving these treats. I've also included tips to enhance flavor and discussed storage options. Remember, you can adjust flavors and even make these bars gluten-free. With these methods and ideas, your cheesecake bars will impress everyone. Now, get ready to enjoy this tasty dessert anytime you want!