Craving crispy chicken wings that are both tasty and easy to make? You’ve come to the right place! In this article, I’ll guide you through my foolproof recipe for crispy baked chicken wings, complete with a zesty garlic sauce. Say goodbye to greasy frying and hello to deliciously crunchy wings that will impress your friends and family. Let’s dive into the simple steps for wing perfection!
Ingredients
Main Ingredients
– 2 pounds chicken wings
– 1 tablespoon baking powder
– 1 teaspoon salt
– 1 teaspoon black pepper
– 1 teaspoon garlic powder
– 1 teaspoon onion powder
– ½ teaspoon paprika
– ½ teaspoon smoked paprika (optional)
Zesty Garlic Sauce Ingredients
– ½ cup unsalted butter
– 4 cloves garlic, minced
– 2 tablespoons honey
– 2 tablespoons lemon juice
– Fresh parsley, chopped (for garnish)
Nutritional Information
Each serving of these crispy baked chicken wings contains about:
– Calories: 400
– Protein: 25 grams
– Fat: 30 grams
– Carbohydrates: 6 grams
The crispy baked chicken wings are not just tasty; they are also easy to make. You can enjoy them guilt-free, knowing you followed a simple, healthy recipe. The zesty garlic sauce adds a rich flavor that makes these wings stand out.
Step-by-Step Instructions
Preparation Steps
1. Pat chicken wings dry
Start by patting the chicken wings dry with paper towels. This step is key for crispy wings. Removing moisture allows the skin to crisp up in the oven.
2. Prepare seasoning mix
In a large bowl, add the baking powder, salt, black pepper, garlic powder, onion powder, paprika, and smoked paprika. Toss these spices together with the wings until they coat evenly. This mix adds great flavor and helps with crispiness.
Baking Instructions
1. Arrange wings on the wire rack
Preheat your oven to 425°F (220°C). Line a baking sheet with aluminum foil and place a wire rack on top. Arrange the seasoned wings in a single layer on the rack. Make sure they do not touch. This helps air circulate for even cooking.
2. Baking time and temperature guidelines
Bake the wings for 40-45 minutes. Flip them halfway through cooking. Look for a golden color and crispy skin. If you want extra crunch, broil them for 2-3 minutes at the end.
Making the Zesty Garlic Sauce
1. Preparing the butter and garlic mixture
While the wings bake, melt the butter in a small saucepan over medium heat. Add the minced garlic and cook for 1-2 minutes. You want the garlic to be fragrant but not burnt.
2. Combining all sauce ingredients
Stir in honey and lemon juice into the butter and garlic mix. Bring the mixture to a simmer, cooking for an additional 2-3 minutes. This will thicken the sauce a bit. Remove it from heat and set it aside until the wings are ready.Enjoy your cooking!
Tips & Tricks
Achieving the Perfect Crispiness
To get crispy chicken wings, start by drying them well. Moisture makes wings soggy. Use paper towels to pat them dry. This simple step is key for that perfect crunch.
Next, use baking powder. It helps create a crunchy outer layer. The baking powder raises the pH level of the skin. This allows it to brown better. Just one tablespoon mixed with your seasonings is all you need.
Cooking Tips
Flipping the wings during baking is important. About halfway through baking, turn them over. This ensures even cooking and crispiness on both sides.
For extra texture, broil the wings at the end. Set your oven to broil and place the wings under the heat for 2-3 minutes. Watch closely to prevent burning. This step gives a nice, crispy finish.
Serving Suggestions
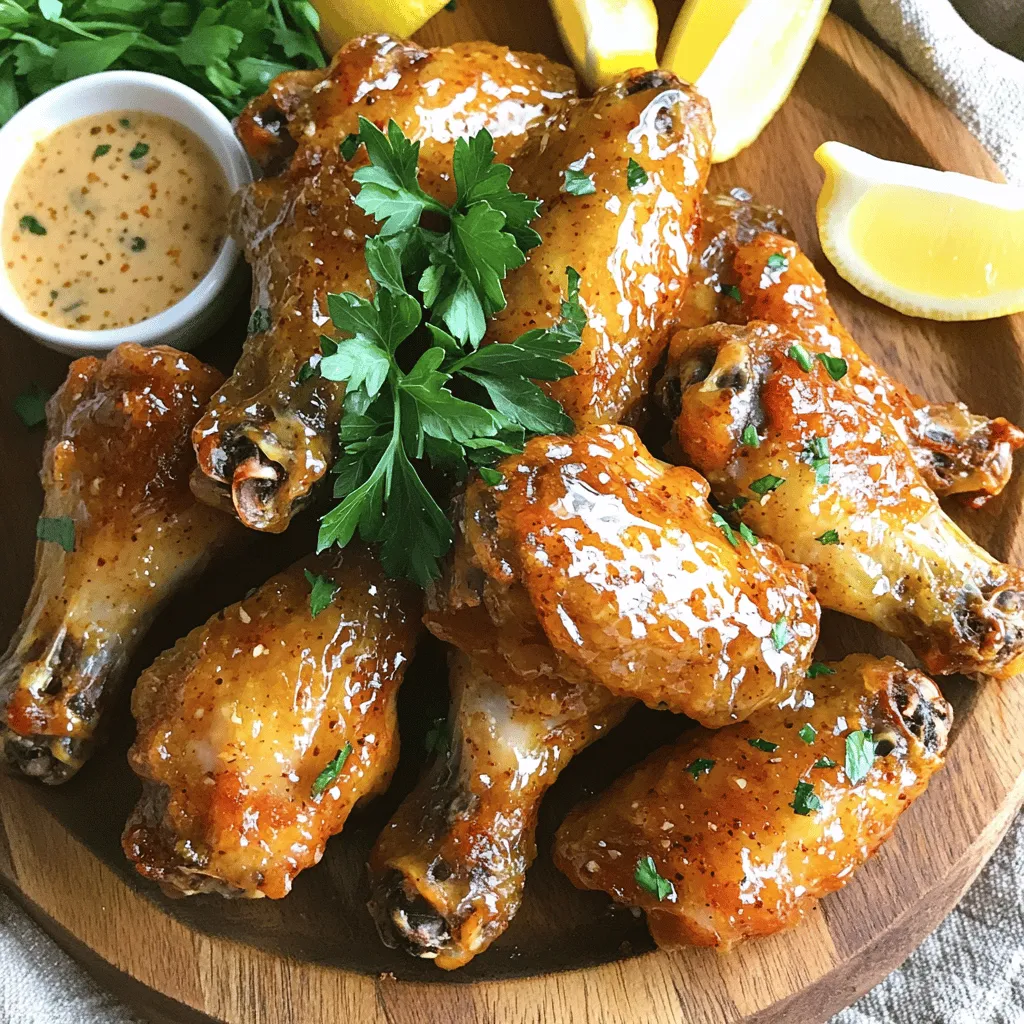
When serving, presentation matters. I like to arrange the crispy wings on a large platter. Add lemon wedges around them for a pop of color. A small bowl of zesty garlic sauce on the side makes it fun for dipping.
Pair your wings with classic dips, like ranch or blue cheese. You can also try different sauces, like barbecue or buffalo. Each adds its own unique flavor.
Variations
Flavor Variations
You can change the flavor of your crispy baked chicken wings easily. Try these seasoning mixes for a twist:
– Cajun: Add 1 tablespoon of Cajun seasoning for a spicy kick.
– Lemon Pepper: Replace paprika with lemon pepper for a zesty taste.
– Herb Blend: Use Italian herbs like oregano and thyme for a fresh flavor.
– Smoky BBQ: Mix in your favorite BBQ seasoning for a sweet and smoky profile.
Each seasoning gives a new life to the same base. You can mix and match these to fit your mood.
Sauce Alternatives
Sauces can transform your wings from good to great. Here are some tasty options:
– Buffalo Sauce: Use a classic spicy Buffalo sauce for a kick.
– BBQ Sauce: Sweet BBQ sauce makes for a fun, sticky treat.
– Honey Garlic Sauce: Mix honey with soy sauce for a sweet option.
– Teriyaki Sauce: This gives a sweet and savory flavor that pairs well with chicken.
Feel free to coat your wings in any sauce after baking. It adds flavor and fun!
Cooking Method Variations
You can also change how you cook your wings for variety. Here’s how:
– Air Fryer: Preheat your air fryer to 400°F (200°C). Cook wings for about 25-30 minutes, shaking halfway for crispiness. This method is fast and easy!
– Grilling: Preheat your grill to medium heat. Grill wings for about 20 minutes, turning often. This gives a smoky flavor and nice grill marks.
You can enjoy crispy wings using these different methods. Each way adds its own unique taste and texture to the dish.
Storage Info
Refrigeration Guidelines
To store leftover wings, first let them cool. Place them in an airtight container. This keeps them fresh for up to three days. You can also wrap them tightly in aluminum foil or plastic wrap. Make sure they are sealed well to avoid drying out.
Reheating Instructions
To reheat wings, the oven is your best friend. Preheat your oven to 350°F (175°C). Spread the wings on a baking sheet. Bake them for about 10-15 minutes. This helps keep the wings crispy. You can also use an air fryer. Set it to 350°F (175°C) and heat for 5-7 minutes for crispy wings.
Freezing Options
Yes, you can freeze cooked wings! Let them cool completely. Place them in a freezer bag or container. Remove as much air as possible. They can last up to three months in the freezer. When you’re ready to eat, thaw them overnight in the fridge before reheating.
FAQs
Common Questions
How do I make wings extra crispy?
To make wings extra crispy, dry them well before cooking. Use paper towels to remove moisture. Adding baking powder helps with crispiness too. The baking powder raises the pH level of the wings. This makes them crisp up nicely in the oven.
Can I use frozen chicken wings?
Yes, you can use frozen chicken wings. Just make sure to thaw them first. Thaw them overnight in the fridge. This helps them cook evenly and get crispy. You may need to add a few more minutes to the cooking time.
What are the best sides to serve with chicken wings?
Great sides for chicken wings include celery sticks and carrot sticks. You can also serve them with a fresh salad. Potato wedges or fries make a tasty pairing too. Don’t forget some ranch or blue cheese dressing for dipping!
How long do leftover wings last in the fridge?
Leftover wings last about 3 to 4 days in the fridge. Store them in an airtight container for best results. Reheat wings in the oven to keep them crispy.
Additional Cooking Tips
Can I bake wings without baking powder?
You can bake wings without baking powder, but they may not be as crispy. Baking powder helps create a crust. If you skip it, dry the wings well and bake them at a higher temperature.
How to adjust cooking time for larger wings?
For larger wings, you will need to increase the cooking time. Add about 5 to 10 more minutes to the baking time. Always check that the internal temperature reaches 165°F (74°C).
Saucing Options
Should I toss wings in sauce before or after baking?
It’s best to toss wings in sauce after baking. This keeps the wings crispy. If you coat them before, they may get soggy. You can serve extra sauce on the side for dipping as well.
This post has shown you how to make crispy baked chicken wings with a zesty garlic sauce. We covered the ingredients, step-by-step prep and cooking instructions, plus tips for the perfect crispiness. You learned about storage options and variations if you want to switch flavors.
Now, you have all the tools you need to create delicious wings at home. Enjoy experimenting with different sauces and serving ideas to make this dish your own!