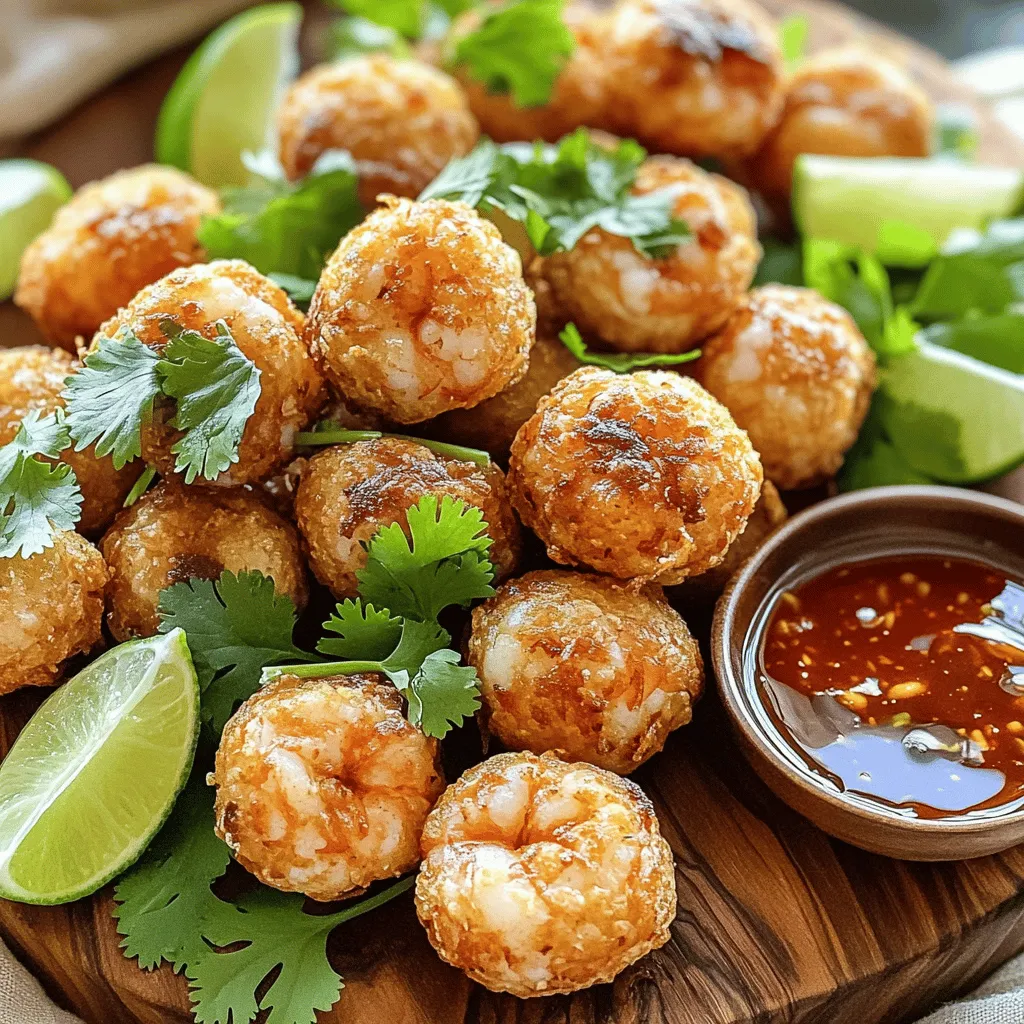
Are you ready to dive into a crunchy delight that dances on your taste buds? Today, we’re making Crispy Shrimp Balls with Sweet Chili Sauce! These golden bites combine fresh shrimp, savory herbs, and a crispy panko crust. Perfect for sharing or enjoying solo, they pair beautifully with a sweet and spicy sauce. Let’s uncover the secrets to this mouthwatering dish and impress your friends at the next gathering!
Ingredients
Main Ingredients for Crispy Shrimp Balls
– 1 pound large shrimp, peeled and deveined
– 1 cup breadcrumbs (preferably panko for extra crunch)
– 1/2 cup finely chopped green onions
– 1/4 cup fresh cilantro, chopped
Sweet Chili Sauce Ingredients
– 1/2 cup sweet chili sauce
– 1 tablespoon rice vinegar
– 1 teaspoon sesame oil
Other Required Ingredients
– 1 egg, lightly beaten
– 2 cloves garlic, minced
– 1 teaspoon ginger, grated
– Salt and pepper to taste
– Oil for frying
I love using fresh shrimp for this recipe. The shrimp adds a sweet and juicy taste. Panko breadcrumbs give the shrimp balls that perfect crunch. You can find panko at any store. Fresh green onions and cilantro bring a bright flavor. They also add color to your dish.
For the sweet chili sauce, I prefer store-bought options. They are easy and tasty. You can mix the sauce with rice vinegar and sesame oil. This combo gives a nice balance of sweet and tangy.
When frying, use a good amount of oil. This helps cook the shrimp balls evenly. Be sure to check the temperature of your oil. It should be hot but not smoking. This ensures a crispy outside and a juicy inside.Enjoy the process and the delicious outcome!
Step-by-Step Instructions
Preparing the Shrimp
To make great crispy shrimp balls, start with the shrimp. Chop the shrimp into small pieces. You can also use a food processor to make this easier. Pulse the shrimp until it is coarsely minced. This gives the right texture for the balls. Transfer the chopped shrimp to a large mixing bowl.
Mixing the Ingredients
Next, you will mix all the ingredients. Add the breadcrumbs, green onions, cilantro, egg, garlic, ginger, soy sauce, salt, and pepper to the bowl. Mix everything well. You want a thick mixture that holds together. If it feels too wet, add a bit more breadcrumbs. If it’s too dry, add a little water or another egg.
Frying the Shrimp Balls
Now comes the fun part—frying! Heat enough oil in a large pan over medium heat. You need about two inches of oil. Wait until the oil is hot but not smoking. To check, drop a small piece of the mixture into the oil. If it sizzles, you’re ready.
Carefully add the shrimp balls, but don’t overcrowd the pan. Fry them in batches. This helps them cook evenly. Fry until they are golden brown and crispy, about four to five minutes. Use a slotted spoon to remove them and let them drain on paper towels. Enjoy the smell!
Tips & Tricks
Achieving the Perfect Crispy Texture
To get that crunch, use panko breadcrumbs. They are light and airy. This helps create a golden crust. Regular breadcrumbs don’t provide the same crunch. Frying at the right temperature is key. Heat your oil to around 350°F. If it’s too hot, the outside burns. If it’s too cool, the shrimp balls soak up oil.
Flavor Enhancements
Want a little kick? Add spices like cayenne or paprika to the mix. This will give your shrimp balls extra flavor. Balancing your sauces is also important. The sweet chili sauce pairs well with a splash of rice vinegar. This cuts through the sweetness and adds a tangy note.
Common Mistakes to Avoid
One big mistake is overmixing the shrimp mixture. This can make the texture tough. Mix just until combined. Another error is frying at the wrong oil temperature. Always check the heat before frying. If you follow these tips, you’ll create delicious shrimp balls every time.

Variations
Alternative Protein Options
You can swap shrimp for chicken or tofu. For chicken, use ground chicken to keep the texture similar. Just mix it the same way as shrimp. If you prefer tofu, use firm tofu. Mash the tofu well and follow the same steps.
Serving Suggestions
You can pair shrimp balls with many sauces. Try soy sauce, garlic sauce, or even a spicy sriracha. To present your shrimp balls, use a colorful platter. Add lime wedges and fresh herbs for a pop of color. You could also serve them in small cups for fun!
Regional Flavor Profile Variations
Incorporating local spices can add depth. If you love heat, try adding cayenne or chili flakes. For a sweet twist, adjust the sweetness of the sauce. You can mix in honey or brown sugar to taste. This way, everyone can enjoy their own flavor!
Storage Info
Storing Leftovers
To store leftover crispy shrimp balls, place them in an airtight container. Make sure they are completely cool before sealing the container. This method prevents moisture buildup and keeps them crisp. They will last for 2 to 3 days in the fridge. If you want to enjoy them later, consider freezing them instead.
Freezing Instructions
You can freeze both uncooked and cooked shrimp balls. For uncooked shrimp balls, arrange them on a baking sheet and freeze them until firm. After that, transfer them to a freezer bag. This method helps keep their shape. Cooked shrimp balls can be frozen too. Just place them in a container after they have cooled. They will stay good for 1 to 2 months.
When reheating, keep the texture in mind. For best results, reheat cooked shrimp balls in an oven at 375°F (190°C). This will help restore their crispiness. Avoid using the microwave, as it can make them soggy.
Portion Size Considerations
For meal planning, I suggest serving about 4 to 6 shrimp balls per person. This portion works well as an appetizer or a main dish. If you’re prepping for a party, consider doubling the recipe.
Best practices for meal prep include freezing portions. You can make a big batch of shrimp balls, freeze them, and cook them as needed. This method saves time and allows you to enjoy a tasty treat whenever you want.
FAQs
Can I make shrimp balls ahead of time?
Yes, you can make shrimp balls ahead of time. To do this, follow these tips:
– Prep in Advance: Mix your shrimp ball mixture and shape it into balls.
– Chill: Place them on a tray and chill in the fridge for up to 2 hours.
– Store: If you want to keep them longer, freeze the uncooked shrimp balls on a tray. Once frozen, transfer them to a freezer bag. They will last up to 2 months.
– Cooking Later: When ready to cook, fry them straight from the freezer. Just add a few extra minutes to the cooking time.
What can I substitute for sweet chili sauce?
If you need a substitute for sweet chili sauce, try these options:
– Sriracha and Honey: Mix equal parts for a spicy-sweet flavor.
– Thai Chili Paste: This adds heat and sweetness, perfect for dipping.
– Soy Sauce and Brown Sugar: Mix these for a savory and sweet option.
Each alternative will change the flavor a bit, but they all work well with the shrimp balls.
How do I know when the shrimp balls are done frying?
You can tell if your shrimp balls are ready by looking for these signs:
– Color: They should be golden brown.
– Time: Fry them for about 4-5 minutes per batch.
– Texture: They will feel firm to the touch and crispy on the outside.
Using these indicators will help ensure your shrimp balls are cooked perfectly every time.
You now have all the tools to make crispy shrimp balls. We talked about the key ingredients and the step-by-step prep. You learned tips to get the best texture and flavor. I also shared fun variations and storage advice.
Take these ideas and try them out. Enjoy your cooking and impress your friends with your shrimp balls!