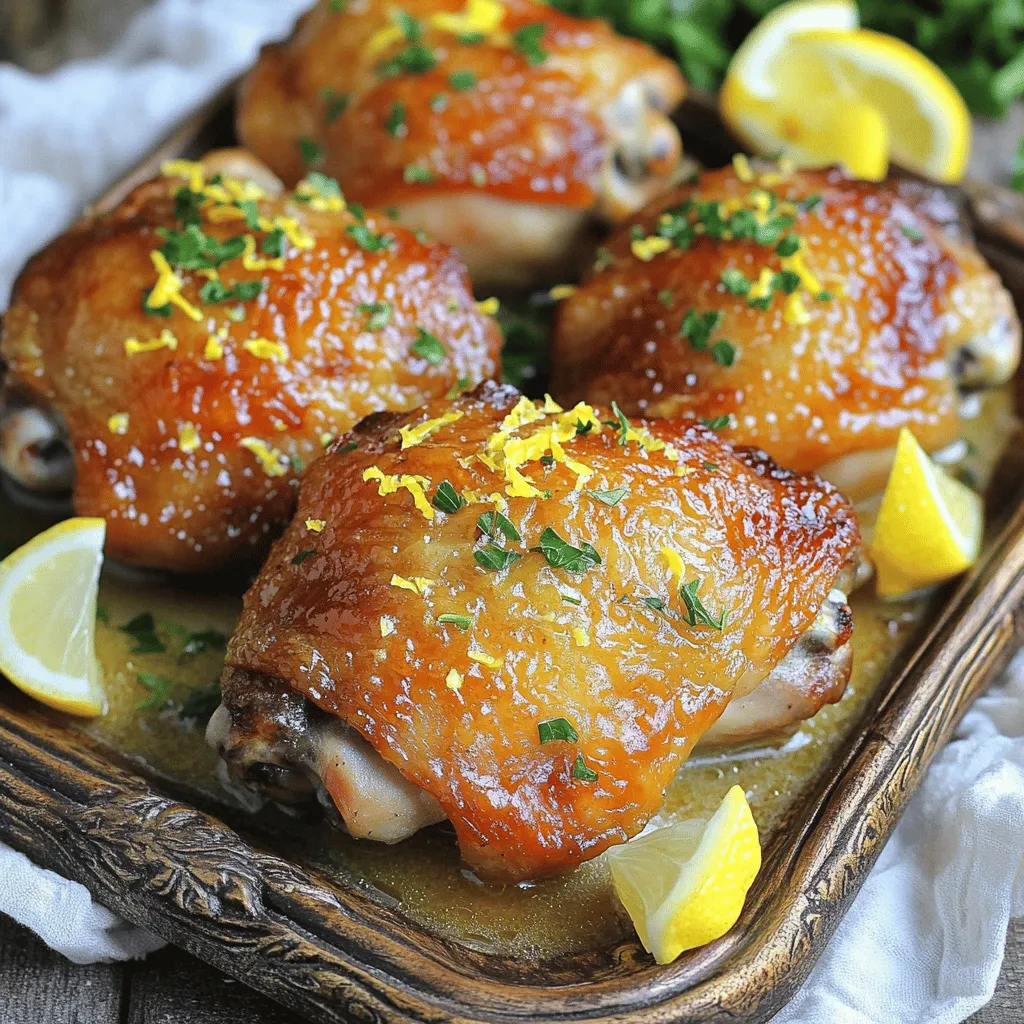
Looking for a quick and tasty dinner? Garlic Butter Chicken Thighs are a winner! This easy family recipe uses just a few simple ingredients but packs a punch with flavor. Imagine juicy, tender chicken with a crispy skin, all bathed in rich garlic butter. You can whip it up in no time and impress your family. Get ready to make dinner a delight with this simple, delicious dish!
Ingredients
Essential Ingredients for Garlic Butter Chicken Thighs
– 4 bone-in, skin-on chicken thighs
– 4 tablespoons unsalted butter
– 6 cloves garlic, minced
– 1 lemon (zested and juiced)
To make Garlic Butter Chicken Thighs, you need a few key items. First, the chicken thighs must have skin and bones. This adds flavor and helps keep the meat juicy. You will also need unsalted butter. This gives a rich taste without extra salt. Fresh garlic is a must for that strong flavor. Finally, a lemon adds bright notes to balance the dish.
Herbs and Seasonings
– 1 teaspoon dried thyme
– 1 teaspoon dried rosemary
– Salt and pepper to taste
Herbs are essential for adding depth to the chicken. Thyme and rosemary work well together. They create a warm and earthy flavor. Don’t forget salt and pepper. These simple seasonings enhance all the other flavors.
Garnishing Ingredients
– Fresh parsley, chopped, for garnish
For a finishing touch, use fresh parsley. Its bright green color makes the dish pop. Plus, it adds a fresh taste that complements the garlic butter. When you serve the chicken, sprinkle the parsley on top. This simple step makes your dish look professional and inviting.
Step-by-Step Instructions
Preparation Steps
1. First, preheat your oven to 400°F (200°C). This step warms the oven for even cooking.
2. Next, pat the chicken thighs dry with paper towels. This helps the skin crisp up nicely.
3. Season both sides of the chicken thighs with salt and pepper. Use enough to coat them well.
Cooking Method
1. In an oven-safe skillet, melt 2 tablespoons of butter over medium heat. Watch it closely to prevent burning.
2. Once the butter melts, increase the heat to medium-high. Add the chicken thighs, skin-side down.
3. Sear the chicken for about 5-7 minutes. Look for a golden brown and crispy skin.
4. Flip the chicken and cook for another 2-3 minutes on the other side. This helps seal in the juices.
5. Reduce the heat back to medium. Add the minced garlic to the skillet, stirring for about 30 seconds. This brings out the garlic’s flavor.
6. Pour in the lemon juice. Stir in the lemon zest, thyme, rosemary, and the rest of the butter. Let the butter melt and coat the chicken.
Baking
1. Carefully transfer the skillet to the preheated oven. Do this with oven mitts to avoid burns.
2. Bake for 25-30 minutes. Use a meat thermometer to check the internal temperature.
3. Ensure the chicken reaches 165°F (75°C). This is the safe temperature for cooked chicken.
4. Once cooked, remove the skillet from the oven. Let the chicken rest for 5 minutes before serving.
Tips & Tricks
How to Achieve Crispy Skin
To get crispy skin on your chicken thighs, start by drying them well. Use paper towels to pat them dry. This step helps to remove moisture. Moisture keeps the skin from crisping up.
Next, use the right searing technique. Heat your skillet over medium-high heat. Add a bit of butter and let it melt. Place the chicken thighs in the pan skin-side down. Sear them for about 5-7 minutes. Look for a golden-brown color. This step locks in flavor and ensures a crisp texture.
Flavor Enhancements
Want to boost the flavor? Think about adding fresh herbs. You can try parsley, basil, or rosemary. Fresh herbs brighten the dish and add depth.
You can also change the butter. Use garlic herb butter or even flavored olive oil. Each option brings a unique taste. These small swaps can take your meal to the next level.
Serving Suggestions
For side dishes, consider roasted veggies or mashed potatoes. They complement the chicken well. Serve the chicken on a big platter. Drizzle it with the garlic butter sauce. Add lemon wedges for a pop of color. Finish with a sprinkle of parsley for freshness. This not only looks great but makes for a tasty meal.
Variations
Spicy Garlic Butter Chicken Thighs
To add a kick to your garlic butter chicken thighs, try making them spicy. You can easily do this by incorporating red pepper flakes into the butter. Start with half a teaspoon and adjust to your taste. If you want even more heat, add a splash of your favorite hot sauce. The heat from the sauce will blend well with the rich garlic flavor.
Herb-Infused Variations
Another fun way to change the taste is by experimenting with herbs. You can switch out thyme and rosemary for fresh basil or oregano. If you want a creamier sauce, mix in a bit of heavy cream while cooking. This will give you a rich, velvety sauce that pairs wonderfully with the chicken.
Cooking Methods
You can also change how you cook the chicken. For a slow-cooked version, put the chicken thighs in a slow cooker. Add the garlic, butter, and seasonings. Cook on low for 4 to 6 hours. This method makes the chicken super tender.
If you love grilling, this recipe works great on the grill, too! Just marinate the chicken in the garlic butter mixture for an hour. Then, grill over medium heat for about 6-8 minutes on each side. This gives you a smoky flavor that is perfect for summer cookouts.
Storage Info
Leftover Storage
To keep your garlic butter chicken thighs fresh, store them in the fridge. First, let them cool to room temperature. Then, place the chicken in an airtight container. This way, they stay juicy and tasty. You can keep them in the fridge for up to 3 days. If you want to eat them later, freezing is a great option.
Reheating Instructions
When you’re ready to enjoy your leftovers, reheating is key. If you choose the oven, set it to 350°F (175°C). Place the chicken in a baking dish, cover it with foil, and heat for about 15-20 minutes. This keeps the chicken moist. If you use a microwave, heat on medium power for 2-3 minutes. Check often to avoid drying it out.
Freezing Options
Freezing is great for long-term storage. To freeze cooked chicken thighs, wrap each piece tightly in plastic wrap. Then, place them in a freezer bag. Make sure to remove as much air as possible. You can freeze them for up to 3 months. When you’re ready to eat, thaw the chicken in the fridge overnight for the best results. This keeps the texture and flavor intact.
FAQs
How to make Garlic Butter Chicken Thighs more flavorful?
To enhance the flavor of Garlic Butter Chicken Thighs, I suggest adding spices and herbs. You can try:
– A pinch of smoked paprika for a slight smokiness.
– Fresh thyme or rosemary for a more vibrant taste.
– A dash of lemon pepper for a zesty kick.
Mixing these ingredients into the butter and garlic makes a huge difference. Feel free to experiment with your favorite herbs, too!
What should the internal temperature be for chicken thighs?
The safe internal temperature for chicken thighs is 165°F (75°C). Use a meat thermometer for accuracy. Insert it into the thickest part of the thigh, avoiding the bone. If it reads 165°F, your chicken is ready and safe to eat.
Can I use boneless chicken thighs for this recipe?
Yes, you can use boneless chicken thighs! The cooking time will be shorter. Cook them for about 20-25 minutes in the oven. Check the internal temperature to ensure they reach 165°F.
What to serve with Garlic Butter Chicken Thighs?
Garlic Butter Chicken Thighs pair well with many sides. Here are some popular choices:
– Steamed broccoli or green beans for a healthy touch.
– Mashed potatoes or rice to soak up the garlic butter.
– A fresh salad for a light and crisp side.
These sides enhance the meal and balance the rich flavors of the chicken.
How do I know when the chicken is fully cooked?
To check if your chicken is fully cooked, use a meat thermometer. Insert it into the thickest part of the thigh. Look for a reading of 165°F (75°C). If you don’t have a thermometer, cut into the chicken and check for clear juices. No pink meat means it’s done!
In this post, you learned how to make garlic butter chicken thighs. We covered essential ingredients, like chicken, butter, garlic, and herbs. You also got step-by-step instructions for preparation and cooking, plus tips for crispy skin and flavor. Variations let you customize your dish. Remember, proper storage and reheating will keep your leftovers tasty. Enjoy this simple and delicious meal that impresses!