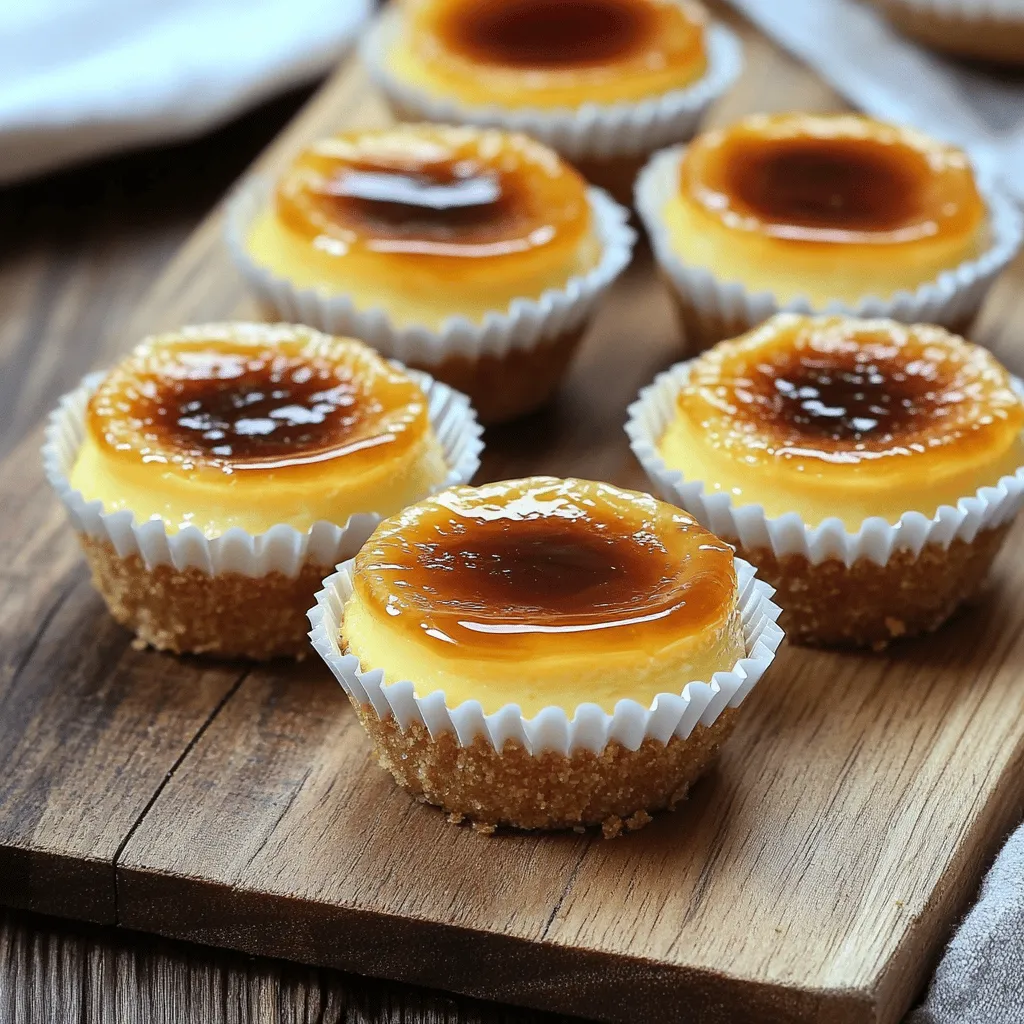
Craving something sweet and delicious? Let me introduce you to Mini Crème Brûlée Cheesecakes! These tiny treats pack a big flavor punch. They blend the rich creaminess of cheesecake with the classic caramelized sugar topping of crème brûlée. In this article, I’ll share simple steps, easy tips, and delicious variations to elevate your dessert game. Let’s dive in and make your dessert dreams come true!
Ingredients
List of Ingredients
– 1 cup digestive biscuits, crushed
– 4 tablespoons unsalted butter, melted
– 16 oz (450g) cream cheese, softened
– ½ cup granulated sugar
– 1 teaspoon vanilla extract
– 2 large eggs
– ¼ cup heavy cream
– 2 tablespoons brown sugar (for topping)
Measurement Units
I use cups, tablespoons, and ounces for this recipe. These units make it easy to measure ingredients. For example, a cup holds eight ounces.
Tips for Ingredient Quality
For the best taste, choose high-quality cream cheese. Look for brands that are rich and creamy. You can also use mascarpone cheese for a twist. If you can’t find digestive biscuits, try graham crackers or vanilla cookies. These options work well and add different flavors.
Step-by-Step Instructions
Preparing the Crust
Preheat your oven to 325°F (160°C). This step helps create a nice, firm crust. In a mixing bowl, combine 1 cup of crushed digestive biscuits with 4 tablespoons of melted unsalted butter. Mix until it looks like wet sand. This texture is key for a sturdy base.
Baking the Crust
Line a muffin tin with cupcake liners. Firmly press the biscuit mixture into the bottom of each liner. Bake in the preheated oven for about 10 minutes. The crust should look slightly golden. After baking, remove the tin and let it cool for a few minutes.
Making the Cheesecake Filling
In a large mixing bowl, beat 16 oz of softened cream cheese with ½ cup of granulated sugar and 1 teaspoon of vanilla extract. Mix until it is smooth and creamy. Add in 2 large eggs one at a time, mixing well each time. Finally, stir in ¼ cup of heavy cream until fully combined.
Filling the Muffin Tin
Pour the cheesecake mixture over the cooled crusts in the muffin tin. Fill each liner about ¾ full. Bake in the oven for 20 to 25 minutes. The edges should be set, but the centers should jiggle a little. This means they’re perfect.
Cooling and Chilling the Cheesecakes
Once baked, remove the cheesecakes from the oven. Let them cool to room temperature. After that, refrigerate for at least 4 hours or overnight. This chilling time helps the flavors blend and firm up the filling.
Caramelizing the Top
Once the cheesecakes are chilled, sprinkle about ½ teaspoon of brown sugar on top of each one. Use a kitchen torch to gently heat the sugar until it melts and turns golden brown. Make sure to be careful while using the torch. Allow them to cool for a moment as the sugar hardens into a crispy shell.Enjoy the delicious results!
Tips & Tricks
Common Mistakes to Avoid
– Overmixing the filling: Mixing too much can add air. This can lead to cracks in your cheesecakes. Mix until just combined for the best texture.
– Baking too long or short: Pay close attention to the baking time. If you bake too long, your cheesecakes become dry. If you underbake, they may fall apart. Look for firm edges with a slight jiggle in the center.
Enhancing Flavor
– Additional flavorings and extracts: You can add different extracts to change the taste. Almond extract or lemon zest can give your cheesecakes a unique twist. Just use a small amount, about half a teaspoon, to start.
– Chocolate or fruit additions: Mix in chocolate chips or pureed fruit for added flavor. Dark chocolate or fresh strawberries work great. You can even swirl fruit puree on top before baking for a pretty effect.
Presentation Ideas
– Serving suggestions: Serve your cheesecakes on a nice plate. Arrange fresh berries around them for color. You can also use mini forks for a fun touch.
– Garnishing options: Top with a dollop of whipped cream or a sprinkle of crushed cookies. A few mint leaves can add a fresh look. If you want, drizzle caramel or chocolate sauce on top for extra flair.
Variations
Flavor Variations
You can easily switch up the flavors in these mini crème brûlée cheesecakes. One tasty option is chocolate. Just melt some good-quality chocolate and mix it into the cheesecake filling. This adds a rich, decadent twist that chocolate lovers will adore.
Another fun idea is to infuse fruit flavors. You can use raspberry or lemon for a fresh and zesty touch. For raspberry, puree fresh berries and fold them into the filling. For lemon, add lemon juice and zest to brighten the flavor. Both options add a lovely color and taste.
Dietary Modifications
If you need gluten-free options, swap out the digestive biscuits for gluten-free cookies. Ground almonds also work well as a base. For those who cannot have dairy, you can use dairy-free cream cheese. Just make sure to check the labels for the best quality.
Presentation Variations
For serving, think about individual portions. You can use small jars or cups to make each cheesecake its own little treat. This way, guests can grab their own without cutting slices.
You can also choose between mini and regular sizes. Mini cheesecakes are perfect for parties, while regular-sized ones make a great centerpiece for family dinners. Both look stunning with that crispy caramel top and make for an impressive dessert.
Storage Info
Refrigeration
To keep your mini crème brûlée cheesecakes fresh, store them in the fridge. Use an airtight container or cover them with plastic wrap. This way, they won’t absorb other smells in the fridge. Proper storage helps maintain their rich flavor and creamy texture.
These cheesecakes can last about 4 to 5 days in the fridge. After that, their taste may fade, and the texture can change. If you plan to eat them within a week, refrigeration is the best option.
Freezing
If you want to save some for later, freezing works well. First, let the cheesecakes cool completely. Then, wrap each one tightly in plastic wrap, and place them in a freezer-safe bag or container. This protects them from freezer burn.
You can freeze them for up to 2 months. When you’re ready to enjoy them, take them out and thaw them in the fridge overnight. This slow thaw keeps their creamy texture intact.
Reheating Tips
Reheating mini cheesecakes can be tricky. To maintain their texture, avoid using a microwave, as it can make them rubbery. Instead, preheat your oven to 300°F (150°C). Place the cheesecakes on a baking sheet and warm them for about 10 minutes.
After reheating, you can enjoy them warm or let them cool down. For the best experience, caramelize the tops again before serving. This adds that lovely crunchy texture back to each bite.
FAQs
What can I substitute for cream cheese?
You can use mascarpone cheese for a rich taste. Greek yogurt offers a tangy flavor. Silken tofu works well for a dairy-free option. Each choice changes the taste and texture slightly.
How long do mini cheesecakes last in the fridge?
Mini cheesecakes stay fresh for about 5 days when stored properly. Keep them in an airtight container. This helps maintain their taste and texture.
Can I make these ahead of time?
Yes, you can prepare mini cheesecakes up to two days in advance. Simply bake them and chill in the fridge. This allows the flavors to meld nicely.
How do I get a crispy topping without a torch?
You can use your oven to achieve a crispy topping. After chilling, sprinkle brown sugar on top. Place them under the broiler for a few minutes. Watch closely to avoid burning.
What’s the best way to serve mini cheesecakes?
Serve mini cheesecakes chilled for the best flavor. Pair them with fresh berries or a drizzle of chocolate sauce. This enhances their taste and presentation.
Do I need cupcake liners for baking?
Cupcake liners are not required, but they help with easy removal. You can grease the muffin tin instead. Just be careful when taking them out.
This post covered all you need to make delicious mini cheesecakes. You learned about essential ingredients and key measurements. I also shared tips on choosing quality ingredients and avoiding common mistakes. With variations for flavors and dietary needs, you can customize your treats. Finally, you discovered proper storage methods to enjoy them longer. Keep these steps in mind to ensure great results. Happy baking with your mini cheesecakes!