If you crave a sweet treat that’s easy to make and fun to eat, you’re in the right place! No-Bake Birthday Cake Cheesecake Bars are a delicious way to celebrate. With simple steps and tasty ingredients, you’ll whip up a dessert that impresses everyone. Get ready to enjoy creamy, dreamy bars that taste like a party. Let’s dive into making these delightful treats!
Ingredients
Essential Ingredients List
To make No-Bake Birthday Cake Cheesecake Bars, gather these items:
– 1 ½ cups graham cracker crumbs
– 1/2 cup unsalted butter, melted
– 2 tablespoons granulated sugar
– 16 oz cream cheese, softened
– 1 cup powdered sugar
– 1 teaspoon vanilla extract
– 1 cup heavy whipping cream
– 1/2 cup rainbow sprinkles
– Extra sprinkles for topping
These ingredients create a tasty and fun dessert that’s easy to make.
Substitutions for Key Ingredients
You can swap some ingredients if needed. For graham cracker crumbs, use cookie crumbs or crushed pretzels. If you don’t have unsalted butter, salted butter works too. Cream cheese can be replaced with a dairy-free cream cheese for a vegan option. For heavy cream, you can use coconut cream for a lighter choice.
Equipment Needed for Preparation
Gather these tools before you start:
– A medium mixing bowl
– A large mixing bowl
– An electric mixer
– A 9×9-inch baking pan
– Parchment paper for lining
– A spatula
– Measuring cups and spoons
Having the right tools makes the process smoother and more fun.
Step-by-Step Instructions
Preparing the Crust
To start, gather your ingredients. You need graham cracker crumbs, melted butter, and granulated sugar.
1. In a medium bowl, mix 1 ½ cups of graham cracker crumbs with 1/2 cup of melted unsalted butter and 2 tablespoons of granulated sugar.
2. Stir until everything blends well.
3. Next, press this mixture firmly into the bottom of a lined 9×9-inch baking pan. I use the back of a measuring cup to pack it tightly. This creates a solid base for your bars.
Making the Cheesecake Filling
Now, it’s time to make the creamy cheesecake filling. You need softened cream cheese, powdered sugar, vanilla extract, and heavy whipping cream.
1. In a large bowl, beat 16 oz of softened cream cheese with an electric mixer for about 1-2 minutes until it’s creamy and smooth.
2. Gradually add 1 cup of powdered sugar and 1 teaspoon of vanilla extract. Mix until it’s fluffy, which will take about 2-3 minutes.
3. In another bowl, whip 1 cup of heavy cream until stiff peaks form.
4. Gently fold the whipped cream into the cream cheese mixture until no streaks remain.
5. Finally, fold in 1/2 cup of rainbow sprinkles to add some fun color.
Assembling and Chilling the Bars
You’re almost there! Now, let’s put everything together.
1. Spread the cheesecake mixture evenly over the crust in your baking pan. Use a spatula to smooth the top.
2. For the best results, chill the bars in the fridge for at least 4 hours, but overnight is better.
3. Once set, lift the cheesecake out of the pan using the parchment paper.
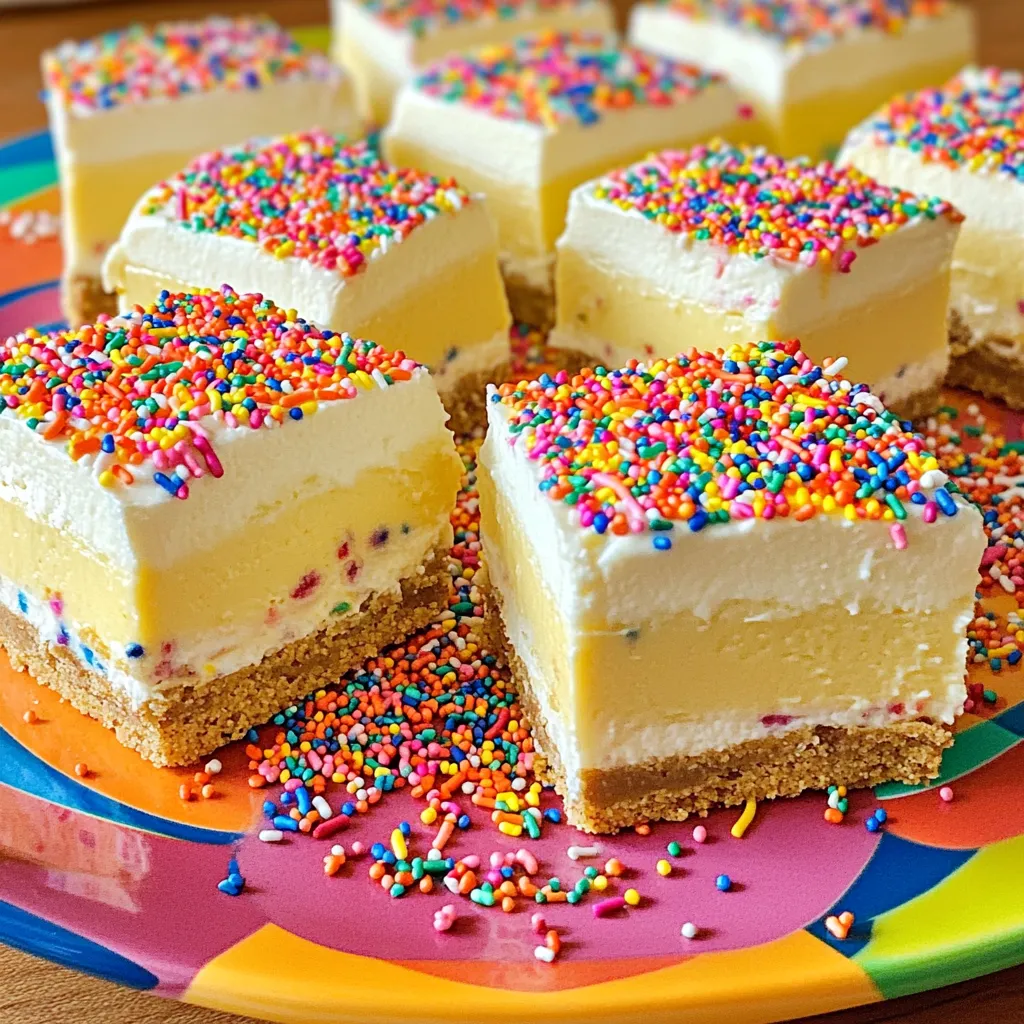
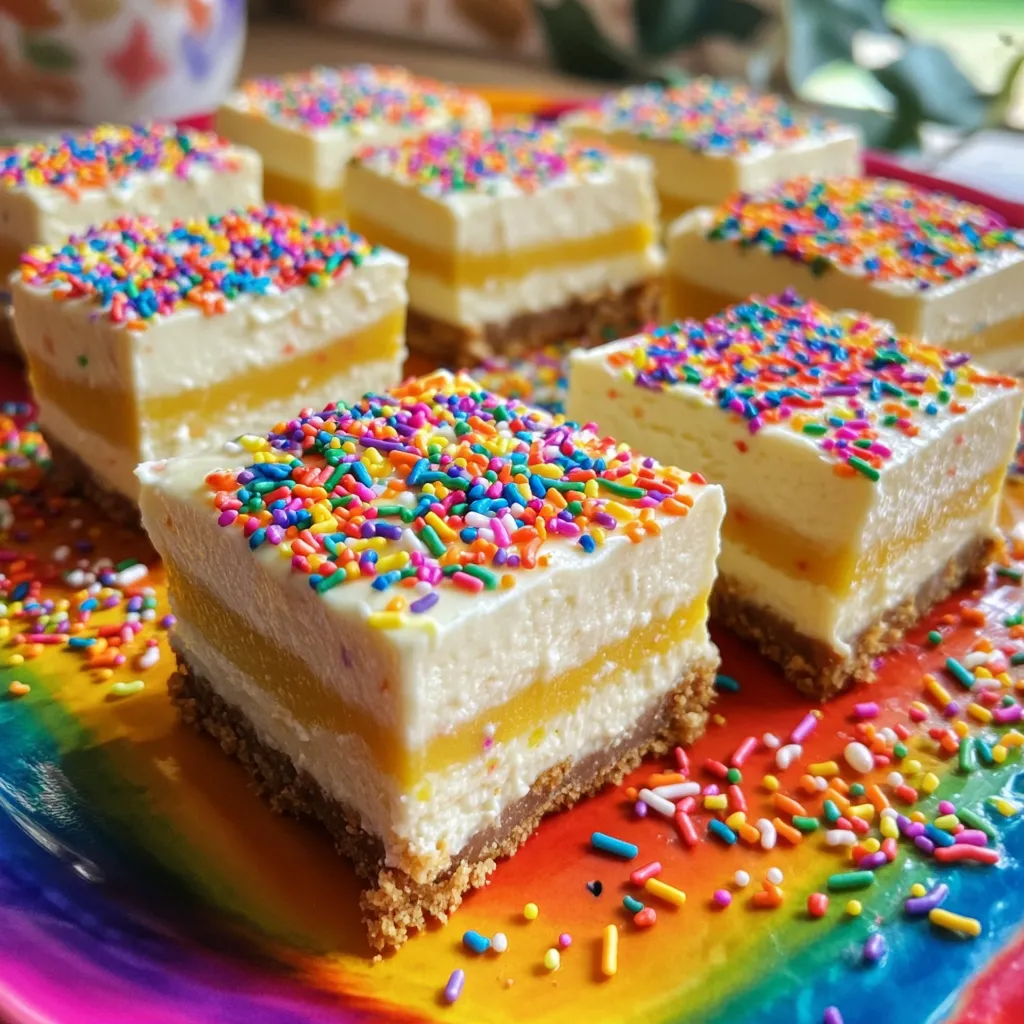
4. Cut into bars and top each one with extra rainbow sprinkles for a festive touch.
Enjoy this delightful treat!
Tips & Tricks
How to Achieve the Perfect Creamy Texture
To get that smooth and creamy texture, start with softened cream cheese. Take it out of the fridge an hour before you mix. This makes it easier to beat. Mix the cream cheese for about two minutes until it’s fluffy. Add the powdered sugar slowly, mixing well after each addition. This helps combine the flavors without lumps. Finally, gently fold in the whipped cream. Be careful not to deflate it. This step keeps your cheesecake light and airy.
Chilling Time Recommendations
Chilling is key for these cheesecake bars. After you spread the filling on the crust, cover it well. Place it in the fridge for at least four hours. For the best taste and texture, chill overnight. This longer time allows the flavors to meld. It also helps the bars set up properly. If you’re in a hurry, four hours will work, but overnight is best.
Presentation and Serving Suggestions
For a fun and festive touch, serve the bars on a colorful platter. Cut the cheesecake into neat squares. Top each square with extra rainbow sprinkles. This adds a pop of color. You can also add a scoop of whipped cream on the side. To make it more special, drizzle chocolate or caramel sauce on the plates. Your guests will love the look and flavor!
Variations
Flavor Variations
You can change the flavor of these bars easily. For a chocolate twist, add cocoa powder to the cream cheese mix. Use one-third cup of cocoa powder for a rich taste. You can also swap the rainbow sprinkles for mini chocolate chips. For a fruity flavor, mix in pureed fruits like strawberries or mangoes. Just use half a cup of fruit puree to keep it creamy.
Dietary Adjustments
If you need gluten-free bars, swap graham cracker crumbs for gluten-free crumbs. Use gluten-free cookies or almond flour for the crust. For a vegan version, use plant-based cream cheese and whipped coconut cream. You can find vegan butter for the crust too. Check labels to ensure all ingredients are vegan-friendly.
Topping Ideas
Toppings can make your bars even more fun. Use different types of sprinkles, like chocolate or star-shaped ones. Fresh fruit like berries adds color and freshness. You can drizzle chocolate or caramel sauce on top for extra sweetness. For a crunch, sprinkle crushed nuts or granola. These toppings make your cheesecake bars festive and delicious!
Storage Info
How to Store Leftover Bars
After you enjoy these cheesecake bars, you may have some left. To keep them fresh, place the bars in an airtight container. If you don’t have one, wrap them tightly with plastic wrap. Store the container in the fridge. This way, the bars stay cold and firm. They will stay good for about 5 days.
Freezing Instructions for Longer Storage
If you want to keep these bars longer, freezing is a great option. First, cut the bars into pieces. Wrap each piece in plastic wrap to prevent freezer burn. Then, place the wrapped bars in a freezer-safe container. You can store them in the freezer for up to 3 months. This keeps their taste fresh and fun!
Best Practices for Thawing
When you’re ready to enjoy your frozen bars, take them out of the freezer. Move them to the fridge for about 4 hours or overnight. This will let them thaw slowly and safely. If you’re in a hurry, you can leave them on the counter for about 30 minutes. Once thawed, they taste just as good as when you made them!
FAQs
Can I make these bars in advance?
Yes, you can make these bars ahead of time. In fact, making them a day before is great. It allows the flavors to mix and the bars to set well. Just store them in the fridge until you’re ready to serve.
How long do the bars last in the fridge?
These bars stay fresh in the fridge for about 5 days. Just keep them in an airtight container. If you want to eat them later, be sure to check for any signs of spoilage before enjoying.
Can I use different cookie crumbs for the crust?
Absolutely! You can use different cookie crumbs for the crust. Try chocolate cookies for a rich flavor or vanilla wafers for a lighter taste. Just keep the amount the same, and adjust the butter as needed to get the right texture.
This article covered how to make delicious cheesecake bars from start to finish. We explored essential ingredients and substitutions. I shared tips for achieving the perfect texture and chilling time. You also learned about flavor variations and dietary options.
In summary, these bars are easy and fun to make. Whether you enjoy them fresh or save some for later, they’ll bring joy to your table. Experiment with flavors to find your favorite. Happy baking!