No-Bake Birthday Cake Protein Balls Tasty and Simple

Looking for a tasty treat that packs a protein punch? I’ve got you covered! These No-Bake Birthday Cake Protein Balls are simple to make and perfect for any celebration. They are not just yummy; they’re also nutritious! This recipe is great whether you want a quick snack or a sweet addition to your party. Let’s dive into the fun of making these delightful bites. Your taste buds will thank you!

Ingredients

List of Ingredients

To make No-Bake Birthday Cake Protein Balls, gather these items:

– 1 cup rolled oats

– 1/2 cup vanilla protein powder

– 1/4 cup almond flour

– 1/4 cup natural almond butter

– 1/4 cup honey or maple syrup

– 1/2 teaspoon vanilla extract

– 1/4 cup rainbow sprinkles

– 1 tablespoon coconut oil, melted (optional)

– Pinch of salt

These ingredients create a fun and tasty treat. The oats give a good base. The protein powder boosts the nutrition. Almond flour adds healthy fats. Almond butter brings creaminess. Honey or maple syrup sweetens the mix. Vanilla adds flavor, while sprinkles make them festive.

Nutritional Information

Each protein ball packs a punch. Here’s a rough breakdown of the nutrition per ball:

– Calories: About 100

– Protein: 3-4 grams

– Carbs: 10-12 grams

– Fat: 4-5 grams

– Fiber: 1-2 grams

These numbers can vary based on brands used. It’s a healthy snack for kids and adults alike. You get energy without the sugar crash.

Substitutions and Allergens

You can easily tweak this recipe to fit your needs. Here are some ideas:

Nut-free: Use sunflower seed butter instead of almond butter.

Gluten-free: Ensure oats are certified gluten-free.

Sweeteners: Swap honey for agave or a sugar-free syrup.

Protein powder: Any type of protein powder works. Just check for allergens.

These substitutions help make the recipe safe for everyone. Enjoy the fun of creating a treat that fits your taste!

Step-by-Step Instructions

Preparation Steps

Start by gathering all your ingredients. You will need:

– 1 cup rolled oats

– 1/2 cup vanilla protein powder

– 1/4 cup almond flour

– 1/4 cup natural almond butter

– 1/4 cup honey or maple syrup

– 1/2 teaspoon vanilla extract

– 1/4 cup rainbow sprinkles

– 1 tablespoon coconut oil, melted (optional)

– Pinch of salt

In a large bowl, mix the rolled oats, vanilla protein powder, and almond flour. Stir until combined. Next, add the almond butter, honey or maple syrup, vanilla extract, and melted coconut oil if you choose to use it. Mix well to form a sticky dough.

Shaping the Protein Balls

Now comes the fun part! Use your hands to shape the mixture into balls that are about 1 inch wide. If the dough sticks to your hands, wet them slightly for an easier process. You want these to be bite-sized and easy to grab.

Cooling and Setting Time

Once shaped, place your protein balls on a lined baking sheet or plate. Refrigerate them for about 30 minutes. This helps them firm up nicely. After they set, store them in an airtight container in the fridge. They will stay fresh for up to one week. Enjoy your tasty, no-bake birthday cake protein balls!

Tips & Tricks

Best Practices for Mixing

Mixing is key for a great texture. Start with dry ingredients first. Use a large bowl to give yourself space. Stir the oats, protein powder, and almond flour well. This helps blend the flavors. When adding wet ingredients, pour them slowly. Stir gently to combine everything. If the mix feels too dry, add a splash of almond butter or honey. Don’t worry about lumps; they will come together when you form the balls.

How to Store for Freshness

To keep your protein balls fresh, store them in an airtight container. Place a layer of parchment paper between layers to avoid sticking. Refrigerate them for up to one week. If you want to keep them longer, freezing works well too. Just place them in a freezer-safe bag. They can last up to three months in the freezer. When you’re ready, thaw them overnight in the fridge.

Presentation Tips for Serving

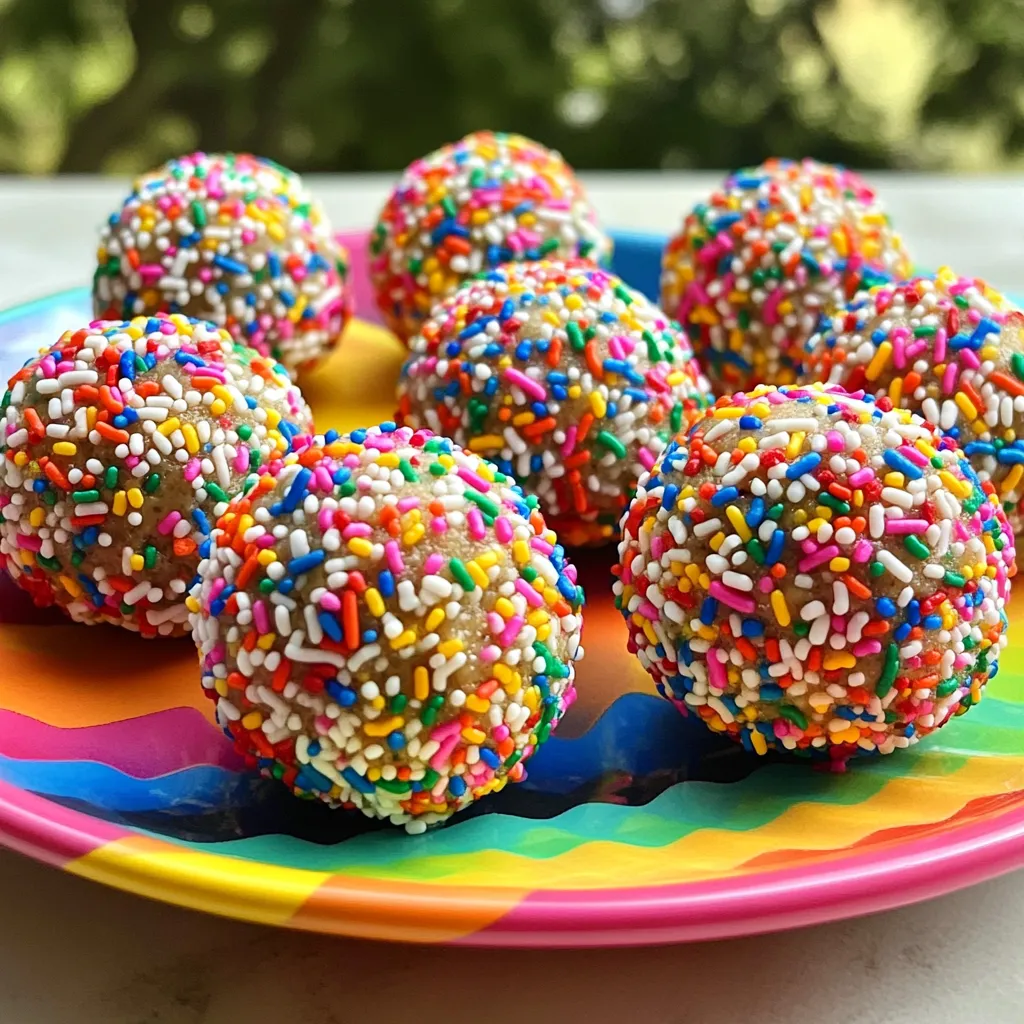
Serving your protein balls can be fun and festive. Use a colorful plate to catch the eye. Arrange the balls in a circle or stack them high. For a special touch, sprinkle extra rainbow sprinkles on top. You could also add a small note card with the recipe. This makes it personal. Guests will love the look and want to try them right away!

Variations

Flavor Variations

You can switch up the flavor of these protein balls. Try using chocolate protein powder instead of vanilla. It adds a rich taste. For a nutty twist, swap almond butter for peanut butter. You can also mix in some cocoa powder for a chocolate cake vibe. If you’re feeling adventurous, add a dash of cinnamon. It gives a warm flavor that pairs well with the sweetness.

Healthier Alternatives

If you want a healthier version, consider using sugar-free options. You can replace honey or maple syrup with a sugar-free syrup. This keeps the sweetness without the extra sugar. You can also use unsweetened almond butter. It cuts down on added sugars while keeping the creamy texture. Another option is to use a plant-based protein powder. This can help lower the calories and boost the nutrients.

Add-ins

Add-ins can take your protein balls to the next level. Nuts like almonds or walnuts add crunch and healthy fats. Seeds like chia or flaxseed boost fiber and omega-3s. Dried fruits, such as cranberries or apricots, add sweetness and chewiness. You can also add coconut flakes for extra flavor. Just remember to adjust the base ingredients if you add a lot of extras. This keeps the texture just right.

Storage Info

How to Store in the Fridge

To keep your no-bake birthday cake protein balls fresh, place them in an airtight container. This method helps maintain their texture and flavor. Store them in the fridge for up to a week. Always keep them covered to prevent drying out.

Freezing Options

If you want to save some for later, freezing works well. Place the protein balls in a single layer on a baking sheet. Freeze them for about one hour until firm. Then, transfer them into a freezer-safe bag or container. They can last up to three months in the freezer.

Shelf Life of No-Bake Protein Balls

No-bake protein balls last about a week in the fridge and three months in the freezer. Always check for any signs of spoilage before you eat them. If they smell off or look different, it’s best to throw them away. Enjoy your tasty snacks while they’re fresh!

FAQs

How long do no-bake protein balls last?

No-bake protein balls can last up to one week in the fridge. I keep them in an airtight container to keep them fresh. You can also freeze them. When frozen, they last about three months. Just take them out and let them thaw before you eat.

Can I use different types of protein powder?

Yes, you can use different protein powders. I recommend using whey, pea, or soy protein. Each type will change the flavor a bit. If you use flavored protein powder, adjust the sweetness. You may need less honey or maple syrup.

Are there any nut-free alternatives for this recipe?

If you need nut-free options, you can use sun butter or soy nut butter. These work well in place of almond butter. For the almond flour, use oat flour or coconut flour. Both give a nice texture. Just make sure to check for allergies when serving.

In this post, we explored how to make no-bake protein balls. We covered ingredients, step-by-step prep, and shaping tips. We also shared variations, storage advice, and answers to common questions. No-bake protein balls are easy and fun to make. They fit many diets and tastes, allowing for great mix-ins. Experiment with flavors and enjoy healthy snacks. Keep them fresh and ready to eat! Make these protein balls your go-to snack for energy and taste.
To make No-Bake Birthday Cake Protein Balls, gather these items: - 1 cup rolled oats - 1/2 cup vanilla protein powder - 1/4 cup almond flour - 1/4 cup natural almond butter - 1/4 cup honey or maple syrup - 1/2 teaspoon vanilla extract - 1/4 cup rainbow sprinkles - 1 tablespoon coconut oil, melted (optional) - Pinch of salt These ingredients create a fun and tasty treat. The oats give a good base. The protein powder boosts the nutrition. Almond flour adds healthy fats. Almond butter brings creaminess. Honey or maple syrup sweetens the mix. Vanilla adds flavor, while sprinkles make them festive. Each protein ball packs a punch. Here’s a rough breakdown of the nutrition per ball: - Calories: About 100 - Protein: 3-4 grams - Carbs: 10-12 grams - Fat: 4-5 grams - Fiber: 1-2 grams These numbers can vary based on brands used. It’s a healthy snack for kids and adults alike. You get energy without the sugar crash. You can easily tweak this recipe to fit your needs. Here are some ideas: - Nut-free: Use sunflower seed butter instead of almond butter. - Gluten-free: Ensure oats are certified gluten-free. - Sweeteners: Swap honey for agave or a sugar-free syrup. - Protein powder: Any type of protein powder works. Just check for allergens. These substitutions help make the recipe safe for everyone. Enjoy the fun of creating a treat that fits your taste! Start by gathering all your ingredients. You will need: - 1 cup rolled oats - 1/2 cup vanilla protein powder - 1/4 cup almond flour - 1/4 cup natural almond butter - 1/4 cup honey or maple syrup - 1/2 teaspoon vanilla extract - 1/4 cup rainbow sprinkles - 1 tablespoon coconut oil, melted (optional) - Pinch of salt In a large bowl, mix the rolled oats, vanilla protein powder, and almond flour. Stir until combined. Next, add the almond butter, honey or maple syrup, vanilla extract, and melted coconut oil if you choose to use it. Mix well to form a sticky dough. Now comes the fun part! Use your hands to shape the mixture into balls that are about 1 inch wide. If the dough sticks to your hands, wet them slightly for an easier process. You want these to be bite-sized and easy to grab. Once shaped, place your protein balls on a lined baking sheet or plate. Refrigerate them for about 30 minutes. This helps them firm up nicely. After they set, store them in an airtight container in the fridge. They will stay fresh for up to one week. Enjoy your tasty, no-bake birthday cake protein balls! Mixing is key for a great texture. Start with dry ingredients first. Use a large bowl to give yourself space. Stir the oats, protein powder, and almond flour well. This helps blend the flavors. When adding wet ingredients, pour them slowly. Stir gently to combine everything. If the mix feels too dry, add a splash of almond butter or honey. Don’t worry about lumps; they will come together when you form the balls. To keep your protein balls fresh, store them in an airtight container. Place a layer of parchment paper between layers to avoid sticking. Refrigerate them for up to one week. If you want to keep them longer, freezing works well too. Just place them in a freezer-safe bag. They can last up to three months in the freezer. When you’re ready, thaw them overnight in the fridge. Serving your protein balls can be fun and festive. Use a colorful plate to catch the eye. Arrange the balls in a circle or stack them high. For a special touch, sprinkle extra rainbow sprinkles on top. You could also add a small note card with the recipe. This makes it personal. Guests will love the look and want to try them right away! {{image_2}} You can switch up the flavor of these protein balls. Try using chocolate protein powder instead of vanilla. It adds a rich taste. For a nutty twist, swap almond butter for peanut butter. You can also mix in some cocoa powder for a chocolate cake vibe. If you're feeling adventurous, add a dash of cinnamon. It gives a warm flavor that pairs well with the sweetness. If you want a healthier version, consider using sugar-free options. You can replace honey or maple syrup with a sugar-free syrup. This keeps the sweetness without the extra sugar. You can also use unsweetened almond butter. It cuts down on added sugars while keeping the creamy texture. Another option is to use a plant-based protein powder. This can help lower the calories and boost the nutrients. Add-ins can take your protein balls to the next level. Nuts like almonds or walnuts add crunch and healthy fats. Seeds like chia or flaxseed boost fiber and omega-3s. Dried fruits, such as cranberries or apricots, add sweetness and chewiness. You can also add coconut flakes for extra flavor. Just remember to adjust the base ingredients if you add a lot of extras. This keeps the texture just right. To keep your no-bake birthday cake protein balls fresh, place them in an airtight container. This method helps maintain their texture and flavor. Store them in the fridge for up to a week. Always keep them covered to prevent drying out. If you want to save some for later, freezing works well. Place the protein balls in a single layer on a baking sheet. Freeze them for about one hour until firm. Then, transfer them into a freezer-safe bag or container. They can last up to three months in the freezer. No-bake protein balls last about a week in the fridge and three months in the freezer. Always check for any signs of spoilage before you eat them. If they smell off or look different, it’s best to throw them away. Enjoy your tasty snacks while they’re fresh! No-bake protein balls can last up to one week in the fridge. I keep them in an airtight container to keep them fresh. You can also freeze them. When frozen, they last about three months. Just take them out and let them thaw before you eat. Yes, you can use different protein powders. I recommend using whey, pea, or soy protein. Each type will change the flavor a bit. If you use flavored protein powder, adjust the sweetness. You may need less honey or maple syrup. If you need nut-free options, you can use sun butter or soy nut butter. These work well in place of almond butter. For the almond flour, use oat flour or coconut flour. Both give a nice texture. Just make sure to check for allergies when serving. In this post, we explored how to make no-bake protein balls. We covered ingredients, step-by-step prep, and shaping tips. We also shared variations, storage advice, and answers to common questions. No-bake protein balls are easy and fun to make. They fit many diets and tastes, allowing for great mix-ins. Experiment with flavors and enjoy healthy snacks. Keep them fresh and ready to eat! Make these protein balls your go-to snack for energy and taste.
No-Bake Birthday Cake Protein Balls

Celebrate any occasion with these No-Bake Birthday Cake Protein Balls that are both delicious and healthy! In just 15 minutes, you can whip up a fun and nutritious treat using simple ingredients like oats, protein powder, and almond butter. These bite-sized balls are perfect for snacking or as a birthday surprise. Click through to discover the full recipe and enjoy these festive protein-packed delights!

Ingredients
  

1 cup rolled oats

1/2 cup vanilla protein powder

1/4 cup almond flour

1/4 cup natural almond butter

1/4 cup honey or maple syrup

1/2 teaspoon vanilla extract

1/4 cup rainbow sprinkles

1 tablespoon coconut oil, melted (optional)

Pinch of salt

Instructions
 

In a large mixing bowl, combine the rolled oats, vanilla protein powder, and almond flour. Mix well.

    Add in the almond butter, honey (or maple syrup), vanilla extract, and melted coconut oil if using. Stir until the mixture is well combined and forms a sticky dough.

      Once the mixture is fully incorporated, gently fold in the rainbow sprinkles, being careful not to break them.

        Use your hands to form the mixture into bite-sized balls, about 1 inch in diameter. If the mixture is too sticky, you can dampen your hands slightly to help shape the balls.

          Place the protein balls on a lined baking sheet or plate, and refrigerate for about 30 minutes to firm up.

            Once set, store the protein balls in an airtight container in the fridge for up to one week.

              Prep Time: 15 minutes | Total Time: 45 minutes | Servings: 12-15 balls

                - Presentation Tips: Arrange the protein balls on a colorful plate and garnish with a sprinkle of extra rainbow sprinkles on top for a festive touch.

                  Leave a Comment

                  Recipe Rating