Savory Salted Caramel Bars Simple and Sweet Treat

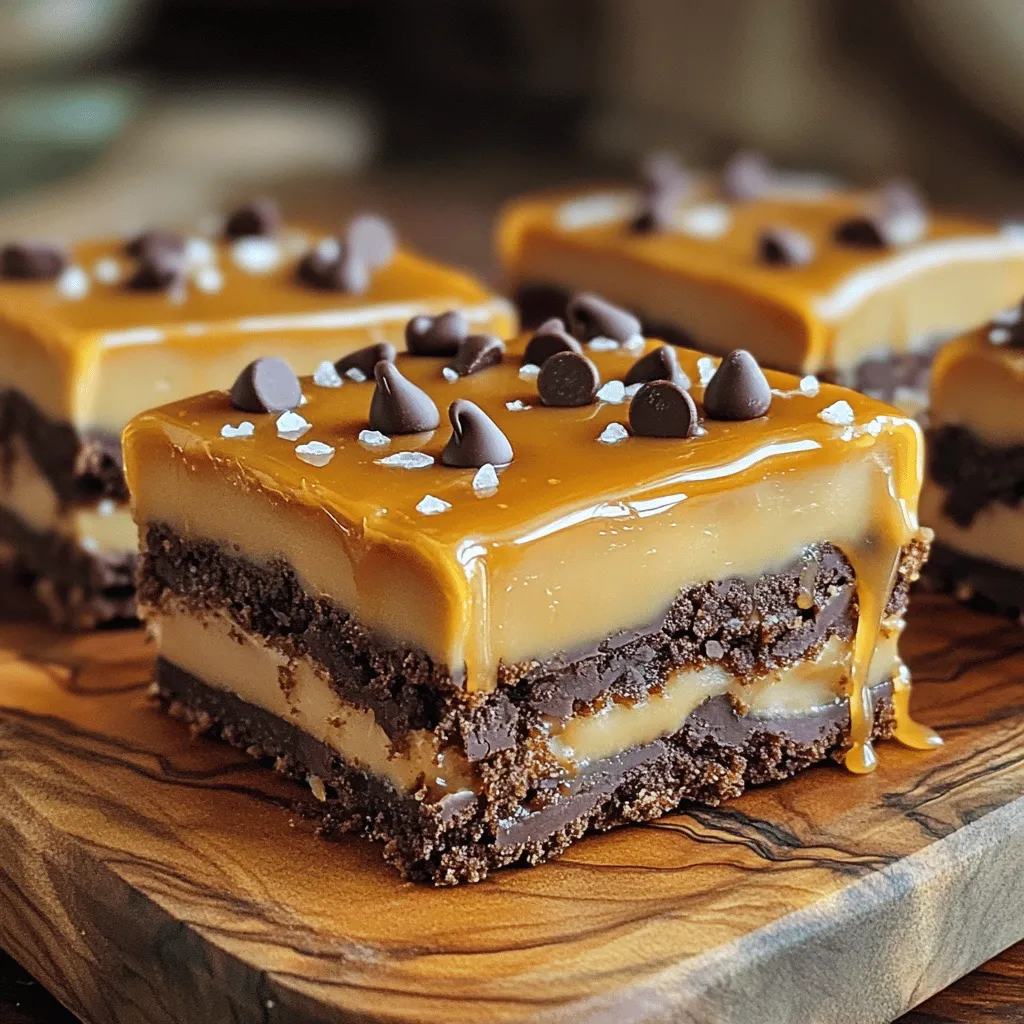
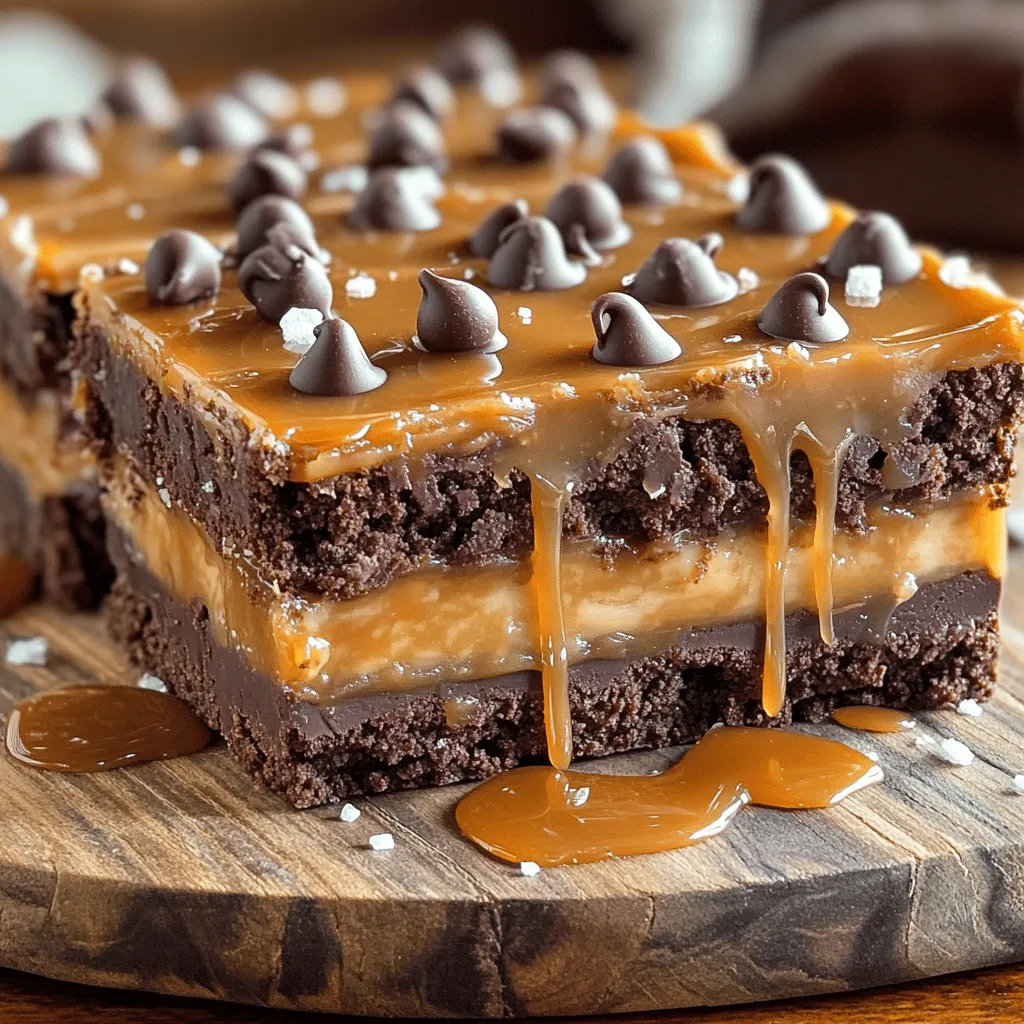
Craving something sweet and savory? These Salted Caramel Bars are the perfect solution! In this recipe, I’ll guide you through simple steps to create a treat that hits all the right notes. With just the right balance of caramel sweetness and a pinch of salt, you’ll impress family and friends. Let’s dive into the world of deliciousness and make a batch together!

Ingredients

List of Ingredients

To make these salted caramel bars, gather these key ingredients:

– 1 ½ cups all-purpose flour

– ½ cup unsweetened cocoa powder

– 1 cup unsalted butter, softened

– ¾ cup white sugar

– ½ cup brown sugar, packed

– 1 teaspoon vanilla extract

– 1 cup sweetened condensed milk

– 1 cup caramel sauce (store-bought or homemade)

– ½ teaspoon sea salt

– ½ teaspoon baking soda

– 1 cup chocolate chips (milk or dark, your choice)

For those with dietary needs, you can substitute some ingredients. Use gluten-free flour if you want a gluten-free version. If you need dairy-free options, try vegan butter and almond milk instead of sweetened condensed milk.

Quality matters in this recipe. Use good-quality caramel sauce for the best taste. I prefer dark chocolate chips for a richer flavor, but milk chocolate works well too. The sea salt should be flaky for a nice texture contrast with the sweet caramel.

For the full recipe, check the details above.

Step-by-Step Instructions

Preparation Steps

1. Preheat your oven to 350°F (175°C). This step warms the oven, ensuring even baking.

2. Prepare your baking dish. Grease a 9×9 inch dish or line it with parchment paper. This makes it easy to lift the bars out later.

3. Mix dry ingredients. In a medium bowl, whisk together 1 ½ cups of flour, ½ cup of cocoa powder, and ½ teaspoon of baking soda. This helps combine them well.

4. Cream the butter and sugars. Take a large bowl and beat 1 cup of softened butter, ¾ cup of white sugar, and ½ cup of brown sugar. Beat until it’s light and fluffy, about 2-3 minutes. You’ll know it’s ready when it looks pale.

5. Add vanilla. Pour in 1 teaspoon of vanilla extract and mix well. This adds depth to your bars.

6. Combine the mixtures. Gradually add the dry mix into the wet mixture. Mix until just combined. Be careful not to over-mix.

7. Press the dough. Take half of the cookie dough and press it evenly into the bottom of your prepared dish. It should cover the bottom well.

8. Make the caramel layer. In another bowl, combine 1 cup of sweetened condensed milk with 1 cup of caramel sauce. Stir until smooth. This will be your creamy layer.

9. Pour the caramel. Carefully pour the caramel mixture over the pressed dough. Spread it evenly with a spatula.

10. Top with dough. Drop spoonfuls of the remaining cookie dough on top of the caramel. Let some caramel show through for a nice look.

11. Add chocolate chips and salt. Sprinkle 1 cup of chocolate chips and ½ teaspoon of sea salt over the top. This makes it extra tasty.

12. Bake the bars. Place the dish in the oven and bake for 25-30 minutes. Look for golden brown edges and a set center.

13. Cool before slicing. Once baked, remove the dish from the oven and let it cool completely. This step is important. If you slice too soon, the bars may fall apart.

Enjoy the process and the sweet aroma filling your kitchen! For the complete recipe, check out the Full Recipe section.

Tips & Tricks

Achieving the Perfect Balance

To find that sweet spot between sweet and salty, I suggest using sea salt. It enhances the flavor without overpowering the dessert. Start with half a teaspoon and adjust to your taste. Remember, you can always add more, but you can’t take it away!

For caramel sauce, you have two great options. You can buy a quality brand like Ghirardelli or make your own from scratch. If you choose homemade, use good butter and brown sugar for the best flavor. It will give you a rich, deep caramel that pairs well with the bars.

When mixing and layering the ingredients, be sure to press the cookie dough firmly into the baking dish. This helps create a strong base. Spread your caramel mixture evenly over this layer. Drop spoonfuls of the remaining dough on top, allowing some caramel to peek through. This creates a nice texture and a beautiful look.

Follow these tips, and you will have salted caramel bars that are both simple and sweet! For the full recipe, check the complete guide above.

Variations

Dietary Alternatives

You can easily change up this salted caramel bars recipe to fit different diets.

To make vegan salted caramel bars, substitute the butter with coconut oil. Use a vegan chocolate chip brand for the topping. Replace sweetened condensed milk with a homemade version made from coconut milk and sugar. This keeps the bars creamy and delicious without dairy.

If you need gluten-free options, swap the all-purpose flour for a gluten-free blend. Almond flour or oat flour can work well too. Just make sure the blend you choose has some binding agents like xanthan gum.

For creative twists, try adding nuts like pecans or walnuts to the cookie layer. You can also switch up the chocolate. Use white chocolate or dark chocolate for a different taste. Each option gives the bars a unique flavor that you will love.

These variations make it easy to enjoy salted caramel bars no matter your dietary needs. Check out the Full Recipe for the base version of these tasty treats!

Storage Info

How to Store Salted Caramel Bars

To keep your salted caramel bars fresh, store them in an airtight container. You can place them in the fridge for up to one week. The cool air helps the caramel stay firm and the bars taste great. If you prefer room temperature, keep them in a cool, dry spot. They will last about three days without refrigeration.

If you want to save some for later, freezing is a great option. Cut the bars into squares and wrap each piece in plastic wrap. Place them in a freezer-safe bag or container. They can stay in the freezer for up to three months. When you want to enjoy them again, let the bars thaw in the fridge overnight.

To maintain texture and flavor, avoid stacking the bars directly on top of each other. Use parchment paper between layers if you need to stack them. This keeps the caramel from sticking to each bar. Also, keep them away from strong odors in the fridge or freezer. Caramel can absorb flavors from other foods.

Remember, these simple steps will help you enjoy your salted caramel bars at their best!

FAQs

How long do salted caramel bars last?

Salted caramel bars can last up to one week. Store them in an airtight container. Keep them in the fridge for the best taste. They also freeze well for up to three months. Just thaw them in the fridge before eating.

Can I use store-bought caramel sauce instead of homemade?

Yes, you can use store-bought caramel sauce. It saves time and still tastes great. Just make sure it’s a quality brand for the best flavor. Homemade sauce adds a special touch, but store-bought works well too.

What’s the best way to cut caramel bars cleanly?

To cut caramel bars cleanly, use a sharp knife. Run the knife under hot water and dry it off before cutting. This helps the knife glide through the bars without pulling or tearing. Clean the knife between cuts for neat pieces.

For the full recipe, check out the Salted Caramel Dream Bars .

In this post, we covered the key ingredients for salted caramel bars, including substitutes for allergens. I shared clear steps for preparation and tips to get the balance right in flavor. Variations like vegan and gluten-free options allow everyone to enjoy these treats. We also discussed storage methods to keep them fresh.

Remember, the right ingredients and proper storage make all the difference. Enjoy your baking!

To make these salted caramel bars, gather these key ingredients: - 1 ½ cups all-purpose flour - ½ cup unsweetened cocoa powder - 1 cup unsalted butter, softened - ¾ cup white sugar - ½ cup brown sugar, packed - 1 teaspoon vanilla extract - 1 cup sweetened condensed milk - 1 cup caramel sauce (store-bought or homemade) - ½ teaspoon sea salt - ½ teaspoon baking soda - 1 cup chocolate chips (milk or dark, your choice) For those with dietary needs, you can substitute some ingredients. Use gluten-free flour if you want a gluten-free version. If you need dairy-free options, try vegan butter and almond milk instead of sweetened condensed milk. Quality matters in this recipe. Use good-quality caramel sauce for the best taste. I prefer dark chocolate chips for a richer flavor, but milk chocolate works well too. The sea salt should be flaky for a nice texture contrast with the sweet caramel. For the full recipe, check the details above. 1. Preheat your oven to 350°F (175°C). This step warms the oven, ensuring even baking. 2. Prepare your baking dish. Grease a 9x9 inch dish or line it with parchment paper. This makes it easy to lift the bars out later. 3. Mix dry ingredients. In a medium bowl, whisk together 1 ½ cups of flour, ½ cup of cocoa powder, and ½ teaspoon of baking soda. This helps combine them well. 4. Cream the butter and sugars. Take a large bowl and beat 1 cup of softened butter, ¾ cup of white sugar, and ½ cup of brown sugar. Beat until it’s light and fluffy, about 2-3 minutes. You’ll know it’s ready when it looks pale. 5. Add vanilla. Pour in 1 teaspoon of vanilla extract and mix well. This adds depth to your bars. 6. Combine the mixtures. Gradually add the dry mix into the wet mixture. Mix until just combined. Be careful not to over-mix. 7. Press the dough. Take half of the cookie dough and press it evenly into the bottom of your prepared dish. It should cover the bottom well. 8. Make the caramel layer. In another bowl, combine 1 cup of sweetened condensed milk with 1 cup of caramel sauce. Stir until smooth. This will be your creamy layer. 9. Pour the caramel. Carefully pour the caramel mixture over the pressed dough. Spread it evenly with a spatula. 10. Top with dough. Drop spoonfuls of the remaining cookie dough on top of the caramel. Let some caramel show through for a nice look. 11. Add chocolate chips and salt. Sprinkle 1 cup of chocolate chips and ½ teaspoon of sea salt over the top. This makes it extra tasty. 12. Bake the bars. Place the dish in the oven and bake for 25-30 minutes. Look for golden brown edges and a set center. 13. Cool before slicing. Once baked, remove the dish from the oven and let it cool completely. This step is important. If you slice too soon, the bars may fall apart. Enjoy the process and the sweet aroma filling your kitchen! For the complete recipe, check out the Full Recipe section. To find that sweet spot between sweet and salty, I suggest using sea salt. It enhances the flavor without overpowering the dessert. Start with half a teaspoon and adjust to your taste. Remember, you can always add more, but you can't take it away! For caramel sauce, you have two great options. You can buy a quality brand like Ghirardelli or make your own from scratch. If you choose homemade, use good butter and brown sugar for the best flavor. It will give you a rich, deep caramel that pairs well with the bars. When mixing and layering the ingredients, be sure to press the cookie dough firmly into the baking dish. This helps create a strong base. Spread your caramel mixture evenly over this layer. Drop spoonfuls of the remaining dough on top, allowing some caramel to peek through. This creates a nice texture and a beautiful look. Follow these tips, and you will have salted caramel bars that are both simple and sweet! For the full recipe, check the complete guide above. {{image_2}} You can easily change up this salted caramel bars recipe to fit different diets. To make vegan salted caramel bars, substitute the butter with coconut oil. Use a vegan chocolate chip brand for the topping. Replace sweetened condensed milk with a homemade version made from coconut milk and sugar. This keeps the bars creamy and delicious without dairy. If you need gluten-free options, swap the all-purpose flour for a gluten-free blend. Almond flour or oat flour can work well too. Just make sure the blend you choose has some binding agents like xanthan gum. For creative twists, try adding nuts like pecans or walnuts to the cookie layer. You can also switch up the chocolate. Use white chocolate or dark chocolate for a different taste. Each option gives the bars a unique flavor that you will love. These variations make it easy to enjoy salted caramel bars no matter your dietary needs. Check out the Full Recipe for the base version of these tasty treats! To keep your salted caramel bars fresh, store them in an airtight container. You can place them in the fridge for up to one week. The cool air helps the caramel stay firm and the bars taste great. If you prefer room temperature, keep them in a cool, dry spot. They will last about three days without refrigeration. If you want to save some for later, freezing is a great option. Cut the bars into squares and wrap each piece in plastic wrap. Place them in a freezer-safe bag or container. They can stay in the freezer for up to three months. When you want to enjoy them again, let the bars thaw in the fridge overnight. To maintain texture and flavor, avoid stacking the bars directly on top of each other. Use parchment paper between layers if you need to stack them. This keeps the caramel from sticking to each bar. Also, keep them away from strong odors in the fridge or freezer. Caramel can absorb flavors from other foods. Remember, these simple steps will help you enjoy your salted caramel bars at their best! Salted caramel bars can last up to one week. Store them in an airtight container. Keep them in the fridge for the best taste. They also freeze well for up to three months. Just thaw them in the fridge before eating. Yes, you can use store-bought caramel sauce. It saves time and still tastes great. Just make sure it’s a quality brand for the best flavor. Homemade sauce adds a special touch, but store-bought works well too. To cut caramel bars cleanly, use a sharp knife. Run the knife under hot water and dry it off before cutting. This helps the knife glide through the bars without pulling or tearing. Clean the knife between cuts for neat pieces. For the full recipe, check out the Salted Caramel Dream Bars . In this post, we covered the key ingredients for salted caramel bars, including substitutes for allergens. I shared clear steps for preparation and tips to get the balance right in flavor. Variations like vegan and gluten-free options allow everyone to enjoy these treats. We also discussed storage methods to keep them fresh. Remember, the right ingredients and proper storage make all the difference. Enjoy your baking!

- Salted Caramel Bars

Indulge your sweet tooth with these irresistible Salted Caramel Dream Bars! This easy recipe combines rich cocoa, creamy caramel, and a hint of sea salt to create a dessert that's perfect for any occasion. With just 15 minutes of prep time, you can whip up these delightful treats that will wow your friends and family. Ready to satisfy your cravings? Click through to explore the full recipe and impress everyone with your baking skills!

Ingredients
  

1 ½ cups all-purpose flour

½ cup unsweetened cocoa powder

1 cup unsalted butter, softened

¾ cup white sugar

½ cup brown sugar, packed

1 teaspoon vanilla extract

1 cup sweetened condensed milk

1 cup caramel sauce (store-bought or homemade)

½ teaspoon sea salt

½ teaspoon baking soda

1 cup chocolate chips (milk or dark, your choice)

Instructions
 

Preheat your oven to 350°F (175°C). Grease a 9x9 inch baking dish or line it with parchment paper for easy removal.

    In a medium bowl, whisk together the flour, cocoa powder, and baking soda. Set aside.

      In a large mixing bowl, beat the softened butter, white sugar, and brown sugar until light and fluffy, about 2-3 minutes.

        Add the vanilla extract and mix well.

          Gradually add the dry ingredients to the wet mixture and mix until just combined.

            Press half of the cookie dough mixture evenly into the bottom of the prepared baking dish.

              In another bowl, combine the sweetened condensed milk and caramel sauce. Stir until well mixed.

                Pour the caramel mixture over the pressed cookie layer in the baking dish, spreading it evenly with a spatula.

                  Drop spoonfuls of the remaining cookie dough over the caramel layer. It’s okay if some caramel shows through.

                    Sprinkle chocolate chips and sea salt over the top layer of cookie dough.

                      Bake in the preheated oven for 25-30 minutes, or until the edges are golden brown and the center is set.

                        Remove from the oven and allow to cool completely in the baking dish before slicing into bars.

                          Prep Time: 15 minutes | Total Time: 1 hour | Servings: 16 bars

                            Presentation Tips: Serve these decadent bars on a platter, garnished with a sprinkle of sea salt for a gourmet touch. Optionally, drizzle additional caramel sauce over the top before serving.

                              Leave a Comment

                              Recipe Rating