Skip to content
DisclaimerTerms Of UseGDPR PolicyCookie Policy

pureeatsnow

  • Home
  • Drinks
  • Appetizers
  • Dinner
  • Dessert
  • About
  • Contact
  • Privacy Policy
DisclaimerTerms Of UseGDPR PolicyCookie Policy

NO-ING-IMG

- 4 boneless, skinless chicken breasts - 2 cups fresh spinach, chopped - 1 cup cream cheese, softened - 1/2 cup grated Parmesan cheese - 1 teaspoon garlic powder - 1 teaspoon onion powder - Salt and pepper to taste - 1 tablespoon olive oil - 1/2 cup breadcrumbs - Fresh herbs (like parsley or basil) for garnish This recipe uses simple ingredients that pack a lot of flavor. The chicken breasts are the stars, providing a tasty canvas. The fresh spinach adds nutrition and color. Cream cheese and Parmesan give the filling a rich and creamy texture. Garlic and onion powder round out the taste nicely. The olive oil helps sauté the spinach and keeps the chicken moist as it bakes. Breadcrumbs give a nice crunch on top. Fresh herbs add a lovely finish that brightens the dish. When selecting your ingredients, always pick the freshest spinach and finest cheeses. This choice makes a big difference in taste. You can easily personalize these ingredients. Try using feta cheese instead of Parmesan or add other spices to suit your taste. Every ingredient plays a role, creating a wonderful harmony in each bite. Enjoy making this creamy spinach stuffed chicken breast! {{ingredient_image_1}} 1. Preheat your oven to 375°F (190°C). This helps the chicken cook evenly. 2. In a skillet, add 1 tablespoon of olive oil. Heat it over medium heat. 3. Sauté 2 cups of chopped spinach in the oil for about 2-3 minutes. The spinach should look wilted and bright green. 4. In a bowl, mix the sautéed spinach with 1 cup of softened cream cheese, 1/2 cup of grated Parmesan cheese, 1 teaspoon of garlic powder, 1 teaspoon of onion powder, and a pinch of salt and pepper. Stir until everything blends well. 1. Take 4 boneless, skinless chicken breasts and pat them dry with a paper towel. This helps the filling stick better. 2. Using a sharp knife, make a cut along the side of each chicken breast. This creates a pocket for the filling. 3. Stuff each chicken breast with the creamy spinach mixture. Fill them generously but don’t overstuff. Secure the opening with toothpicks if needed to keep the filling inside. 1. Place the stuffed chicken breasts in a baking dish. Make sure they have enough space. 2. Sprinkle 1/2 cup of breadcrumbs over the top for a crispy finish. This adds great texture. 3. Bake in your preheated oven for 25-30 minutes. Check the chicken’s internal temperature. It should reach 165°F (75°C) to be safe to eat. Enjoy the cooking process! You will love how this dish fills your kitchen with mouthwatering aromas. - Always pat the chicken dry. This step helps the chicken brown better. - To check for doneness, use a meat thermometer. The chicken should reach 165°F. When you check the chicken, insert the thermometer into the thickest part. This ensures the meat is cooked through. If you don’t have a thermometer, you can cut into the chicken. The juices should run clear, not pink. - For side dishes, serve with sautéed vegetables or roasted potatoes. These pair nicely with the creamy chicken. - Garnish the dish with fresh herbs like parsley or basil. It adds color and flavor. You can also drizzle a bit of olive oil over the chicken for an extra touch. This makes the dish look more appealing and adds a nice richness. Serve it on a colorful plate to impress your guests. Pro Tips Choosing the Right Chicken: Opt for chicken breasts that are similar in size to ensure even cooking. Making the Filling Creamier: For an extra creaminess, consider adding a splash of heavy cream or sour cream to the spinach mixture. Perfectly Crispy Topping: For added crunch, mix some grated Parmesan into the breadcrumbs before sprinkling them on top. Resting is Key: Let the chicken rest for a few minutes after baking to help retain the juices for a more tender bite. {{image_2}} You can get creative with your creamy spinach stuffed chicken breast. Here are some easy swaps: - Alternative cheeses or greens: Try using ricotta or feta cheese instead of cream cheese. You can also mix in kale or arugula for a different taste. - Additional spices or flavorings: Add a pinch of red pepper flakes for heat or a squeeze of lemon juice for brightness. A touch of nutmeg can give the filling a warm flavor. Many people have different diets. You can easily adjust this recipe: - Keto or low-carb options: Use zucchini noodles or cauliflower rice as a side. You can skip the breadcrumbs or use almond flour for a crunchy top. - Dairy-free variations: Substitute cream cheese with a dairy-free version, like cashew cream. Nutritional yeast can add a cheesy flavor without dairy. These variations help you fit this dish to your taste and diet. Enjoy the creamy spinach stuffed chicken your way! To keep your creamy spinach stuffed chicken fresh, follow these tips. First, let the chicken cool completely before storing. Place it in an airtight container. This method helps keep the moisture in and prevents bad smells. You can also wrap each piece in plastic wrap for extra protection. In the fridge, this dish lasts about 3 to 4 days. If you want to enjoy it later, consider freezing it for longer storage. Freezing stuffed chicken is simple. First, let the cooked chicken cool down. Wrap each piece in plastic wrap and then in aluminum foil. This double layer keeps the air out and preserves the flavor. You can also use a freezer-safe bag. Make sure to squeeze out any air before sealing. When you're ready to eat, thaw the chicken in the fridge overnight. For reheating, place it in an oven set to 350°F (175°C) until heated through. This method keeps the chicken tender and moist. Enjoy your delicious meal again! Can I use frozen spinach? Yes, you can use frozen spinach. Just make sure to thaw it first. Squeeze out any extra water. This keeps your filling from being too wet. It will still taste great! What temperature should the chicken reach? The chicken needs to reach an internal temperature of 165°F (75°C). This ensures it is safe to eat. Use a meat thermometer for best results. Why is my chicken dry? If your chicken is dry, it could be overcooked. Always check the temperature. Cook it just until it reaches 165°F (75°C). Let it rest for a few minutes before cutting. This helps keep the juices inside. How do I fix a broken sauce? If your sauce is broken, try adding a little cream cheese. This can help bring it back together. Whisk it in slowly over low heat until smooth. This blog post outlined a delicious stuffed chicken recipe. We covered the list of ingredients, preparation steps, baking instructions, and helpful tips. I also shared variations and storage info to make meal prep easy. Remember, you can adjust flavors to suit your taste. Enjoy honing your cooking skills and impressing others with this dish. Happy cooking!

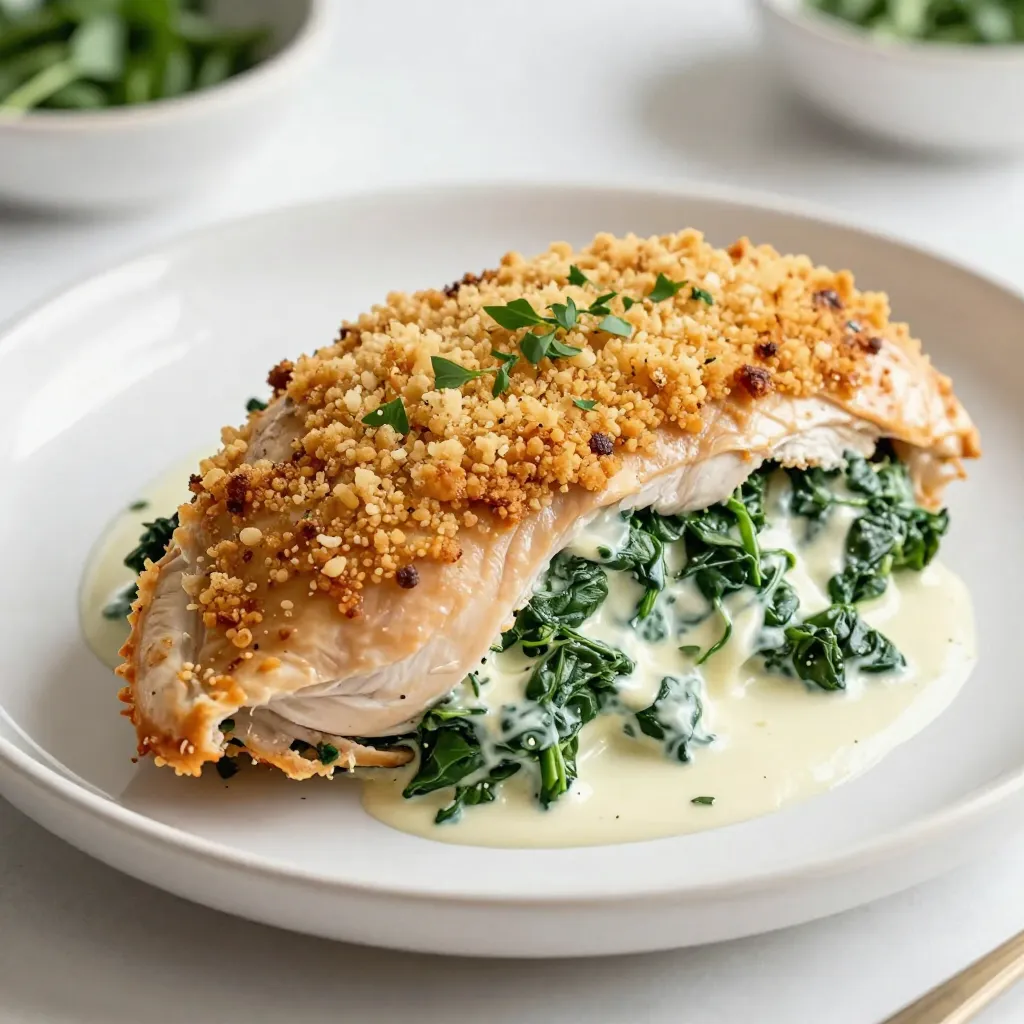
Creamy Spinach Stuffed Chicken Breast Flavorful Delight

Are you ready to impress your family with a dish that screams comfort? This Creamy Spinach Stuffed Chicken Breast is

- 1 cup unsalted butter, melted - 2 cups granulated sugar - 4 large eggs - 1 teaspoon vanilla extract - 1 cup all-purpose flour - 1 cup unsweetened cocoa powder - 1/2 teaspoon baking powder - 1/2 teaspoon salt - 1 cup semi-sweet chocolate chips - 1 cup mini marshmallows - 1 cup graham cracker crumbs - 1/2 cup chocolate sauce (for drizzling on top) - Importance of using unsalted butter: Unsalted butter gives you control over the salt in your recipe. You can adjust salt levels to taste. It also lets the sweet flavors shine more. - Benefits of semi-sweet chocolate chips: Semi-sweet chocolate chips balance the sweetness of the brownie pie. They melt well and add rich chocolate flavor. - Alternative ingredients for dietary preferences: You can use coconut oil instead of butter for a dairy-free option. Almond flour works for a gluten-free version. Dark chocolate chips also add a deeper flavor. {{ingredient_image_1}} - Preheat your oven to 350°F (175°C). - Lightly grease a 9-inch pie dish or round pan with butter. - In a large bowl, mix melted butter with granulated sugar until smooth. - Add four large eggs, one at a time. Mix well after each egg. - Stir in one teaspoon of vanilla extract for flavor. - In a separate bowl, whisk together one cup of flour, one cup of cocoa powder, half a teaspoon of baking powder, and half a teaspoon of salt. - Gradually add this dry mixture into the wet mixture. Stir until just combined. - Fold in one cup of semi-sweet chocolate chips. Make sure they spread evenly. - Pour half of the brownie batter into the greased pie dish. Spread it out evenly. - Sprinkle one cup of graham cracker crumbs over the brownie layer. - Next, add one cup of mini marshmallows on top of the crumbs. - Pour the remaining brownie batter over the marshmallows. Smooth it out with a spatula. - Bake in the oven for 30 to 35 minutes. Use a toothpick to check doneness; it should have moist crumbs. - After baking, remove the pie from the oven. Let it cool for ten minutes. - Drizzle half a cup of chocolate sauce on top while still warm. - Cut into slices and serve warm or at room temperature. Enjoy the gooey marshmallows! - Testing doneness with a toothpick: When baking, insert a toothpick into the center of the pie. If it comes out with moist crumbs, the pie is ready. If it has wet batter on it, give it more time in the oven. - How to avoid overmixing: Mix your ingredients just until they combine. Overmixing can make the pie tough. You want a smooth batter, but lumps are okay. - Best ways to drizzle chocolate sauce: Use a squeeze bottle for easy drizzling. Start from one side and move to the other in quick strokes. This gives a nice, even look. - Ideal serving suggestions: Serve warm for the best gooey experience. Pair with vanilla ice cream or whipped cream for extra delight. - How to store leftovers properly: Wrap the pie tightly in plastic wrap. Store it in an airtight container in your fridge. This keeps it fresh for up to three days. - Reheating suggestions to maintain gooeyness: Reheat slices in the microwave for about 10-15 seconds. This keeps the marshmallows soft and gooey. Enjoy it warm for the best taste. Pro Tips Use Quality Chocolate: Opt for high-quality semi-sweet chocolate chips for a richer flavor that enhances the brownie base. Don't Overbake: Keep a close eye on the baking time; removing the pie when there are moist crumbs on the toothpick ensures a fudgy texture. Layering Tips: For an even distribution of flavors, layer marshmallows and graham crackers evenly to ensure every bite has the classic s'mores experience. Serve Warm: For the ultimate indulgence, serve the pie warm with gooey marshmallows and a drizzle of chocolate sauce on top. {{image_2}} You can make this pie even more fun by adding nuts for crunch. Walnuts or pecans work well. They add texture and flavor. You can also try using flavored chocolate chips. Mint chips or peanut butter chips give a new twist. If you need gluten-free options, use a gluten-free flour blend. It works well in this recipe. For dairy-free alternatives, try coconut oil instead of butter. You can also use dairy-free chocolate chips. They melt nicely and taste great. Seasonal fruits can bring fresh flavors to your dessert. Try adding chopped strawberries or raspberries. They add a nice tartness. You can also create themed variations for holidays. For Halloween, use orange sprinkles. For Christmas, add crushed peppermint on top. To keep your S’mores Brownie Pie fresh, use an airtight container. This helps lock in moisture and flavor. If you store it properly, this pie can stay tasty for about four days at room temperature. If you want it to last longer, consider the freezer. To freeze your S’mores Brownie Pie, cut it into slices first. Wrap each slice tightly in plastic wrap. Then, place them in a freezer-safe bag or container. This way, they stay fresh for about three months. When you want a slice, take it out and thaw it in the fridge overnight. If you're in a hurry, you can leave it at room temp for a few hours. To reheat, just pop it in the microwave for about 20 seconds. Enjoy that warm, gooey goodness! How do I know when the S’mores Brownie Pie is done? You can tell the pie is done when a toothpick comes out with moist crumbs. It should not have wet batter. The edges may look set while the center stays soft. Can I make this dessert in advance? Yes, you can make this dessert in advance. Just cool it and cover it well. Store it at room temperature or in the fridge. What if I don’t have chocolate sauce? If you don't have chocolate sauce, use melted chocolate instead. A simple ganache works well too. You can melt chocolate chips with a bit of cream to make it smooth. Can I use white sugar instead of granulated sugar? Yes, you can use white sugar instead of granulated sugar. They are very similar. Just keep the same amount in the recipe. What can I replace mini marshmallows with? You can replace mini marshmallows with large marshmallows, cut into pieces. You can also use a marshmallow fluff if you want a spreadable option. What goes well with S'mores Brownie Pie? This dessert pairs well with vanilla ice cream or whipped cream. You can also serve it with fresh berries for a fruity touch. Can it be served chilled or only warm? You can serve it warm or at room temperature. Warm slices keep the marshmallows gooey, but it tastes great chilled too. This recipe for S'mores Brownie Pie guides you through each step. You learned the key ingredients, from unsalted butter to chocolate chips. The instructions made mixing and baking easy. I shared helpful tips for perfecting your pie and storing leftovers. You can customize this dessert with flavors and dietary options to suit your taste. Enjoy making this gooey treat and delighting your friends and family! Your baking skills will shine with this delicious pie.

S’mores Brownie Pie Irresistible Dessert Delight

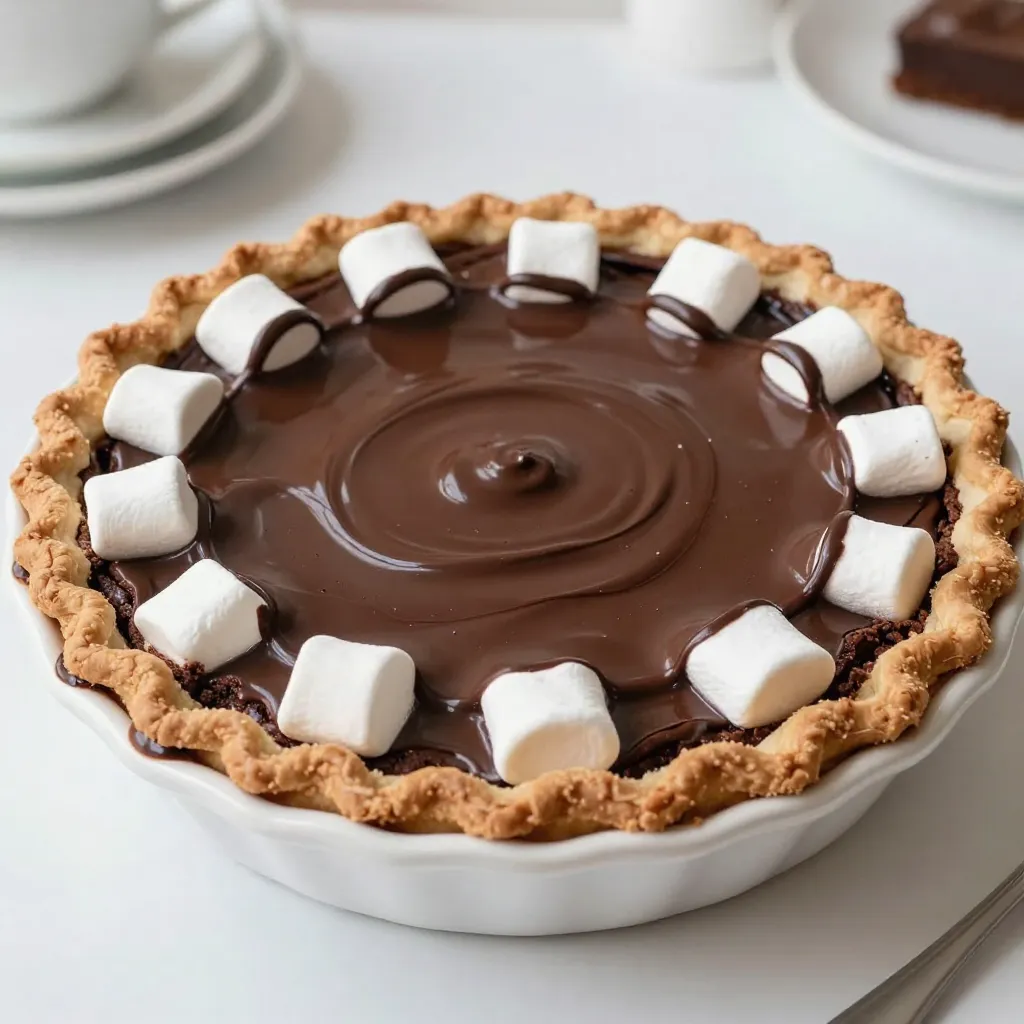
Are you ready for a dessert that combines the best of brownies and s’mores? The S’mores Brownie Pie is an

- 1 cup natural peanut butter (smooth) - 1/2 cup honey or maple syrup - 1/3 cup coconut sugar (or brown sugar) - 1 teaspoon vanilla extract - 1 cup rolled oats - 1/2 cup almond flour (or whole wheat flour) - 1/2 teaspoon baking soda - 1/4 teaspoon salt - 1/2 cup dark chocolate chips (dairy-free if preferred) - 1/4 cup chopped nuts (optional, e.g., walnuts or pecans) - 1/4 cup shredded coconut (optional) When it comes to making Peanut Butter Chocolate Chip Energy Cookies, choosing the right ingredients is key. I love using natural peanut butter because it offers rich flavor and healthy fats. You can use either honey or maple syrup for sweetness. Both work well, but honey gives a nice chewiness. Coconut sugar or brown sugar adds a hint of caramel flavor. I always add a touch of vanilla extract to enhance the taste. For a hearty base, rolled oats are perfect. They provide texture and fiber, making these cookies satisfying. Almond flour is my go-to for a nutty flavor and a gluten-free option. If you prefer whole wheat flour, that works great too. Baking soda helps the cookies rise, while a pinch of salt balances the sweetness. Now, let’s talk about chocolate! Dark chocolate chips are my favorite, and they melt beautifully. If you want a dairy-free option, look for dairy-free chocolate chips. You can also customize your cookies with optional mix-ins. I love adding nuts for crunch, like walnuts or pecans. Shredded coconut gives a tropical twist. These ingredients make each bite exciting. {{ingredient_image_1}} First, preheat your oven to 350°F (175°C). This temperature helps the cookies bake evenly. Next, line your baking sheet with parchment paper. This step keeps the cookies from sticking and makes cleanup easy. In a large bowl, combine 1 cup of natural peanut butter, 1/2 cup of honey or maple syrup, 1/3 cup of coconut sugar, and 1 teaspoon of vanilla extract. Stir these ingredients together until you have a smooth mixture. This mix gives the cookies their rich flavor and sweetness. In another bowl, mix 1 cup of rolled oats, 1/2 cup of almond flour, 1/2 teaspoon of baking soda, and 1/4 teaspoon of salt. This dry mix gives the cookies their structure. Make sure to stir well so everything combines. Now, slowly add the dry mix to your wet ingredients. Stir until everything melds together. Gently fold in 1/2 cup of dark chocolate chips. You can also add any optional ingredients, like 1/4 cup of chopped nuts or 1/4 cup of shredded coconut for extra texture. Once mixed, use a tablespoon or cookie scoop to portion out small balls of dough. Place them on your baking sheet, about 2 inches apart. Flatten each cookie slightly with your palm. This step helps them bake evenly. Bake the cookies in your preheated oven for 10 to 12 minutes. Look for the edges to turn golden brown. This color means they are ready. Once they are done, let the cookies cool on the baking sheet for about 5 minutes. Then, transfer them to a wire rack to cool completely. Enjoy your warm, tasty energy cookies! To get the best texture in your cookies, you may need to adjust the baking time. Every oven runs a bit different. Start checking your cookies after 10 minutes. The edges should be golden, but the center can look soft. This is okay! Flattening your cookies is key. Before you bake, press each ball down slightly. This helps them spread evenly and cook through. Use the back of a fork or your palm. If you need a gluten-free option, swap almond flour for a gluten-free flour blend. This makes your cookies safe for those with gluten allergies. For a vegan version, use maple syrup instead of honey. Choose dairy-free chocolate chips too. This way, everyone can enjoy these tasty treats! To boost the flavor, try adding spices like cinnamon. Just a pinch can make a big difference. Using different nut butters can also change the taste. Almond or cashew butter can add new flavors to your cookies. This keeps your snacks interesting and delicious! Pro Tips Use Natural Peanut Butter: Choose a natural peanut butter without added sugars or oils for the best flavor and texture. Experiment with Sweeteners: Feel free to substitute honey with maple syrup or adjust the amount of coconut sugar to suit your taste preference. Chill the Dough: For thicker cookies, chill the dough for 30 minutes before baking to help them hold their shape. Store Properly: Keep your cookies in an airtight container at room temperature for up to a week, or freeze for longer storage. {{image_2}} If you need a nut-free version of these cookies, try sunflower seed butter. It tastes great and works well in the recipe. You can also use soy nut butter or pumpkin seed butter. These options keep the cookies nut-free while still being tasty and satisfying. You can mix things up with different flavor add-ins. Try using white chocolate chips or butterscotch chips for a sweet twist. You can also add spices like cinnamon or nutmeg to enhance the flavor. A few drops of almond or coconut extract can give your cookies a unique taste that everyone will love. You can make these cookies in different sizes and shapes. For mini cookies, scoop smaller amounts of dough and adjust the baking time to about 8-10 minutes. If you want bars, spread the dough in a lined baking dish. Bake for 15-18 minutes and cut into squares. This way, you can enjoy your cookies just the way you like them! To keep your Peanut Butter Chocolate Chip Energy Cookies fresh, use an airtight container. Store them at room temperature for up to a week. For longer storage, refrigeration is a good choice. This method can keep them fresh for up to two weeks. If you want to store them even longer, freezing is ideal. Just put them in a freezer-safe bag or container. In an airtight container at room temperature, these cookies last about one week. If you refrigerate them, they stay good for about two weeks. When frozen, they can last for up to three months. Just remember to label your containers with the date. This way, you won’t forget how long they’ve been stored. To refresh your cookies, preheat your oven to 350°F (175°C). Place cookies on a baking sheet for about 5 minutes. This step warms them and revives their soft texture. You can also use the microwave. Heat them for just 10-15 seconds. Keep an eye on them to avoid overheating. Enjoy these tasty treats warm for the best flavor! Yes, you can use crunchy peanut butter. It gives the cookies a nice texture. The flavor will stay the same, but you will have bits of nuts in every bite. This change can make your cookies even more fun to eat. To make these cookies vegan, swap honey for maple syrup. Ensure the chocolate chips are dairy-free. Use almond flour or whole wheat flour, as both are vegan. This way, you can enjoy delicious cookies without any animal products. Yes, you can make these cookies gluten-free. Use almond flour instead of whole wheat flour. Check that your oats are certified gluten-free. This way, everyone can enjoy these tasty treats without worry. Each cookie has about 120 calories. It contains healthy fats from peanut butter, protein, and fiber from oats. The dark chocolate adds a bit of sweetness and antioxidants. Always check the labels for exact nutritional values based on your ingredients. Yes, you can freeze the cookie dough. Scoop the dough into balls and place them on a tray. Freeze until solid, then transfer to a freezer bag. When ready to bake, just add a couple of extra minutes to the baking time. We covered how to make Peanut Butter Chocolate Chip Energy Cookies from start to finish. You learned about the key ingredients like peanut butter, honey, and oats. I shared step-by-step instructions, plus tips for perfect texture and flavor. You can customize your cookies with dietary needs and various add-ins. Store them well to keep them fresh. These cookies are simple to make and delicious to enjoy. Dive in and create your own batch for a tasty snack!

Peanut Butter Chocolate Chip Energy Cookies Delight

Looking for a snack that fuels your day? Peanut Butter Chocolate Chip Energy Cookies are here to satisfy your cravings!

- 1 pound chicken tenderloins - 1 cup buttermilk - 1 tablespoon hot sauce (like Tabasco) - 1 cup all-purpose flour - 2 tablespoons Cajun seasoning - 1 teaspoon paprika - 1 teaspoon garlic powder - 1 teaspoon onion powder - 1 teaspoon black pepper - 1/2 teaspoon salt To make spicy Cajun chicken tenders, we start with chicken tenderloins. These pieces are tender and cook quickly. They soak in a mix of buttermilk and hot sauce. This marinade gives the chicken its moist texture and a spicy kick. Next, we mix our seasoning blend. It includes Cajun seasoning, paprika, garlic powder, onion powder, black pepper, and salt. This blend brings flavor and a bit of heat. You can adjust the seasoning to fit your taste. - Vegetable oil for frying - Dipping sauce suggestions (like ranch or spicy aioli) For frying, we need vegetable oil. It helps turn our chicken golden brown and crispy. You can choose your favorite dipping sauces to serve with the tenders. Ranch pairs well, but spicy aioli adds an extra kick. These ingredients come together to create a dish that is not only easy to make but also full of flavor. {{ingredient_image_1}} - Combine Buttermilk and Hot Sauce In a bowl, mix 1 cup of buttermilk with 1 tablespoon of hot sauce. This mix gives the chicken a kick. - Submerge Chicken Tenderloins Add 1 pound of chicken tenderloins into the bowl. Make sure all the chicken is covered. Cover the bowl and place it in the fridge. Let it marinate for at least 1 hour. For more flavor, leave it overnight. - Mix Flour and Seasonings In a large shallow dish, combine 1 cup of all-purpose flour with 2 tablespoons of Cajun seasoning, 1 teaspoon of paprika, 1 teaspoon of garlic powder, 1 teaspoon of onion powder, 1 teaspoon of black pepper, and 1/2 teaspoon of salt. Mix well. - Create a Dredging Station Set up your dredging station. Place the seasoned flour mix next to the bowl of marinated chicken. This will make it easy to coat each piece. - Heat the Oil to the Right Temperature In a deep skillet, pour enough vegetable oil for frying, about 1 inch deep. Heat the oil over medium-high heat until it reaches 350°F (175°C). Use a thermometer for accuracy. - Dredge and Fry the Chicken Take each chicken tender from the buttermilk. Let the extra liquid drip off. Dredge it in the flour mix, coating all sides. Shake off any excess flour. Carefully place the chicken in the hot oil. Fry in batches for about 4-5 minutes on each side. The chicken should be golden brown and reach an internal temperature of 165°F (75°C). Use a meat thermometer to check. To make your chicken tenders crispy, start with marinating them in buttermilk. This adds flavor and moisture. Keep the chicken in the marinade for at least one hour. If you have time, let it sit overnight. This gives the chicken more flavor and keeps it juicy. Next, heat your oil to the right temperature. Aim for 350°F (175°C). If the oil is too cold, the chicken will soak up oil. If it’s too hot, the outside will burn before the inside cooks. Use a thermometer for accuracy. Using a meat thermometer is key. Insert it into the thickest part of a chicken tender. Make sure it reads 165°F (75°C) to ensure safety. This helps you avoid undercooked chicken. Fry the chicken in batches. Overcrowding the pan lowers the oil temperature. This can lead to soggy tenders. Cook in small groups, so each piece gets the right amount of heat. This guarantees a perfect crunch every time. Pro Tips Marination Time Matters: For the best flavor, marinate the chicken tenders overnight. This allows the spices to penetrate the meat, resulting in tender and flavorful chicken. Temperature Check: Always use a meat thermometer to check the internal temperature. Chicken should reach 165°F (75°C) to ensure it is safe to eat. Oil Temperature: Ensure the oil is hot enough before frying. If the oil is too cool, the chicken will absorb more oil and become greasy. Aim for 350°F (175°C). Batch Frying: Fry the chicken in small batches to avoid overcrowding the pan. This helps maintain the oil temperature and ensures even cooking and crispiness. {{image_2}} Mild Option To make these chicken tenders mild, use less Cajun seasoning. Reduce it to 1 tablespoon. You can also skip the hot sauce in the marinade. This will keep the flavor rich without the heat. Extra Spicy Option For heat lovers, add more hot sauce to the marinade. Use 2 tablespoons instead of 1. You can also increase the Cajun seasoning to 3 tablespoons. This will give your tenders a real kick! Panko Crust If you want a crunchier bite, try using panko breadcrumbs. Mix panko with the flour and seasonings. This will add extra texture to your chicken tenders. Just ensure they are well coated before frying. Oven-Baked Version For a healthier option, bake the chicken tenders instead of frying. Preheat your oven to 400°F (200°C). Place the breaded chicken on a baking sheet lined with parchment paper. Bake for about 20-25 minutes. Flip halfway for even cooking. This gives a crispy texture without all the oil. - Refrigeration Guidelines: Store leftover chicken tenders in an airtight container. They will stay fresh for up to 3 days in the fridge. Make sure they cool down to room temperature before sealing. - Freezing Tips: If you want to keep them longer, freeze the chicken tenders. Place them in a single layer on a baking sheet and freeze for 1 hour. Once frozen, transfer them to a freezer bag. They can last up to 3 months in the freezer. - Best Methods for Reheating: To reheat, use an oven for the best results. Preheat your oven to 375°F (190°C). Place the tenders on a baking sheet and bake for about 10-15 minutes. This keeps them crispy. You can also use an air fryer at 350°F (175°C) for about 5-7 minutes. Avoid the microwave, as it can make them soggy. Cajun seasoning is a blend of spices that adds a bold flavor. Common ingredients include: - Paprika - Garlic powder - Onion powder - Black pepper - Cayenne pepper - Oregano - Thyme This mix gives Cajun dishes their distinct taste. You can adjust the spices to suit your taste. Yes, you can bake these chicken tenders for a healthier option. Here’s how: 1. Preheat your oven to 425°F (220°C). 2. Prepare the chicken as you normally would, coating them in the seasoned flour. 3. Place the chicken tenders on a baking sheet lined with parchment paper. 4. Spray or brush them lightly with oil. 5. Bake for about 20-25 minutes, flipping halfway through. Make sure they reach 165°F (75°C) for safety. To make these chicken tenders gluten-free, you can use these substitutions: - Swap all-purpose flour for gluten-free flour or almond flour. - Use gluten-free hot sauce. - Ensure your Cajun seasoning is gluten-free. These changes keep the flavor while making the dish safe for gluten-sensitive eaters. You learned how to make delicious chicken tenders with the right ingredients and steps. Marinating the chicken in buttermilk and hot sauce makes it taste great. Use proper frying techniques for a perfect crunch. You can also adjust spice levels and try different breading methods. Store and reheat your leftovers properly for best taste. Enjoy your chicken tenders, whether you bake or fry them, and get creative with your flavors!

Spicy Cajun Chicken Tenders Crispy and Flavorful Treat

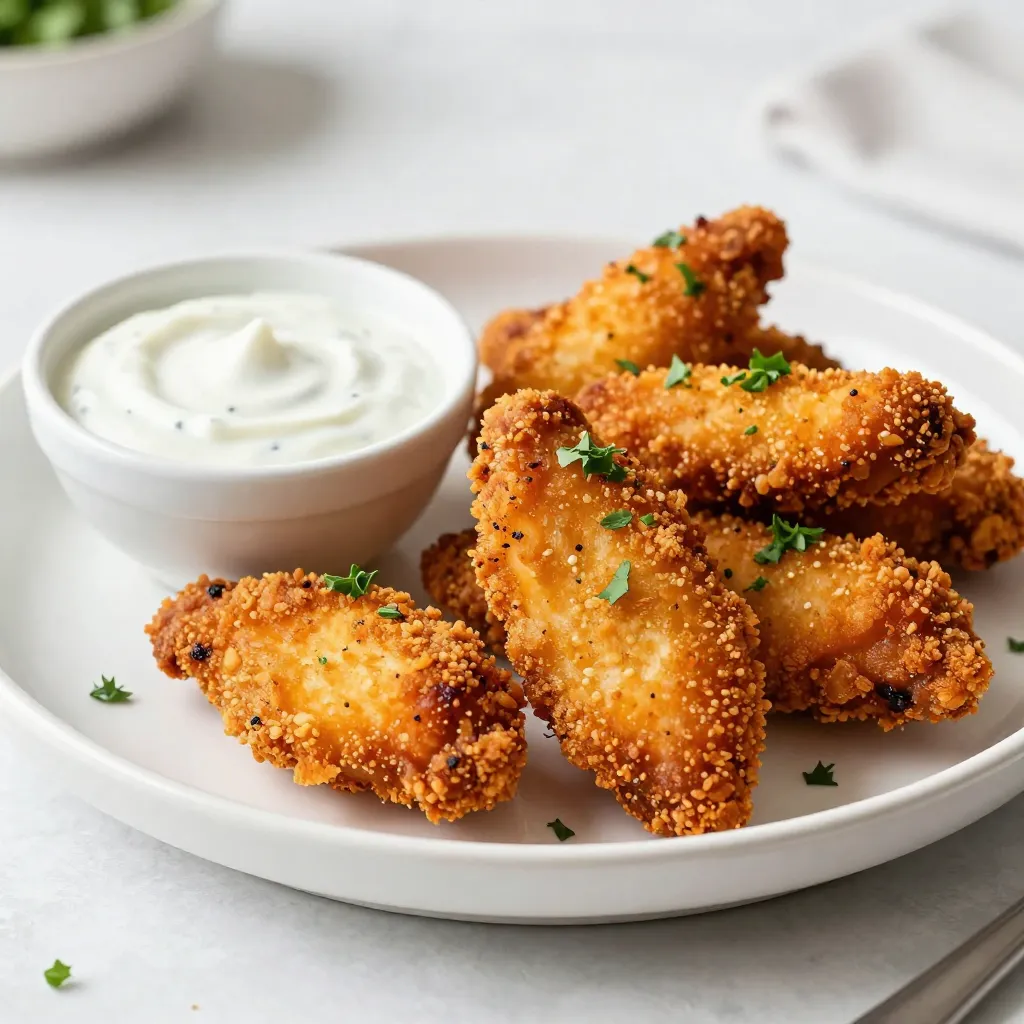
Get ready for a flavor explosion with these Spicy Cajun Chicken Tenders! Crispy, juicy, and packed with heat, these tenders

To make these tasty rosemary garlic roasted potatoes, gather the following: - 2 pounds baby potatoes, halved - 4 cloves garlic, minced - 3 tablespoons fresh rosemary, chopped (or 1 tablespoon dried) - 3 tablespoons olive oil - 1 teaspoon sea salt - ½ teaspoon black pepper - 1 tablespoon lemon juice - Optional: Fresh parsley for garnish If you need to swap some ingredients, here are some ideas: - Potatoes: You can use Yukon Gold or red potatoes. - Garlic: Garlic powder can work in a pinch. Use 1 teaspoon for each clove. - Rosemary: Try thyme or oregano for a different flavor. - Olive oil: Canola or avocado oil are good alternatives. - Lemon juice: Use vinegar for a tangy twist. Choosing the right potatoes is key. Look for firm baby potatoes without blemishes. The skin should feel smooth. If you can, pick potatoes that are similar in size. This helps them cook evenly. When you roast them, they turn soft inside and crispy outside. That's what we want. Always wash potatoes well before using them. This helps remove dirt and any chemicals. {{ingredient_image_1}} Start with 2 pounds of baby potatoes. Halve each potato so they cook evenly. Rinse them under cold water to remove dirt. Pat them dry with a clean towel. This step helps get the skin crisp. In a large bowl, add your halved potatoes. Next, add 4 cloves of minced garlic. Then, toss in 3 tablespoons of chopped fresh rosemary. If you use dried rosemary, 1 tablespoon works well. Pour in 3 tablespoons of olive oil, 1 teaspoon of sea salt, and ½ teaspoon of black pepper. Mix everything together until the potatoes are covered. The oil and spices make them tasty. Finally, drizzle 1 tablespoon of lemon juice over the mix. Stir gently to combine. Preheat your oven to 425°F (220°C). Spread the potato mix on a baking sheet. Use parchment paper to make cleanup easy. Make sure to spread them out so they roast well. Roast for 25-30 minutes. Halfway through, turn the potatoes for even browning. You want them golden brown and crispy. Once done, take them out and let them cool for a few minutes. If you like, sprinkle fresh parsley on top before serving. Enjoy your delicious rosemary garlic roasted potatoes! To boost the flavor of your rosemary garlic roasted potatoes, consider using fresh herbs. Fresh rosemary adds a bright taste. You can also mix in thyme or oregano for more depth. Try adding a sprinkle of grated Parmesan cheese before serving. This adds a salty, savory touch that pairs well with the garlic. A squeeze of fresh lemon juice brightens the dish and enhances all the flavors. You only need a few tools for this recipe. A large mixing bowl helps combine the ingredients well. Use a cutting board and sharp knife to cut the potatoes and mince the garlic easily. A baking sheet lined with parchment paper makes cleanup a breeze and ensures even roasting. For best results, a good-quality oven thermometer can help ensure your oven is at the right temperature. To get crispy potatoes, start by cutting them into even pieces. This ensures they cook at the same rate. Make sure to coat them well in olive oil. This helps create a crispy outer layer. During roasting, turn the potatoes halfway through. This ensures they brown evenly on all sides. Roast until they are deep golden brown and crispy. Let them cool for a few minutes before serving to maintain that nice crunch. Pro Tips Use Fresh Herbs: Fresh rosemary will provide a more vibrant flavor compared to dried, enhancing the overall taste of the dish. Even Sizing: Ensure the baby potatoes are roughly the same size for even cooking and browning, leading to perfectly roasted results. Don’t Skip the Lemon: The lemon juice adds a bright acidity that balances the richness of the potatoes and enhances their flavor. Garnish for Freshness: Adding fresh parsley right before serving not only adds color but also a fresh herbal note to the dish. {{image_2}} You can change the flavor of your roasted potatoes by adding different herbs. Try using thyme or oregano instead of rosemary. Both herbs will give a fresh taste. Mix and match your herbs for fun. This lets you create a new dish each time. Roasted potatoes can be even better with extra veggies. Carrots, bell peppers, or zucchini all work well. Cut them into similar sizes as the potatoes. This helps all the vegetables cook evenly. You can add these to the bowl when mixing the potatoes. This makes a colorful and tasty side dish. If you like heat, try adding red pepper flakes or paprika. These spices bring warmth and depth to your potatoes. Just a pinch can change the whole dish. For a smoky flavor, you can add smoked paprika or even some diced bacon. These additions make your potatoes exciting and full of flavor. To store your leftover rosemary garlic roasted potatoes, let them cool first. Place them in an airtight container. Make sure to keep them in the fridge. They will stay fresh for about 3 to 5 days. If you want to keep them longer, freezing is a great option. To reheat your potatoes, use the oven for the best crisp. Preheat your oven to 400°F (200°C). Spread the potatoes on a baking sheet. Heat them for about 10 to 15 minutes. This method brings back their crunchy texture. You can also use a microwave if you're in a hurry, but they might not be as crispy. Freezing rosemary garlic roasted potatoes is simple. After cooling, place them in a freezer-safe bag. Squeeze out as much air as you can before sealing. They can last for up to 2 months in the freezer. When you’re ready to eat them, thaw in the fridge overnight. Then reheat in the oven for best results. Enjoy your tasty leftovers! For roasting, I recommend using baby potatoes. They cook evenly and have a nice texture. You can also use Yukon Gold or red potatoes. These types have a creamy inside and crisp skin. If you want a firmer texture, try fingerling potatoes. Remember, the size matters. Halving the potatoes helps them crisp up nicely. Yes, you can use dried rosemary. It works well and saves time. Use about one tablespoon of dried rosemary for every three tablespoons of fresh. Dried herbs are more concentrated, so you need less. However, fresh rosemary brings a bright flavor that dried cannot match. If you can, use fresh for the best taste. This recipe is already vegan! All the ingredients are plant-based. You can enjoy these tasty potatoes without any animal products. If you want extra flavor, add a dash of nutritional yeast. It gives a cheesy taste without dairy. Enjoy your crispy, flavorful, vegan dish! In this article, we explored how to make delicious rosemary garlic roasted potatoes. We discussed the best ingredients, how to prep and roast them for crispiness, and shared tips for enhancing flavor. I also covered fun variations to try and the best ways to store leftovers. In closing, these potatoes can be a tasty side for any meal. Enjoy experimenting with flavors and textures. Happy cooking!

Rosemary Garlic Roasted Potatoes Perfectly Crisped

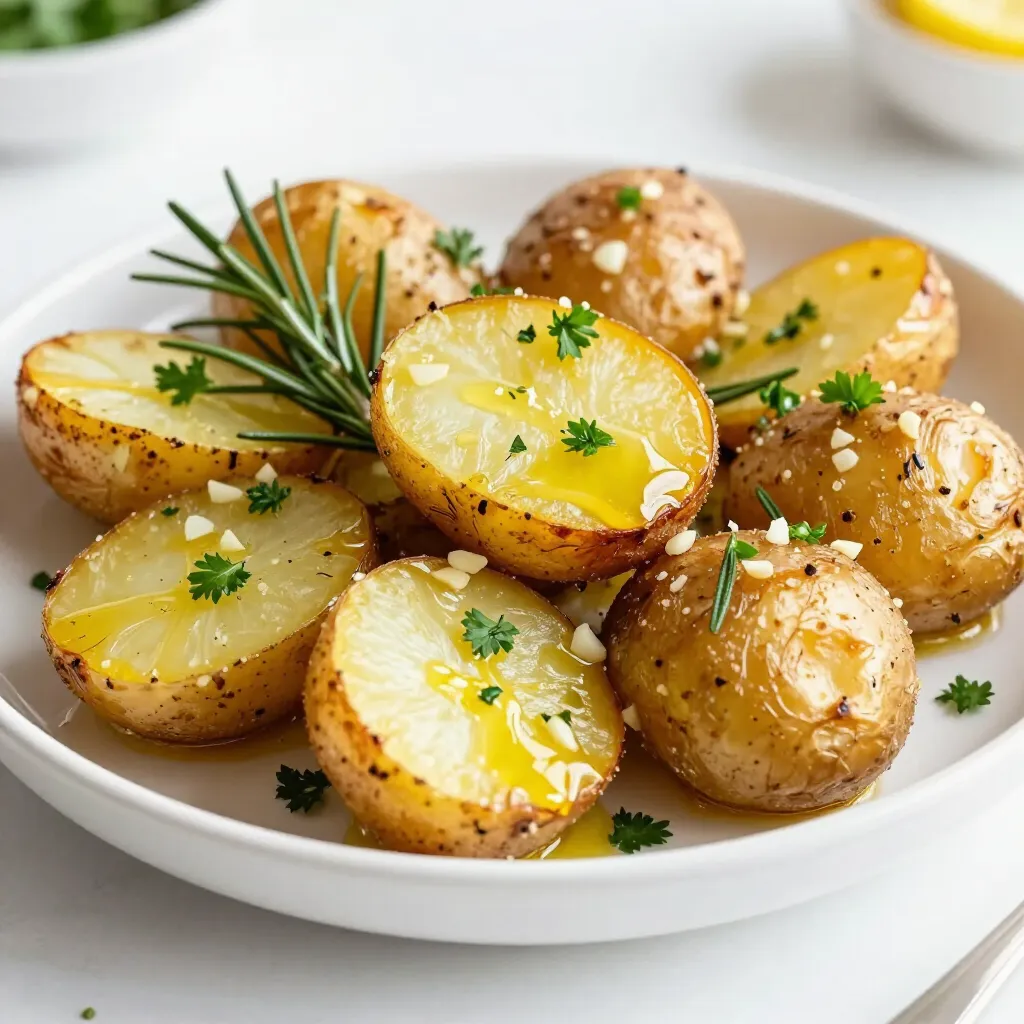
Looking to elevate your dinner with a tasty side dish? These Rosemary Garlic Roasted Potatoes are just the answer! I’ll

- 1 cup sticky rice (glutinous rice) Sticky rice is the base of this dessert. It has a unique texture that gets sticky when cooked. Rinse the rice well under cold water until the water runs clear. This helps remove excess starch. Soak the rice in water for at least four hours, or better yet, overnight. The soaking softens the rice and helps it cook evenly. - 1 ½ cups coconut milk - ½ cup sugar - ½ teaspoon salt The coconut sauce adds creaminess and sweetness. Combine coconut milk, sugar, and salt in a saucepan. Heat this mixture over medium heat, stirring until the sugar dissolves. Avoid boiling it. Save about half a cup of this sauce for drizzling on the finished dish. - 2 ripe mangoes, peeled and sliced - 1 tablespoon sesame seeds (optional, for garnish) - 2 tablespoons chopped fresh mint or cilantro (optional, for garnish) Mangoes are the star of this dessert. Use ripe, sweet mangoes for the best flavor. Slice them thinly and place them next to the sticky rice. You can sprinkle sesame seeds on top for a nice crunch. Fresh mint or cilantro adds a pop of color and flavor. These garnishes make your dish look beautiful and inviting. {{ingredient_image_1}} Start by rinsing 1 cup of sticky rice under cold water. Keep rinsing until the water runs clear. This step removes excess starch. Next, soak the rice in a bowl of water for 4 hours or overnight for best results. After soaking, drain the rice. Place it in a steamer basket lined with cheesecloth or a clean dish towel. Steam the rice over boiling water for 25 to 30 minutes. Cook until it is tender and translucent. While the rice steams, make the coconut sauce. In a saucepan, combine 1 ½ cups of coconut milk, ½ cup of sugar, and ½ teaspoon of salt. Cook this mixture over medium heat. Stir until the sugar dissolves. Be careful not to let it boil. Reserve about ½ cup of this sauce for later. You will drizzle it over the dessert. Once the rice is cooked, transfer it to a large bowl. Pour the remaining coconut sauce over the hot rice. Mix gently until the rice is fully coated. Let it sit for 20 to 30 minutes. This allows the rice to absorb the flavors. To serve, scoop some sticky rice onto plates. Arrange sliced mangoes next to the rice. Drizzle the reserved coconut sauce over both. For a finishing touch, sprinkle sesame seeds on top. You can also add chopped mint or cilantro if you like. Enjoy your delicious Thai Mango Sticky Rice! Soaking the sticky rice is key. Rinse it well under cold water. This helps remove excess starch. Soak the rice for at least four hours, but overnight is best. This gives the rice time to absorb water. When you steam the rice, use a steamer basket lined with cheesecloth. Place the soaked rice in the basket. Steam it over boiling water for 25 to 30 minutes. The rice should be tender and slightly translucent when done. You can change the flavor of your sticky rice! Try adding pandan leaves while steaming. This will give the rice a lovely green color and a unique taste. You can also add a splash of vanilla extract to the coconut sauce. For a more tropical twist, mix in some lime zest. This adds a fresh, zesty flavor that pairs well with mango. Serve your Thai mango sticky rice warm. Plate it with the sliced mangoes beside the rice. Drizzle the reserved coconut sauce on top. For a fun touch, sprinkle sesame seeds over the dish. Fresh mint or cilantro as a garnish adds color and freshness. To make it more festive, serve it in small cups at parties. Each guest can enjoy their own little dessert! Pro Tips Soaking the Rice: For the best texture, soak the sticky rice for at least 4 hours or preferably overnight. This ensures the grains cook evenly and become perfectly sticky. Steaming Method: Make sure to line your steamer basket with cheesecloth or a clean dish towel to prevent the rice from falling through. This will also help maintain steam and moisture. Coconut Sauce Consistency: When preparing the coconut sauce, avoid boiling it. Gentle heating will dissolve the sugar without affecting the creamy texture. Serving Suggestion: For an elegant presentation, arrange the mango slices in a fan shape next to the sticky rice and drizzle the reserved coconut sauce artfully over the dish. {{image_2}} You can make Thai mango sticky rice even more fun by adding tropical fruits. Fruits like pineapple, kiwi, or passion fruit work well. These fruits add color and a sweet twist. To use them, just slice them up and place them next to the mango on your plate. This not only looks great but also tastes amazing! If you want a vegan version, it’s super easy! The main ingredients are already vegan. Just make sure to use a vegan sugar. Some sugar is processed with bone char. You can find vegan sugar at many grocery stores. This way, you can enjoy the dish without any animal products. For those who want to cut down on sugar, try alternative sweeteners. Honey can be a tasty substitute, but it isn’t vegan. Maple syrup works too and adds a nice flavor. You can use agave syrup as well. Adjust the amount to your taste. Just remember, each sweetener gives a unique twist to the coconut sauce. To store leftover Thai mango sticky rice, first let it cool. Place the rice and mango in an airtight container. Seal it tightly to keep the air out. You can store it in the fridge for up to three days. If you have extra coconut sauce, store it in a separate container. When you're ready to enjoy your leftovers, take them out of the fridge. For best results, steam the sticky rice again. Place the rice in a steamer for about 5-10 minutes. This keeps the rice moist and soft. If you prefer, you can microwave it too. Just add a splash of water, cover, and heat for 30 seconds to 1 minute. Thai mango sticky rice is best fresh but can last a bit. In the fridge, it stays good for about three days. If you freeze it, it can last for up to one month. When you're ready to eat frozen rice, thaw it in the fridge overnight before reheating. Enjoy the flavors as if it were fresh! The best rice for this dish is sticky rice, also known as glutinous rice. This rice has a high starch content. This gives it a chewy texture. You can find it in Asian grocery stores. Look for short-grain varieties for the best results. Yes, you can use canned coconut milk. It adds great flavor to the dish. Choose full-fat coconut milk for a rich taste. Light coconut milk works too, but it may not be as creamy. Shake the can well before using to mix the cream. To select ripe mangoes, look for smooth skin. The color should be bright and vibrant. Gently squeeze the mango; it should give slightly. This means it is ripe and juicy. You can also smell the stem; a sweet aroma means it’s ready to eat. In this guide, we explored how to make Thai Mango Sticky Rice. We covered the best sticky rice, components for coconut sauce, and tasty garnishes. I shared step-by-step instructions, handy tips, flavor variations, and storage advice. This delicious dessert is easy to make at home. With fresh ingredients and a little practice, you can impress anyone. Enjoy your sweet treat, and don’t be afraid to try different fruits or flavors!

Thai Mango Sticky Rice Irresistible Dessert Recipe

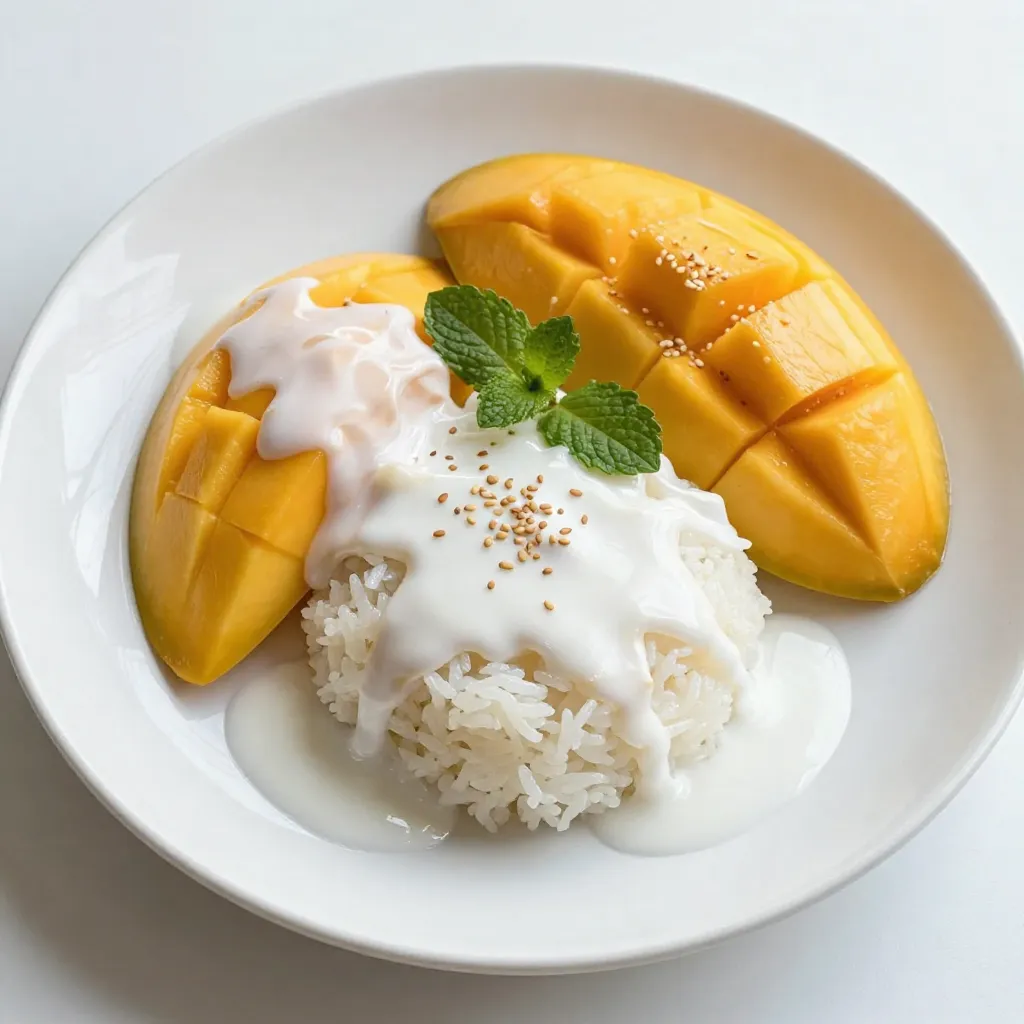
If you love sweet treats, you need to try Thai Mango Sticky Rice! This dessert combines creamy coconut sauce with

- 4 boneless, skinless chicken breasts - 1 cup fresh strawberries, hulled and sliced - 1/4 cup balsamic vinegar To start, you'll need boneless, skinless chicken breasts. These cook quickly and stay juicy. Fresh strawberries bring sweetness and a pop of color. Balsamic vinegar adds a tangy depth, making the dish bright and lively. - 2 tablespoons honey - 1 tablespoon olive oil - 2 cloves garlic, minced Honey sweetens the glaze, balancing the vinegar’s tartness. Olive oil keeps the chicken moist. Garlic gives a warm flavor that makes everything better. - Salt and pepper to taste - 1 teaspoon fresh basil, chopped (for garnish) - 1 teaspoon fresh mint, chopped (for garnish) Salt and pepper enhance all the flavors. Fresh basil and mint add a refreshing touch and a colorful finish. These herbs make your dish look and taste special. {{ingredient_image_1}} To start, grab a small bowl. In this bowl, whisk together the balsamic vinegar, honey, and olive oil. This mix brings a sweet and tangy flavor. Next, add minced garlic, salt, and pepper. These will enrich the taste. Once mixed, set it aside. This step is key for a tasty glaze. Now, take the chicken breasts. Season them well with salt and pepper. Next, heat a large skillet over medium-high heat. Add a drizzle of olive oil to the pan. Once the skillet is hot, place the chicken breasts inside. Cook for about 5-7 minutes on each side. You want them golden brown and cooked through. The internal temperature should reach 165°F (75°C). This ensures the chicken is safe to eat. When the chicken is almost done, pour the balsamic mixture over it in the skillet. Let it simmer for 2-3 more minutes. This will create a delicious glaze. During the last minute of cooking, toss in the sliced strawberries. Gently coat them in the glaze. When everything is cooked, remove the skillet from heat. Serve the chicken on a platter, drizzling any remaining balsamic glaze over it. Top with fresh basil and mint for a lovely garnish. - Ensuring chicken stays juicy: Start with room temperature chicken. This helps it cook evenly. Season it well with salt and pepper before cooking. Use a meat thermometer to check for doneness. Aim for 165°F (75°C). Let the chicken rest for a few minutes after cooking. This keeps the juices inside. - Achieving the perfect glaze: Make your balsamic mixture and set it aside. Pour it over the chicken when it’s almost done cooking. Let it simmer for a few minutes. This will thicken the glaze. The strawberries should only be added in the last minute. This way, they warm up but stay fresh. - Alternatives for fresh strawberries: If strawberries are out of season, use frozen ones instead. Just thaw them first. Raspberries or blueberries work too. Both add a different but tasty twist. - Using different types of vinegar: If you don’t have balsamic vinegar, try red wine vinegar or apple cider vinegar. Both can give a nice flavor. Mix in a little sugar or honey to mimic the sweetness of balsamic. - What to pair with Balsamic Strawberry Chicken: This dish goes well with rice or quinoa. You could also serve it with a fresh green salad. Roasted vegetables are a great side too. They add color and flavor. - Plating ideas for an appealing presentation: Place the chicken in the center of the plate. Drizzle extra balsamic glaze over it. Scatter strawberries around the chicken. Finish with fresh basil and mint on top. This makes the dish look fancy! Pro Tips Marinate for Extra Flavor: Allow the chicken to marinate in the balsamic mixture for at least 30 minutes before cooking for deeper flavor. Use Fresh Ingredients: Opt for fresh strawberries and herbs to enhance the dish's flavor and presentation. Check Chicken Temperature: Ensure the chicken reaches an internal temperature of 165°F (75°C) for safe consumption. Serve with a Side: Pair this dish with a light salad or roasted vegetables to complement the sweet and savory flavors. {{image_2}} You can switch up the main protein in this dish. Turkey works great and still keeps it light. Tofu is another option if you want a plant-based meal. Both are tasty and soak up the balsamic flavor well. If you grill or bake them, keep the cooking times similar to chicken. Check for doneness, and enjoy the new twist! Spice can elevate your dish. Consider adding red pepper flakes for heat or paprika for warmth. You can also mix in other fruits. Peaches or blueberries add a fresh taste. Just slice them and toss them in during the last minute of cooking. The mix of flavors will surprise your taste buds! Make your meal complete by adding sides. Roasted veggies or rice pair nicely with the chicken. You can also use leftover ingredients to create a salad. Toss the fresh strawberries and some greens together. Drizzle with olive oil and balsamic vinegar for a quick side. This way, you enjoy a colorful and healthy plate! After making Balsamic Strawberry Chicken, you may have some leftovers. To store them, let the dish cool first. Place the chicken and strawberries in an airtight container. Keep it in the fridge. This dish can last for up to three days. Make sure to check for any signs of spoilage before eating. Can you freeze this dish? Yes, you can freeze Balsamic Strawberry Chicken. To freeze, first cool the dish completely. Then, wrap it tightly in plastic wrap or foil. Place the wrapped dish in a freezer bag. This will help prevent freezer burn. You can freeze it for up to three months. To defrost, move the dish to the fridge overnight before reheating. To reheat Balsamic Strawberry Chicken without drying it out, use the stovetop. Place the chicken in a skillet on low heat. Add a splash of water or broth. Cover the skillet to keep moisture in. This method keeps the chicken juicy. You can also use the microwave. Heat in short bursts of 30 seconds. Check often to avoid overcooking. Enjoy your delicious meal again! Yes, you can prepare Balsamic Strawberry Chicken ahead of time. This makes it easy for busy evenings. You can marinate the chicken in the balsamic mixture. Let it sit in the fridge for a few hours or overnight. This will enhance the flavor. When ready to cook, just follow the steps. You can also cook it fully and store it. Simply reheat it when you want to eat. Balsamic Strawberry Chicken is quite healthy. It has lean protein from chicken. Strawberries add vitamins and antioxidants. Balsamic vinegar has low calories and adds flavor without fat. Honey gives a touch of sweetness but is natural. This dish is a great balance of protein and fruit. It can fit well into many diets. You can serve Balsamic Strawberry Chicken with many sides. Here are some great options: - Steamed vegetables: Broccoli or green beans work well. - Rice or quinoa: Both add a nice base to the meal. - Salad: A fresh salad with greens complements the dish. - Crusty bread: Perfect for soaking up the glaze. - Light white wine: A nice drink to pair with the meal. These sides will make your meal even more delightful. In this post, we explored how to make a tasty Balsamic Strawberry Chicken. We covered ingredients like chicken, strawberries, and balsamic vinegar. I shared simple steps to create a flavorful dish and tips for cooking. You can also switch ingredients and add sides to suit your taste. Remember, cooking is fun and allows for creativity. Experiment with flavors you love. Enjoy your meal, and don’t hesitate to share your own variations!

Balsamic Strawberry Chicken Delightful and Easy Meal

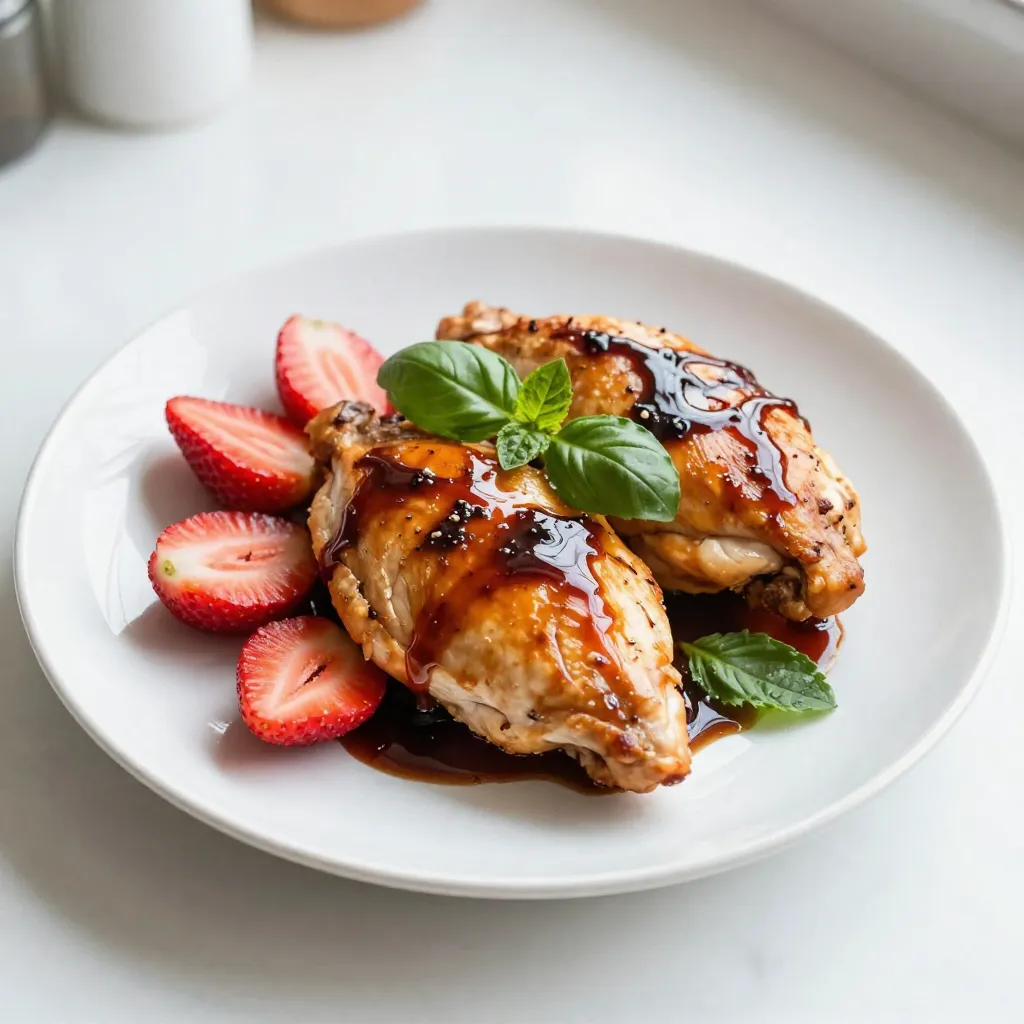
Looking for a tasty and easy meal? Balsamic Strawberry Chicken is your answer! This dish combines juicy chicken breasts with

To make these delightful chocolate fudge brownie cookies, you need some simple ingredients. Here’s what you will need: - 1 cup unsalted butter, melted - 1 ½ cups granulated sugar - 2 large eggs - 2 teaspoons vanilla extract - 1 cup all-purpose flour - ½ cup unsweetened cocoa powder - ½ teaspoon baking powder - ½ teaspoon salt - 1 cup semi-sweet chocolate chips - ½ cup chopped nuts (optional) These ingredients come together to create rich and fudgy cookies. The melted butter gives these cookies their nice texture. Granulated sugar adds sweetness, while eggs help bind everything. Vanilla extract brings in a lovely flavor. The all-purpose flour and cocoa powder are key to that brownie-like taste. Baking powder helps the cookies rise just a bit, while salt enhances the chocolate flavor. Lastly, the semi-sweet chocolate chips add bursts of chocolate goodness. If you like nuts, add some for a nice crunch! Using these ingredients, you can enjoy cookies that are easy to make and truly delicious. {{ingredient_image_1}} 1. Preheat your oven to 350°F (175°C). Line a baking sheet with parchment paper. 2. In a mixing bowl, combine 1 cup of melted butter and 1 ½ cups of granulated sugar. Stir until smooth. 3. Add 2 large eggs, one at a time. Mix well after each egg. Stir in 2 teaspoons of vanilla extract. 4. In another bowl, whisk together 1 cup of all-purpose flour, ½ cup of cocoa powder, ½ teaspoon of baking powder, and ½ teaspoon of salt. 5. Gradually add the dry mixture to the wet mixture. Stir until just combined. 6. Fold in 1 cup of semi-sweet chocolate chips and ½ cup of chopped nuts, if you choose to use them. 7. Use a cookie scoop or a tablespoon to drop dough onto the prepared baking sheet. Space them about 2 inches apart. 8. Bake the cookies for 10-12 minutes. The edges should be set, and the centers should look slightly soft. 9. Let the cookies cool on the baking sheet for about 5 minutes. 10. Transfer the cookies to a wire rack to cool completely. Achieving the right texture To make your cookies soft and chewy, use melted butter. It helps create a rich texture. Mixing the dough just until combined is key. If you mix too much, your cookies may turn tough. Aim for a thick dough with plenty of chocolate chips. Keeping cookies chewy vs. crispy For chewy cookies, bake them a minute or two less than the time stated. The centers should look soft but not raw. If you prefer crispy cookies, let them bake longer until the edges are firm. The baking time will affect how each cookie turns out. Oven temperature accuracy Always preheat your oven to 350°F (175°C). An accurate oven helps cookies bake evenly. If you have an oven thermometer, use it to check your oven’s real temperature. This small tool can make a big difference in your baking. Best practices for cookie spacing When you drop dough on the baking sheet, keep space between cookies. Aim for about 2 inches apart. This space allows the cookies to spread without touching. If they touch, they may bake into one giant cookie! Alternatives for butter and sugar If you need a butter substitute, try coconut oil or applesauce. Both add moisture without losing flavor. For sugar, use brown sugar for a deeper taste. You can also try maple syrup for a unique twist. Dairy-free options To make these cookies dairy-free, swap the butter for vegan butter or coconut oil. Use dairy-free chocolate chips for the perfect finish. These swaps will still give you delicious cookies that everyone can enjoy. Pro Tips Chill the Dough: If you find your dough too soft, refrigerate it for 30 minutes before baking. This helps the cookies hold their shape better. Use Quality Chocolate: The flavor of your cookies will improve significantly if you use high-quality chocolate chips. Consider using dark chocolate for a richer taste. Don’t Overbake: For fudgier cookies, take them out of the oven when the edges are set but the centers are still soft. They will continue to firm up while cooling. Experiment with Mix-ins: Feel free to customize your cookies by adding different mix-ins like dried fruits, coconut flakes, or even a sprinkle of sea salt on top before baking. {{image_2}} You can change the flavor of these cookies easily. Try using dark chocolate instead of semi-sweet. This will give a rich taste. You can also mix milk chocolate chips for a sweeter bite. Adding spices can enhance your cookies too. A pinch of cinnamon or a dash of chili powder gives warmth. You can use peppermint extract for a fresh twist. This will make every bite special! If you need gluten-free cookies, swap the all-purpose flour. Use a gluten-free mix instead. It works well and keeps the cookies chewy. For a vegan twist, replace the eggs with flaxseed meal. Use 1 tablespoon of flaxseed mixed with 2.5 tablespoons of water for each egg. You can also use coconut oil instead of butter. This way, everyone can enjoy these tasty treats! Mix-ins make cookies fun and unique. You can add chopped nuts like walnuts or pecans for crunch. If you prefer fruit, try dried cherries or cranberries. They add sweetness and chewiness. Swirling in caramel or peanut butter gives a creamy texture. Just add a spoonful on top before baking. This will create a lovely surprise in every cookie! To keep your chocolate fudge brownie cookies fresh, use an airtight container. Glass or plastic containers work well. If you have a lot of cookies, layer them with parchment paper. This keeps them from sticking together. You can store cookies at room temperature for up to a week. If you want them to last longer, refrigeration is an option. However, cold can change the texture. The cookies may become a bit dry in the fridge. You can freeze cookie dough for later use. To do this, scoop the dough onto a baking sheet lined with parchment paper. Freeze until solid, then transfer the dough balls into a freezer bag. Make sure to squeeze out all the air before sealing. When you’re ready to bake, take out the dough and thaw it in the fridge overnight. You can also bake straight from the freezer. Just add a minute or two to the baking time. These cookies last about a week at room temperature. If stored in the fridge, they can last up to two weeks. You can freeze them for up to three months if you want to keep them longer. Watch for signs of spoilage. If you see mold or a strange smell, it’s best to toss them. Fresh cookies should smell sweet and chocolatey. You can tell when your chocolate cookies are done by checking the edges. They should look set and firm, but the centers will appear soft. A good rule is to bake for 10-12 minutes. When you remove them from the oven, let them cool for 5 minutes on the baking sheet. They will continue to firm up as they cool. Yes, you can use different types of chocolate chips! Feel free to mix semi-sweet, dark, or even white chocolate chips. Each type changes the flavor a bit. Experimenting with chocolate can make your cookies even more fun! Absolutely! These cookies are great for gifting. They look nice and taste amazing. You can package them in a cute box or a jar. Add a ribbon for a nice touch. Your friends and family will love them! Yes, you can make these cookies without nuts. Just skip the chopped nuts in the recipe. The cookies will still be rich and fudgy. If you want some crunch, try adding crushed cookies or a sprinkle of sea salt on top. To make your cookies more fudgy, try these tips: - Use more chocolate chips. - Add an extra egg yolk. - Bake for a shorter time. These changes will give your cookies a rich, gooey texture. Enjoy your fudgy treats! Making these chocolate cookies is simple and fun. We covered key ingredients, clear steps, and helpful tips. You learned how to tweak recipes and store cookies for freshness. With these tools, you can bake perfect cookies every time. Remember, baking is all about practice and enjoying the process. So, grab your ingredients and start baking today! Your homemade treats will surely impress family and friends.

Chocolate Fudge Brownie Cookies Simple and Delicious

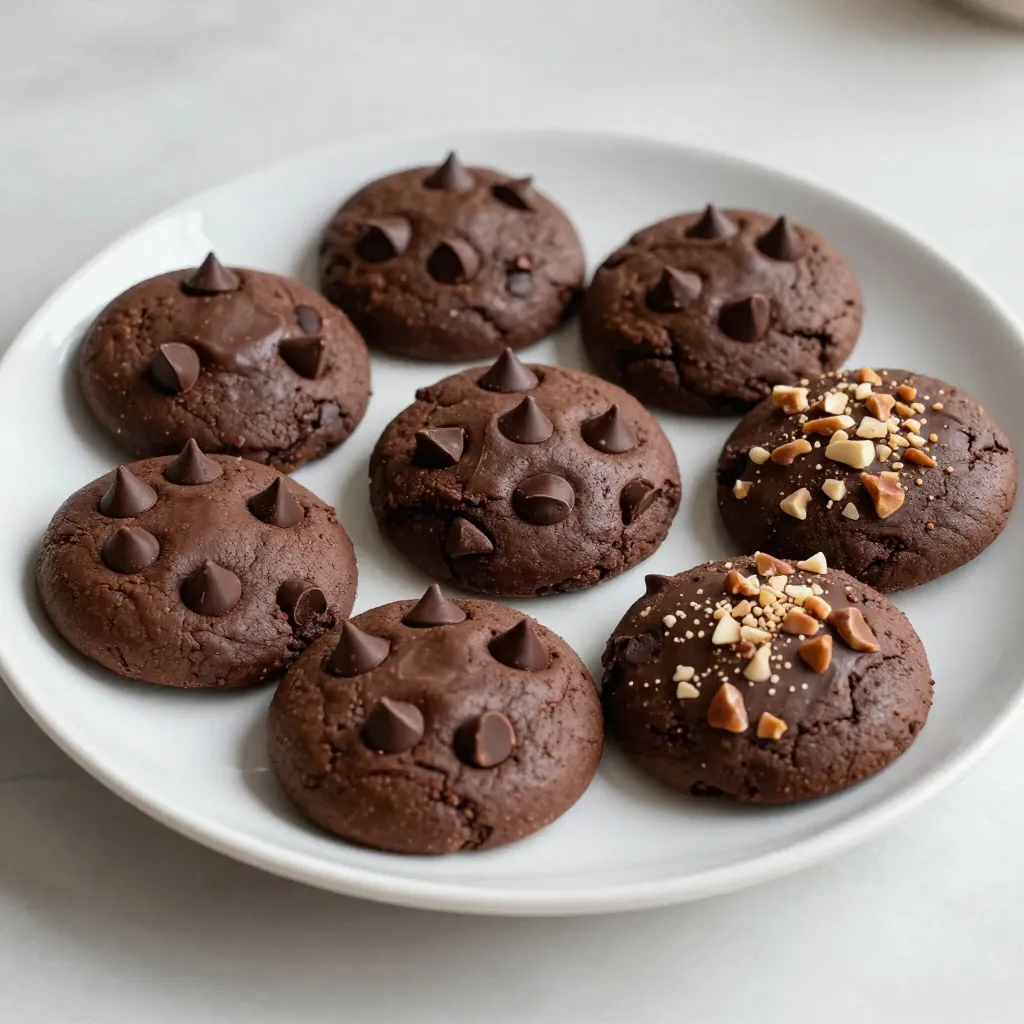
Get ready to indulge in a sweet treat that’s both simple and delicious! These chocolate fudge brownie cookies offer the

- 2 medium sweet potatoes, peeled and diced - 1 can (15 oz) black beans, rinsed and drained - 1 can (15 oz) kidney beans, rinsed and drained - 1 can (28 oz) crushed tomatoes - 1 cup vegetable broth - 1 onion, chopped - 3 cloves garlic, minced - 1 red bell pepper, chopped - 1 green bell pepper, chopped - 2 tablespoons chili powder - 1 teaspoon cumin - 1 teaspoon smoked paprika - 1/2 teaspoon cayenne pepper (optional) - Salt and black pepper to taste - 2 tablespoons olive oil - Fresh cilantro, for garnish - Avocado slices, for serving To make this dish, you need to prepare your ingredients. Start by peeling and dicing the sweet potatoes. Chop the onion, garlic, and bell peppers. Rinsing the beans removes excess sodium, so do that before adding them to the pot. Use a large pot for cooking. This recipe serves six people and takes about one hour from start to finish. This vegan sweet potato chili is hearty and packed with nutrients. Sweet potatoes add fiber and vitamins A and C. Black beans and kidney beans provide protein and iron. Each serving contains approximately: - Calories: 300 - Protein: 12g - Carbohydrates: 54g - Fiber: 14g - Fat: 7g This chili is healthy and filling, perfect for any meal! {{ingredient_image_1}} Start by gathering your ingredients. You need sweet potatoes, beans, tomatoes, broth, onion, garlic, and peppers. Chop the onion, garlic, and bell peppers. Peel and dice the sweet potatoes. This should take about 15 minutes. 1. Heat olive oil in a large pot over medium heat. Add the chopped onion. Cook until it looks clear, about 5 minutes. 2. Next, add minced garlic, red bell pepper, and green bell pepper. Cook for 3-4 minutes until soft. 3. Now, stir in diced sweet potatoes, chili powder, cumin, smoked paprika, cayenne pepper, salt, and black pepper. Cook for 2-3 minutes to bring out the spice flavors. 4. Pour in crushed tomatoes and vegetable broth. Mix it all well. Bring to a boil, then reduce the heat to low. 5. Cover the pot and let it simmer for 25-30 minutes. The sweet potatoes should be soft. 6. Add black beans and kidney beans. Simmer for another 10 minutes to warm them. 7. Taste your chili and adjust the seasoning if needed. Keep an eye on the heat. Medium heat works best for the first steps. Lower the heat to simmer gently. This keeps the flavors rich and deep. Make sure the sweet potatoes cook until tender. Check them with a fork; they should be soft but not mushy. You can make this chili your own. Start with the sweet potatoes. You can swap them for butternut squash or even pumpkin. This adds a nice twist. You may also add corn for a sweet crunch. For a heartier chili, try adding lentils. They cook well and boost protein. Want more heat? Toss in extra cayenne pepper or add chopped jalapeños. If you like sweet flavors, add a touch of maple syrup. It works great with the spices. You can also sprinkle in smoked salt for a deeper flavor. Each choice adds a new layer to your chili. Cook the onions until they are soft. This brings out their natural sweetness. Toast the spices before adding the other ingredients. It boosts their taste. Let the chili simmer longer for richer flavors. Taste as you go, and adjust the seasoning to your liking. Pro Tips Use Fresh Spices: Fresh spices enhance the flavor significantly. Consider buying whole spices and grinding them yourself for maximum freshness. Adjust Heat Levels: If you prefer a milder chili, omit the cayenne pepper. You can also serve hot sauce on the side for those who like it spicy. Make Ahead: This chili tastes even better the next day! Make a batch in advance and store it in the fridge for a quick meal. Garnish Creatively: Experiment with different garnishes like lime wedges, diced red onion, or vegan cheese to elevate your chili presentation. {{image_2}} You can switch out sweet potatoes for regular potatoes if needed. Carrots or squash work well too. For a creamier texture, try using canned coconut milk instead of vegetable broth. You can also use olive oil for any neutral oil like canola or avocado oil. If you want a low-sodium option, use low-sodium broth or canned beans. Black and kidney beans add great texture and protein. You can also use pinto beans or chickpeas. If you like a lighter chili, try adding lentils. They will cook faster and add fiber. Mix and match beans to find your favorite combination. Toppings make your chili more fun. Fresh cilantro brightens the dish. Avocado slices add creaminess. You could also use lime wedges for a zesty kick. For crunch, try tortilla chips or crushed crackers. If you want a bit more heat, add jalapeños or hot sauce. Vegan sour cream or nutritional yeast can give it a cheesy flavor. Enjoy exploring different toppings! After you make this chili, let it cool first. Once cool, transfer it to airtight containers. This will help keep it fresh. Store the chili in the fridge for up to five days. If you want to eat it later, freezing is a great option. To freeze the chili, use freezer-safe containers or bags. Leave some space at the top to allow for expansion. Label the bags with the date. You can freeze it for up to three months. When you're ready to eat, thaw it overnight in the fridge. Reheat the chili in a pot over medium heat. Stir it often to make sure it heats evenly. You can also use the microwave. Heat it in a bowl for about two to three minutes. Make sure it's hot all the way through before serving. Add a little water or broth if it seems too thick. Enjoy your hearty and healthy delight! Yes, you can make this chili in a slow cooker. Start by sautéing the onion and garlic in a pan. Then, add all the ingredients to the slow cooker. Cook on low for six to eight hours. This method makes the flavors deeper and richer. Sweet potatoes are very healthy. They are high in fiber, which helps digestion. They also have a lot of vitamins, like vitamin A, which is good for your eyes. Plus, they contain antioxidants that help protect your body from damage. Yes, this recipe is gluten-free. All the ingredients used, like beans and vegetables, do not contain gluten. You can enjoy this chili if you are gluten-sensitive or have celiac disease. The chili can be mild or spicy. It depends on how much cayenne pepper you add. If you want it less spicy, skip the cayenne. If you love heat, add more cayenne to bring the spice level up. Absolutely! You can add many vegetables to this chili. Corn, zucchini, or carrots work well. Feel free to get creative and use what you have in your kitchen. This makes the dish even more colorful and nutritious. We covered the key ingredients and how to prepare them for your chili. I shared steps for cooking and timing, along with tips to enhance flavor. You now know how to customize your chili, try different beans, and consider various toppings. Lastly, I provided smart storage tips for leftovers. This chili recipe is flexible and full of flavor. Enjoy many meals from this easy dish!

Vegan Sweet Potato Chili Hearty and Healthy Delight

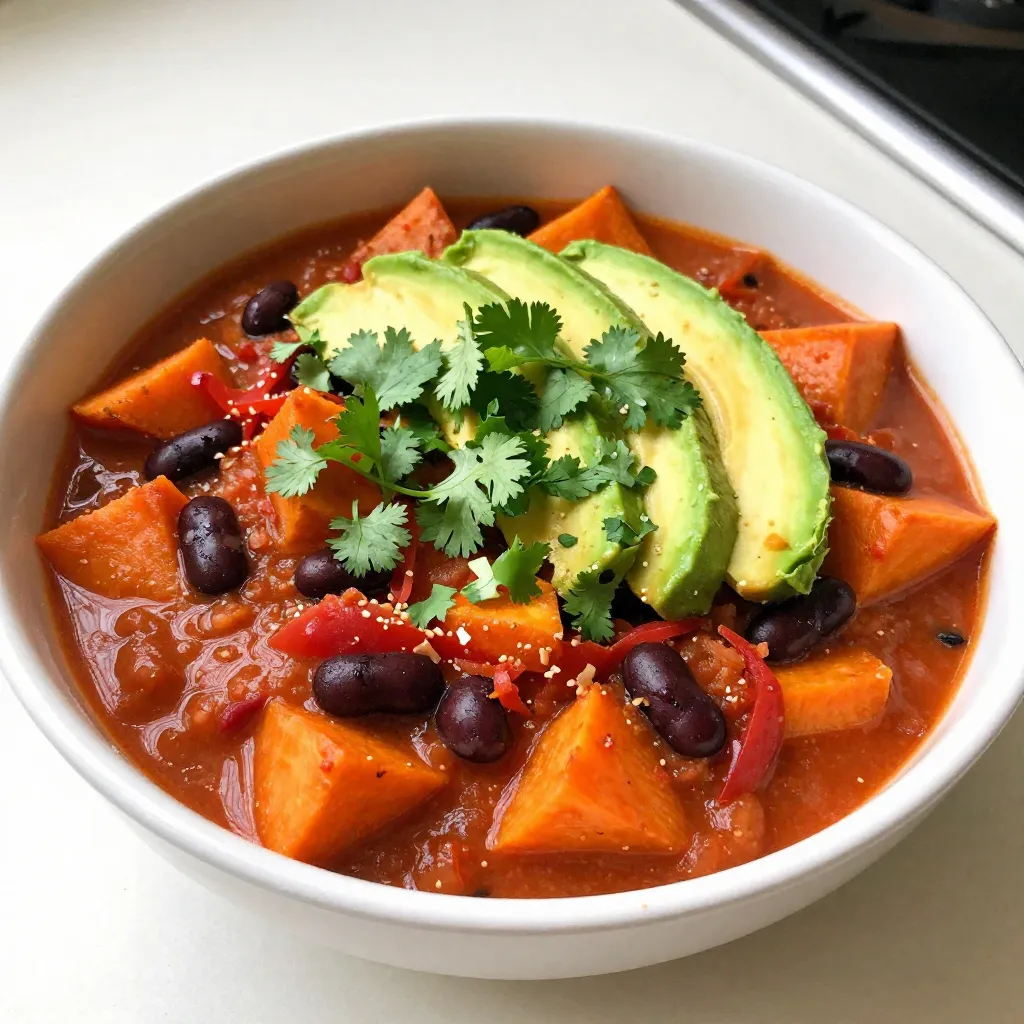
Looking for a warm and filling meal that’s good for you? This Vegan Sweet Potato Chili is your answer! Packed

- 24 Oreo cookies, crushed - 1/4 cup unsalted butter, melted - 1 cup creamy peanut butter - 1 cup powdered sugar - 1 cup heavy whipping cream - 8 oz cream cheese, softened - 1 teaspoon vanilla extract - 1/2 cup semi-sweet chocolate chips - 1/4 cup chocolate syrup (optional for drizzling) - Extra Oreo crumbs for garnish The right amounts make this pie great. The crushed Oreos form a tasty crust. The melted butter holds the crust together. Creamy peanut butter gives a rich flavor. Powdered sugar adds sweetness without graininess. Heavy cream makes the filling light and fluffy. Softened cream cheese adds creaminess and helps set the filling. Vanilla extract gives a warm flavor. Semi-sweet chocolate chips add a rich chocolate layer. The optional chocolate syrup adds a pretty drizzle and extra sweetness. Extra Oreo crumbs make a nice garnish, too. For the best results, I suggest some trusted brands. Use Nabisco for the Oreo cookies; they have the classic taste. Jif or Skippy works well for creamy peanut butter. For cream cheese, Philadelphia is a favorite among bakers. Use Land O’Lakes for unsalted butter to control the saltiness. For whipping cream, Horizon Organic offers good quality. Ghirardelli is my go-to for semi-sweet chocolate chips, as they melt smoothly and taste great. {{ingredient_image_1}} To start, grab 24 Oreo cookies and crush them finely. I use a food processor to make it easy. Next, melt 1/4 cup of unsalted butter in a small bowl. Mix the crushed cookies and melted butter well. This will help form a solid crust. Now, press the mixture firmly into the bottom of a 9-inch pie dish. Make sure it’s even and compact. Place the dish in the refrigerator to set while you work on the filling. For the filling, take a large bowl and add 1 cup of creamy peanut butter and 8 oz of softened cream cheese. Beat these together until smooth. The cream cheese adds a nice creaminess. Gradually add 1 cup of powdered sugar and keep mixing until it blends well. This sweetens the filling and gives it a great texture. In a separate bowl, pour in 1 cup of heavy whipping cream. Whip it using a mixer until stiff peaks form. This means it will hold its shape. Now, gently fold the whipped cream into the peanut butter mixture. Use a spatula to combine them without deflating the whipped cream. The goal is a light and airy filling. Once the filling is ready, take the Oreo crust from the fridge. Pour the peanut butter filling into the crust and spread it evenly. Now it’s time for chocolate! In a microwave-safe bowl, add 1/2 cup of semi-sweet chocolate chips. Heat them in 30-second bursts, stirring in between. Once melted and smooth, drizzle the chocolate over the top in a fun pattern. This adds a rich flavor. Finally, put the pie back in the refrigerator. Let it chill for at least 4 hours. This helps it set completely. If you can wait overnight, that’s even better! Once it’s ready, you can drizzle some chocolate syrup on top and sprinkle extra Oreo crumbs for garnish. Now, slice it into wedges and enjoy every bite! To get a smooth and creamy filling, mix the peanut butter and cream cheese well. Take your time and don’t rush this step. When whipping the cream, stop when stiff peaks form. This keeps it light and fluffy. When you fold the cream into the peanut butter mix, do it gently to keep air in. This step makes your pie airy and soft. This pie shines with a drizzle of chocolate syrup on top. A sprinkle of extra Oreo crumbs adds crunch and flavor. You can also add whipped cream for a fun touch. Serve each slice with a fork and enjoy every bite. For a special twist, offer fresh berries on the side for color. They pair well with the rich flavors. Be careful not to overmix the filling after adding the whipped cream. Overmixing can make it dense instead of light. Also, chilling the pie is key; don't skip this step! If you don't chill it enough, the filling may not set right. Lastly, remember to measure your ingredients precisely. Using too much of one thing can change the taste and texture. Pro Tips Use High-Quality Chocolate: Choosing high-quality semi-sweet chocolate chips will enhance the flavor of your pie, making it even more indulgent. Chill the Filling: If your filling is too soft, refrigerate it for a short time before pouring it into the crust to help it firm up a bit. Variations on Toppings: Feel free to experiment with toppings like crushed nuts or drizzles of caramel sauce for a unique twist on the classic recipe. Make Ahead: This pie can be made a day in advance, making it a great dessert option for parties or gatherings. {{image_2}} You can make a no-bake version of this pie! To do this, simply skip baking the crust. Just press the crushed Oreo cookies mixed with melted butter into a pie dish. Then, refrigerate it to set. This method saves time and keeps everything nice and cool. To make this pie vegan and dairy-free, swap the cream cheese for a vegan cream cheese. Use coconut cream instead of heavy cream. You can also use maple syrup instead of powdered sugar. Make sure to check the Oreo cookies, as some brands may contain dairy. Feel free to get creative with flavors! You can add more chocolate by mixing in chocolate chips with the peanut butter filling. Try using dark chocolate for a richer taste. For toppings, consider crushed nuts, whipped coconut cream, or fresh berries. Each adds a unique twist to this delightful pie. To keep your Chocolate Peanut Butter Oreo Pie fresh, store it in the fridge. Use a pie cover or plastic wrap. This helps keep the pie moist and prevents it from absorbing other smells. The pie stays good in the fridge for about 5 days. After that, it may lose its fresh taste and creamy texture. Check for any signs of spoilage before eating. You can freeze the pie for up to 2 months. First, slice the pie into wedges. Wrap each slice in plastic wrap and then foil. This keeps them safe from freezer burn. When ready to eat, thaw in the fridge overnight. Enjoy the pie chilled for the best taste! Yes, you can use reduced-fat ingredients. However, this can change the taste and texture. The pie may not be as rich or creamy. I suggest using reduced-fat cream cheese and peanut butter. The crust can also use reduced-fat Oreos. You can use coconut cream or a non-dairy milk like almond milk. Whipped topping is another option for a lighter feel. Just remember that this can affect the pie’s texture and flavor. Coconut cream gives a nice richness, while almond milk may make it less creamy. Yes, you can make this pie ahead of time. It’s great to chill it overnight. This way, the flavors blend well, and it sets perfectly. Just cover it tightly with plastic wrap to keep it fresh. Absolutely! You can use gluten-free Oreo cookies for the crust. Check the labels to ensure all other ingredients are gluten-free. This way, everyone can enjoy this tasty pie without worrying. This blog provided a detailed guide on making a delicious pie. We covered key ingredients, step-by-step instructions, and tips for the best results. Variations and storage tips ensure you can customize and preserve your pie well. Remember, quality ingredients matter for taste. Follow the methods closely to avoid pitfalls. Enjoy your creamy, dreamy pie and feel free to experiment with flavors. You now have all the tools to impress with this delightful dessert!

Chocolate Peanut Butter Oreo Pie Irresistible Delight

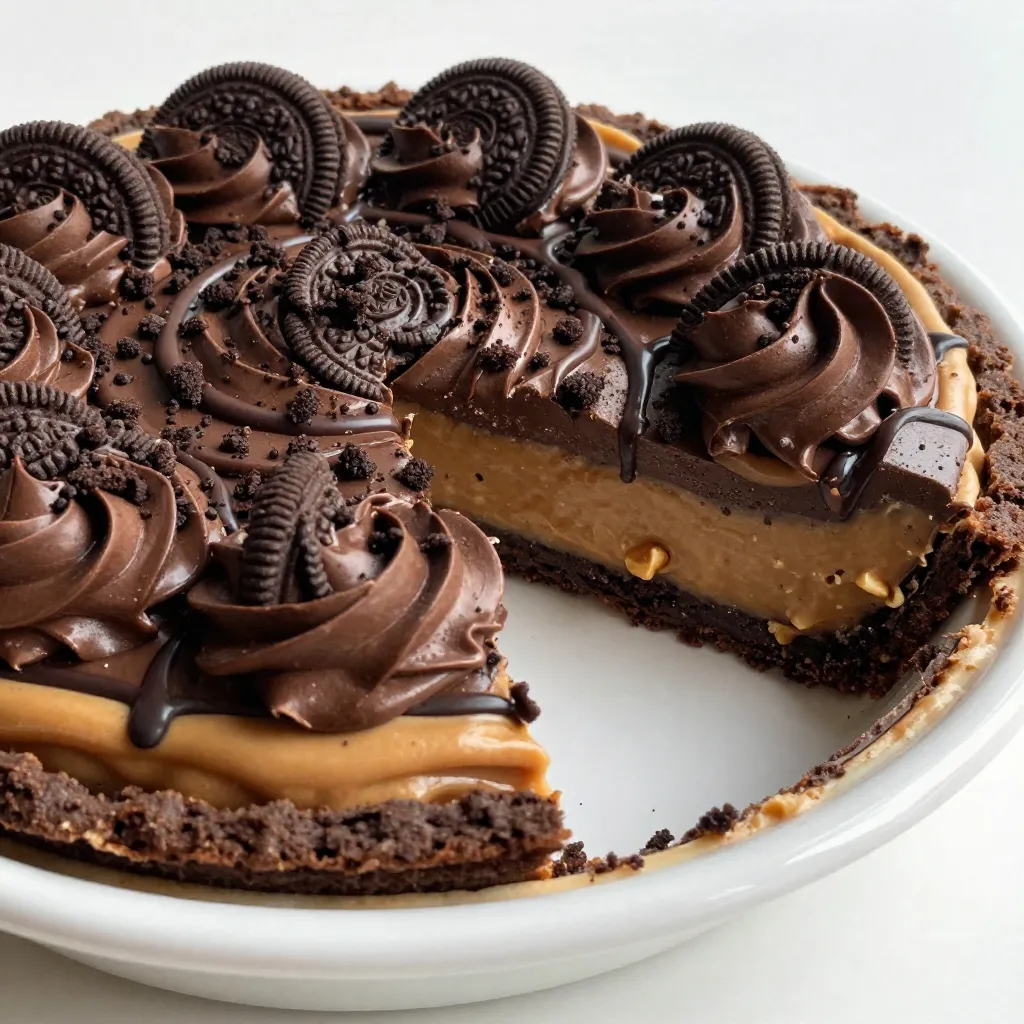
Craving something sweet? You’re in for a treat! This Chocolate Peanut Butter Oreo Pie is your new go-to dessert. Imagine

Older posts
Page1 Page2 … Page84 Next →

dsad

© 2026 pureeatsnow • Built with GeneratePress

Our Policies

  • Copyright Policy
  • Cookie Policy
  • GDPR Policy
  • Privacy Policy
  • Disclaimer
  • Terms Of Use

More Information

  • Home
  • About
  • Contact
  • Appetizers
  • Dessert
  • Dinner
  • Drinks
©2026, pureeatsnow About Back To Top