Skip to content
DisclaimerTerms Of UseGDPR PolicyCookie Policy

pureeatsnow

  • Home
  • Drinks
  • Appetizers
  • Dinner
  • Dessert
  • About
  • Contact
  • Privacy Policy
DisclaimerTerms Of UseGDPR PolicyCookie Policy

NO-ING-IMG

- 1 lb ground chicken - 1 tablespoon vegetable oil - 3 cloves garlic, minced - 1 inch ginger, grated - 1 red bell pepper, diced - 1 carrot, shredded - 3 green onions, chopped - 1/4 cup creamy peanut butter - 2 tablespoons soy sauce - 1 tablespoon honey - 1 tablespoon lime juice - 1 teaspoon sriracha (adjust to taste) - 1 head of iceberg or butter lettuce, leaves separated - Salt and pepper to taste - Chopped peanuts and cilantro for garnish To make Spicy Peanut Chicken Lettuce Wraps, gather these fresh and tasty ingredients. Ground chicken gives the wraps a hearty base. Vegetable oil helps cook the chicken and veggies perfectly. Garlic and ginger add great flavor and aroma to the dish. For crunch and color, include red bell pepper, carrot, and green onions. These veggies not only taste good but also make your wraps look vibrant. The peanut sauce is the star of this recipe. Use creamy peanut butter, soy sauce, honey, lime juice, and sriracha for that spicy kick. Adjust the sriracha to make it milder if you prefer. Finally, you'll need lettuce for wrapping. Iceberg or butter lettuce works great. Don’t forget to garnish your wraps with chopped peanuts and cilantro for extra flavor and crunch. With these ingredients, you are ready to create a dish that is sure to impress. Enjoy the fun of making and eating these flavorful wraps! {{ingredient_image_1}} 1. Start with a large skillet. Heat 1 tablespoon of vegetable oil over medium heat. 2. Add 3 minced cloves of garlic and 1 inch of grated ginger. Sauté for about 1 minute until you smell their aroma. 3. Next, add 1 pound of ground chicken. Break it apart with your spatula. Cook until it is browned, about 5 to 7 minutes. 4. Once the chicken is cooked, stir in 1 diced red bell pepper, 1 shredded carrot, and 3 chopped green onions. Cook for another 3 to 4 minutes. The veggies should feel tender. 1. In a small bowl, combine 1/4 cup of creamy peanut butter, 2 tablespoons of soy sauce, 1 tablespoon of honey, 1 tablespoon of lime juice, and 1 teaspoon of sriracha. 2. Mix this well until the sauce is smooth and creamy. 1. Pour the peanut sauce over the chicken mixture. Stir well to coat everything evenly. Cook for an extra 2 minutes to heat it through. 2. Season with salt and pepper to your taste. 3. Serve the spicy chicken mixture in the separated lettuce leaves. 4. Top with chopped peanuts and fresh cilantro for a tasty garnish. To ensure chicken is cooked through, use a meat thermometer. The chicken should reach 165°F. This keeps it safe to eat. Meanwhile, breaking the chicken into small pieces helps it cook evenly. You can adjust spiciness with sriracha. Start with a teaspoon, then taste. If you want more heat, add more sriracha. This way, everyone can enjoy their wraps at their spice level. To neatly serve wraps, use a large platter. Place the lettuce leaves on one side. Spoon the chicken mixture into the middle. This makes it easy for everyone to build their wraps. For plating, add garnishes like chopped peanuts and cilantro. These add color and crunch. You can also drizzle extra peanut sauce on top for a beautiful touch. Pro Tips Use Fresh Ingredients: Fresh garlic and ginger will enhance the flavor of your dish significantly compared to dried or powdered versions. Adjust Spice Level: Feel free to modify the amount of sriracha in the sauce to suit your heat preference; start with less and add more as needed. Prep Ahead: You can prepare the chicken mixture in advance and store it in the fridge for up to a day. Just reheat before serving. Garnish for Presentation: A sprinkle of chopped peanuts and fresh cilantro not only adds flavor but also enhances the visual appeal of your dish. {{image_2}} You can change the ground chicken to ground turkey for a leaner option. Turkey keeps the dish light but still very tasty. If you want a plant-based choice, use tofu instead. Simply crumble firm tofu and cook it like the chicken. Both options give you a great texture and flavor. Feel free to jazz up your wraps by adding mushrooms or bean sprouts. Mushrooms add a nice umami taste, while bean sprouts give a nice crunch. You can also swap peanut butter with almond butter. Almond butter has a unique flavor that works well in this dish. Just make sure to adjust the salt if you do this. If you like your sauce sweeter, add more honey. This will balance the spice nicely. To kick up the heat, try a spicier sauce. You can use chili paste or add extra sriracha. Both options will give your wraps a fun twist and make them even more exciting. To keep your spicy peanut chicken lettuce wraps fresh, use airtight containers. Place any leftover chicken mixture in one container. Store the lettuce leaves separately. This helps keep them crisp. Refrigerate both for up to three days. If you mix them together, the lettuce will get soggy. When you're ready to enjoy the chicken mixture again, use the stovetop. Heat a skillet over medium heat. Add the chicken mixture and stir until it's warm. This usually takes about 5 minutes. You can also use a microwave. Just heat in short bursts, stirring in between to avoid hot spots. Yes, you can freeze the chicken mixture! Place it in a freezer-safe bag or container. Make sure to remove as much air as possible. This will help prevent freezer burn. The chicken mixture can last in the freezer for up to three months. Just thaw it in the fridge overnight before reheating. Iceberg and butter lettuce both work well for wraps. Iceberg has a nice crunch. It holds fillings tightly, making it easy to eat. Butter lettuce is softer and has a mild flavor. It wraps around fillings nicely and adds a sweet taste. If you want crunch, go for iceberg. If you want softness, use butter lettuce. Yes, you can prep this meal ahead. Cook the chicken mixture first. Store it in the fridge for up to three days. When you're ready to serve, just heat it up. Keep the lettuce separate until serving time. This keeps the leaves fresh and crisp. These wraps have a nice kick from sriracha. The spice level can be adjusted easily. If you like it mild, use less sriracha. For more heat, add extra sriracha. Taste the mixture before serving to find your perfect level. In this blog post, I covered how to make delicious Spicy Peanut Chicken Lettuce Wraps. We looked at the key ingredients, clear cooking steps, and important tips to help you succeed. I also shared variations for different proteins and flavors, plus storage advice. The wraps are tasty, fun, and can suit many diets. Now it's time for you to try this recipe. You’ll enjoy making and sharing these wraps with family or friends!

Spicy Peanut Chicken Lettuce Wraps Flavorful Delight

Get ready for a flavor explosion with my Spicy Peanut Chicken Lettuce Wraps! These easy-to-make wraps blend savory ground chicken

To make Lemon Garlic Broccoli Pasta, gather these items: - 8 ounces pasta (spaghetti or fettuccine works well) - 2 cups fresh broccoli florets - 4 cloves garlic, minced - 1/4 cup olive oil - Zest of 1 lemon - 2 tablespoons lemon juice - 1/2 teaspoon red pepper flakes (optional for spice) - Salt and pepper to taste - Freshly grated Parmesan cheese (for serving) - Fresh parsley, chopped (for garnish) Each ingredient plays a key role in creating a fresh and zesty flavor. If you don't have all the ingredients, here are some swaps: - Use whole wheat pasta for a healthier option. - Swap broccoli for green beans or asparagus for a different crunch. - Try garlic powder if you are out of fresh garlic. - Replace olive oil with avocado oil for a different taste. - Use nutritional yeast instead of Parmesan for a vegan twist. These alternatives keep the dish tasty while catering to your pantry. Using fresh ingredients can make a big difference. - Choose vibrant green broccoli. It should feel firm and look fresh. - Select good quality olive oil. It adds depth to the dish. - Fresh garlic is best. It has a stronger flavor than pre-minced options. - Use ripe lemons for the best zest and juice flavor. Quality ingredients lead to a better taste and overall experience. {{ingredient_image_1}} Start by boiling a large pot of salted water. Use about 8 ounces of pasta, like spaghetti or fettuccine. Cook it according to the package instructions. When there are just 2 to 3 minutes left, add 2 cups of fresh broccoli florets to the pot. This helps the broccoli stay bright and tender. Once done, drain both the pasta and broccoli. Save about 1/2 cup of pasta water for later. Set them aside while you make the garlic oil. In a large skillet, pour in 1/4 cup of olive oil. Heat it over medium heat until it shimmers. Then, add 4 cloves of minced garlic. Sauté the garlic for about 30 seconds. Watch it closely so it doesn’t burn. If you like a bit of heat, add 1/2 teaspoon of red pepper flakes and cook for another 10 seconds. The kitchen will smell amazing! Now, it’s time to mix everything together. Add the cooked pasta and broccoli to your skillet with the garlic oil. Toss everything well so the pasta and broccoli are coated in the oil. Pour in the zest of 1 lemon and 2 tablespoons of lemon juice. If the pasta looks dry, use the reserved pasta water to make it creamy. Season with salt and pepper to taste. Toss again to blend the flavors. Serve right away, topped with freshly grated Parmesan cheese and a sprinkle of chopped parsley for a fresh touch. Enjoy your meal! To keep your broccoli bright and crunchy, add it to the boiling water only in the last few minutes. This method gives it a nice green color and keeps it from getting mushy. Start cooking the pasta first, then add the broccoli florets two to three minutes before draining. This way, they cook perfectly together, and you save time. You can make this dish even better by adding more tasty ingredients. Here are some ideas: - Cherry tomatoes: Add them for a burst of sweetness. - Lemon zest: Extra zest boosts that fresh lemon flavor. - Nuts: Toss in pine nuts or walnuts for crunch. - Herbs: Fresh basil or oregano adds a nice twist. Feel free to mix and match these options to find your perfect flavor profile. While spaghetti and fettuccine work well, you can use other pasta types too. Consider these options: - Penne: Its shape holds sauce well. - Fusilli: The twists catch bits of garlic and broccoli. - Orzo: This small pasta offers a fun texture. Choose the pasta you like best, and enjoy your Lemon Garlic Broccoli Pasta! Pro Tips Fresh Broccoli Matters: Using fresh broccoli florets will enhance the flavor and texture of your dish. Frozen broccoli can become mushy when cooked. Perfect Pasta Cooking: To avoid overcooked pasta, set a timer and taste a strand a minute or two before the package's suggested cooking time. Adjusting Sauce Consistency: If the pasta feels dry after adding the lemon juice and zest, gradually incorporate the reserved pasta water until you reach your desired creaminess. Garnish for Flavor: Fresh parsley not only adds a pop of color but also a fresh flavor that complements the lemon and garlic beautifully. Don't skip it! {{image_2}} You can easily add protein to this dish. Chicken, shrimp, or tofu work well. Just cook your protein in the skillet before adding garlic. For chicken, use diced breast and cook until golden. For shrimp, toss them in when the garlic is fragrant. For tofu, cube it and sauté until crispy. Each option adds flavor and makes the meal heartier. To make this dish vegan, skip the Parmesan cheese. You can replace it with nutritional yeast for a cheesy flavor. Another option is to use vegan cheese. Make sure to check the labels for dairy-free versions. This way, everyone can enjoy the meal without losing taste. Feel free to add seasonal veggies to your pasta. In spring, peas or asparagus are great choices. In summer, try zucchini or bell peppers. In fall, add roasted butternut squash or kale. Each vegetable brings a new taste and texture. Plus, this keeps your meals fresh and exciting throughout the year. You can store leftover Lemon Garlic Broccoli Pasta in an airtight container. Let the pasta cool first. Place it in the fridge for up to three days. This dish keeps its flavor well, but the broccoli may lose some crunch. To reheat, use a skillet on medium heat. Add a splash of olive oil to keep it moist. Stir often to heat evenly. You can also use a microwave. Just cover the bowl with a lid or plastic wrap. Heat in short bursts to avoid overcooking. If you want to freeze this dish, do so without the cheese. Let it cool completely first. Place it in a freezer-safe bag or container. It can last up to three months in the freezer. When ready to eat, thaw it in the fridge overnight before reheating. Yes, you can use frozen broccoli. It saves time and is still nutritious. Just cook it until tender, similar to fresh broccoli. You may want to add it to the pasta for the last 4-5 minutes to heat through. Frozen broccoli can be softer, so adjust cooking time as needed. Spaghetti or fettuccine are both great choices. They hold the sauce well. You can also try penne or linguine for a fun twist. Choose any pasta you enjoy, but keep the cooking time in mind. Follow package instructions for perfect texture. To make this dish gluten-free, choose gluten-free pasta. There are many tasty options available now. You can find them made from rice, corn, or chickpeas. Just cook as directed on the package. The rest of the ingredients are already gluten-free, so you're set! This blog post covered key ingredients for Lemon Garlic Broccoli Pasta, including quality tips and alternatives. I shared step-by-step cooking methods, from preparing the pasta and broccoli to making garlic oil. Helpful tips on avoiding overcooked broccoli and selecting the best pasta type enhance your dish. We also explored tasty variations and storage tips for leftovers. In my view, trying new ingredients makes cooking fun and delicious. Enjoy experimenting with this simple recipe.

Lemon Garlic Broccoli Pasta Flavorful Weeknight Meal

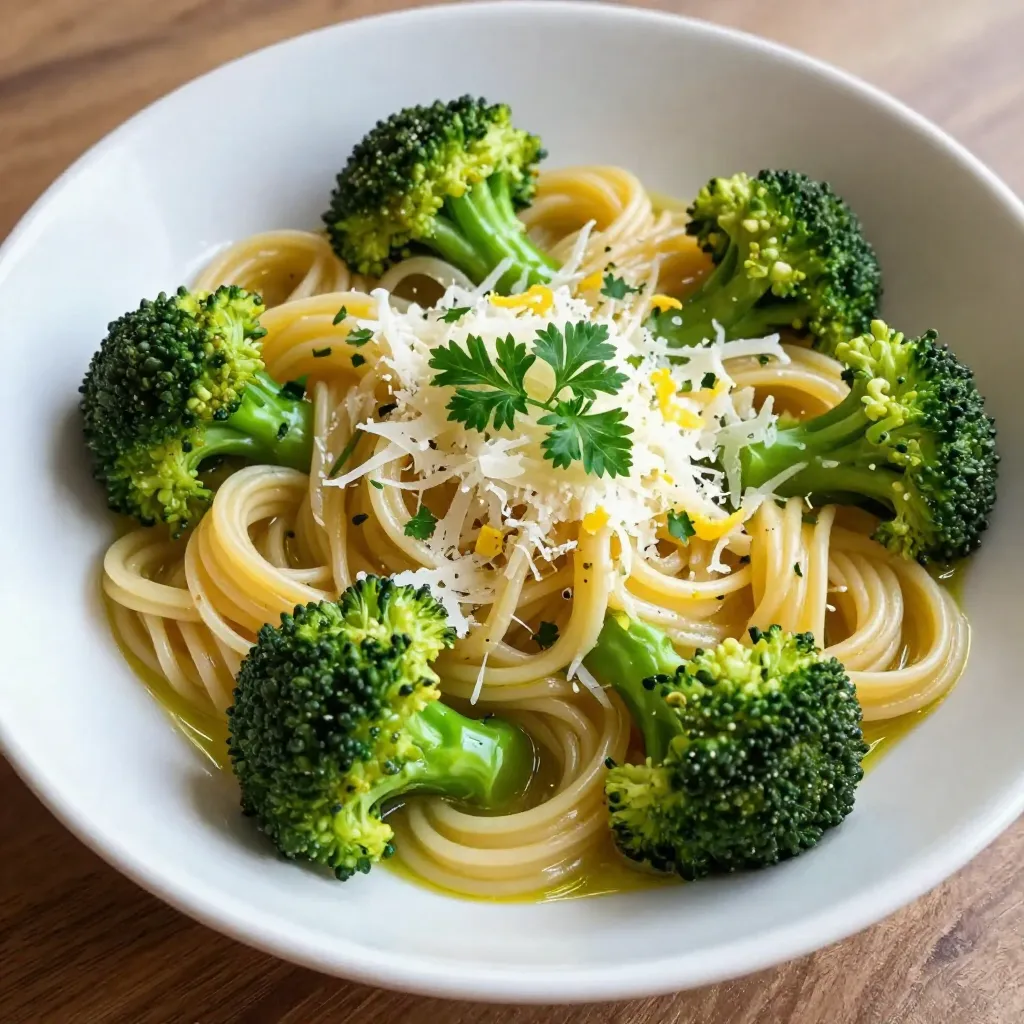
Looking for a quick and tasty dinner? Lemon Garlic Broccoli Pasta is the perfect weeknight meal! This dish is fresh,

To make creamy spinach mushroom lasagna, you'll need a few key ingredients. Here’s the list: - 9 lasagna noodles - 2 cups fresh spinach, roughly chopped - 1 cup mushrooms, sliced - 1 small onion, diced - 2 cloves garlic, minced - 2 cups ricotta cheese - 1 cup shredded mozzarella cheese - 1 cup grated Parmesan cheese - 2 cups marinara sauce - 1 cup heavy cream - 1 teaspoon Italian seasoning - Salt and pepper to taste - 2 tablespoons olive oil Each ingredient plays an important role. The lasagna noodles provide structure. The spinach and mushrooms add flavor and nutrients. The cheeses create that creamy texture we all love. You can customize this dish to suit your taste. Here are some options: - Add cooked chicken or sausage for extra protein. - Use different cheeses like goat cheese or feta. - Throw in other veggies like zucchini or bell peppers. - Swap marinara sauce for pesto or Alfredo sauce. - Try adding spices like red pepper flakes for heat. These options can elevate your lasagna and make it unique. You want the best ingredients for your lasagna. Here are some tips on where to find them: - Fresh Produce: Local farmers' markets often have fresh spinach and mushrooms. - Grocery Stores: Look for organic options at your local grocery store. - Cheese: Specialty cheese shops usually have high-quality ricotta, mozzarella, and Parmesan. - Online: If you can't find something in-store, consider online grocery delivery services. Quality ingredients make a big difference in your dish. When you use fresh and flavorful items, your lasagna will shine. {{ingredient_image_1}} To start, boil a large pot of salted water. Once it bubbles, add 9 lasagna noodles. Cook them as the package says, usually about 8-10 minutes. When they are done, drain the noodles. Lay them flat on parchment paper. This keeps them from sticking together. Next, grab a large skillet. Heat 2 tablespoons of olive oil over medium heat. Add 1 small diced onion. Cook it for 2-3 minutes until it gets soft. Then, toss in 2 minced garlic cloves and 1 cup of sliced mushrooms. Sauté for about 5 minutes until the mushrooms become brown. Finally, stir in 2 cups of chopped spinach. Cook it until it wilts, then season with salt, pepper, and 1 teaspoon of Italian seasoning. Remove this mix from heat. In a medium bowl, combine 2 cups of ricotta cheese, 1 cup of heavy cream, and half of the grated Parmesan cheese (1/2 cup). Use a spoon or spatula to mix well. Add salt and pepper to taste. This sauce adds creaminess to our lasagna. Now it’s time to layer! In a 9x13 inch baking dish, spread a thin layer of marinara sauce on the bottom. Place 3 lasagna noodles on top. Spread half of the ricotta mixture over the noodles. Next, add half of the sautéed vegetables you made. Spoon 1/3 of the marinara sauce on top and sprinkle with a third of the mozzarella cheese. Repeat this layering: noodles, ricotta, vegetables, and sauce. End with a final layer of noodles on top. Preheat your oven to 375°F (190°C). Spread the rest of the marinara sauce over the last layer of noodles. Sprinkle the remaining mozzarella cheese and Parmesan cheese on top. Cover the dish with aluminum foil. Bake it for 25 minutes. After that, remove the foil and bake for another 15 minutes until the cheese is bubbly and golden. After baking, let the lasagna cool for 10 minutes. This makes it easier to slice. Serve it warm. You can enjoy it with a simple salad or some garlic bread. This creamy spinach mushroom lasagna is a hit for any dinner! To stop noodles from sticking, cook them in a large pot. Use plenty of water and add salt to the water. When the noodles are done, drain them well. Place the noodles on a parchment-lined sheet. Spread them out so they do not touch each other. Start by heating olive oil in a skillet over medium heat. Add diced onion first and sauté for about two to three minutes until it looks clear. Next, add minced garlic and sliced mushrooms. Cook until the mushrooms turn golden brown. Add chopped spinach last and stir until it wilts down. This method keeps the flavors bright and fresh. For a creamy lasagna, mix ricotta cheese with heavy cream in a bowl. This combo makes the filling smooth and rich. Add a pinch of salt and pepper to taste. Mixing in some grated Parmesan cheese also helps to enhance the creamy texture. You can prepare this lasagna ahead of time. Assemble the layers and cover the dish with foil. Store it in the fridge for up to two days. When ready to bake, just add a few extra minutes to the cooking time. This makes it easy for busy days! Pro Tips Perfectly Cooked Noodles: Ensure that the lasagna noodles are al dente when cooking. They will absorb moisture from the sauce while baking, so you want them slightly firm to avoid mushiness. Layering Technique: For even distribution, alternate the layers of ricotta and vegetable mixtures. This ensures every slice has a balanced flavor and texture. Cheese Variations: Feel free to mix different cheeses like goat cheese or feta for a tangy twist. This can elevate the flavor profile of your lasagna. Resting Time: Allow the lasagna to rest for at least 10 minutes after baking. This helps the layers set and makes for cleaner slices when serving. {{image_2}} You can easily make this lasagna vegetarian. Just keep the mushrooms and spinach. Add more veggies like zucchini or bell peppers. You can also add roasted eggplant. This boosts flavor and texture. Use a mix of cheeses, like goat cheese or feta, to change the taste. It makes every bite unique. For a vegan version, swap out the ricotta cheese. Use tofu blended with lemon juice and nutritional yeast. This gives a creamy base. Replace mozzarella with vegan cheese. You can also skip the heavy cream and use coconut milk instead. It adds a nice sweetness. Ensure your marinara sauce is vegan-friendly too. To make this lasagna gluten-free, use gluten-free lasagna noodles. Many brands offer great options now. Check the package for cooking instructions. You can also layer in thin slices of zucchini or eggplant instead of noodles. This adds flavor and keeps it light. Enjoy every delicious bite without the gluten! After enjoying your creamy spinach mushroom lasagna, you will want to save any leftovers. Let the lasagna cool completely at room temperature. Once cooled, cover it tightly with plastic wrap or aluminum foil. You can also store it in an airtight container. This way, it stays fresh for up to three days in the fridge. If you want to save the lasagna for longer, freezing is a great option. First, let the lasagna cool fully. Then, cut it into individual portions. Wrap each piece tightly in plastic wrap, then in aluminum foil. This double wrapping prevents freezer burn. You can store the lasagna in the freezer for up to three months. When you're ready to eat, just thaw it in the fridge overnight. To reheat your lasagna, preheat your oven to 350°F (175°C). Place the portioned lasagna in an oven-safe dish. Add a splash of marinara sauce to keep it moist. Cover it with foil to prevent the cheese from burning. Heat for about 20-25 minutes until hot. If you want a bubbly top, remove the foil for the last 5 minutes of heating. Enjoy your delicious leftovers! Yes, you can use no-boil lasagna noodles. They save time and effort. Just layer them directly in the dish. The moisture from the sauce will cook them as the lasagna bakes. Keep an eye on the baking time, as it may change slightly. If you need a substitute for ricotta cheese, try cottage cheese. It has a similar texture. You can also use cream cheese mixed with yogurt. This mix will give a creamy finish. Aim for a smooth consistency for best results. The lasagna will last about 3 to 5 days in the refrigerator. Make sure it's in an airtight container. If you want to save it longer, freeze it. It can last for up to 3 months in the freezer. Absolutely! You can add other vegetables like zucchini or bell peppers. They will add color and flavor. Just sauté them along with the spinach and mushrooms. This makes the dish even more nutritious. Yes, this recipe is great for meal prep. You can make it ahead of time and store it. Just bake it when you're ready to eat. This makes weeknight dinners easy and delicious. This blog post shared key tips for making creamy spinach mushroom lasagna. We covered essential ingredients and steps for a perfect dish. You learned how to customize your recipe, store leftovers, and address common questions. My final thought is simple: this lasagna is easy and fun to make. Enjoy the process and tweak it to your taste. You'll impress family and friends with your skills and delicious meals. Happy cooking!

Creamy Spinach Mushroom Lasagna Flavorful Dinner Idea

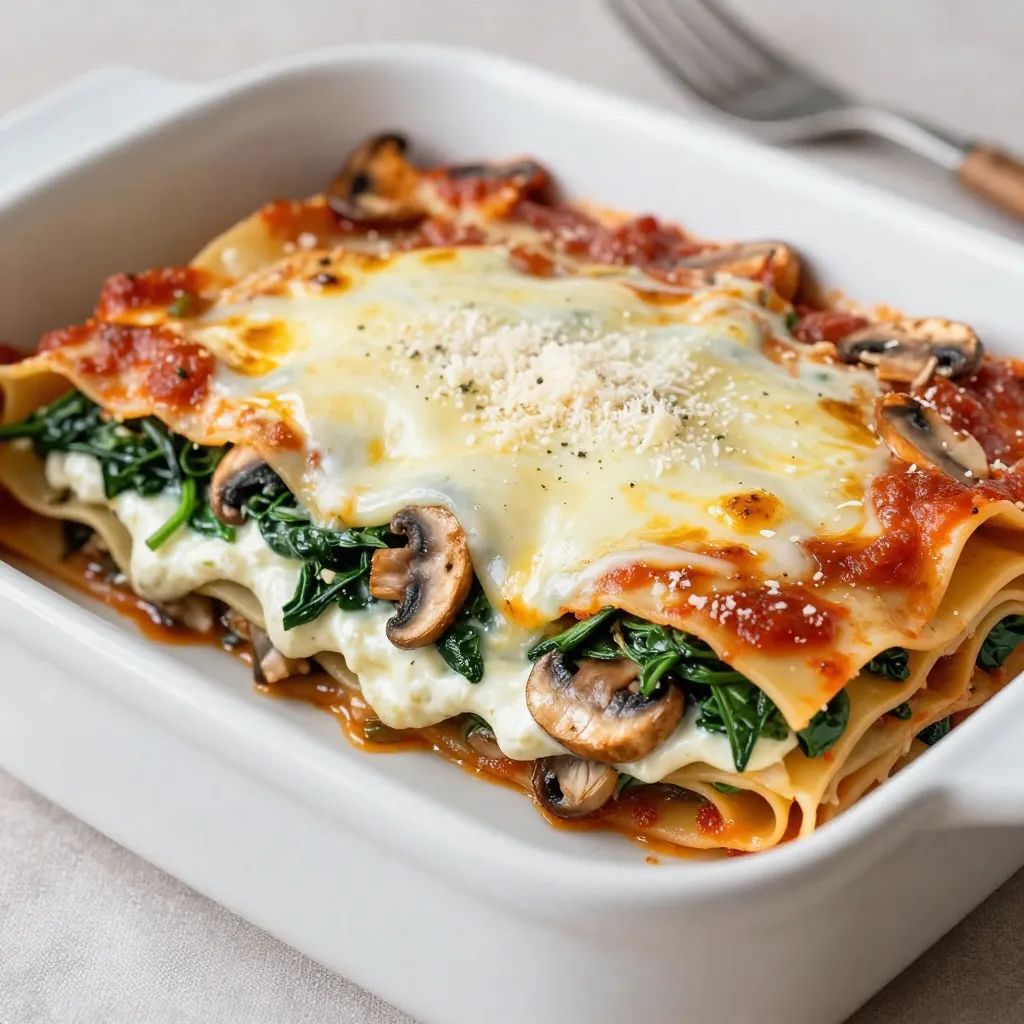
Looking for a tasty and comforting dinner idea? You can’t go wrong with creamy spinach mushroom lasagna. This dish is

- 1 cup unsalted butter, melted - 1 cup granulated sugar - 1 cup brown sugar, packed - 4 large eggs - 2 teaspoons vanilla extract - 1 cup all-purpose flour - 1 cup unsweetened cocoa powder - 1/2 teaspoon salt - 1/2 teaspoon baking powder - 1 cup peanut butter (creamy or crunchy) - 1 cup mini peanut butter cups, chopped - 1/2 cup chocolate chips (optional, for topping) - Sea salt for sprinkling (optional) You can swap unsalted butter for coconut oil if you want a dairy-free option. For sugar, you might use coconut sugar instead of granulated sugar. If you need a gluten-free version, use gluten-free flour. You can also replace eggs with flax eggs (1 tablespoon ground flaxseed mixed with 2.5 tablespoons water per egg) for a vegan twist. Instead of mini peanut butter cups, try using chopped chocolate or other candy bars. Make sure your ingredients are fresh. Always check the expiration date on baking powder and flour. For the best flavor, use high-quality cocoa powder. When measuring flour, spoon it into your measuring cup and level it off. This prevents the brownies from being too dense. Store any leftover bars in an airtight container at room temperature for up to three days. For longer freshness, keep them in the fridge. Add sea salt right before serving for a nice touch. {{ingredient_image_1}} Start by preheating your oven to 350°F (175°C). This step is key to getting your brownie bars just right. Next, grease a 9x13 inch baking dish. Line it with parchment paper, leaving some paper hanging over the sides. This helps you lift the bars out easily later. In a large bowl, whisk together 1 cup of melted butter, 1 cup of granulated sugar, and 1 cup of brown sugar. Mix until it looks smooth. Now, add 4 large eggs one by one. Mix well after each egg, then stir in 2 teaspoons of vanilla extract. In another bowl, sift together 1 cup of all-purpose flour, 1 cup of cocoa powder, 1/2 teaspoon of salt, and 1/2 teaspoon of baking powder. Slowly add this dry mix to the wet mix. Fold gently until just combined. Pour half of the brownie batter into your prepared dish. Spread it evenly. In a small bowl, mix 1 cup of peanut butter with a little warmed butter if needed. Drop dollops of this peanut butter mix over the brownie base. Sprinkle 1 cup of chopped mini peanut butter cups over the peanut butter layer. Then, pour the rest of the brownie batter on top, spreading it out to cover everything. If you want, sprinkle some chocolate chips on top for extra flavor. Bake for 25-30 minutes. The edges should set, and the center should look slightly sticky when you check with a toothpick. The key to a great brownie bar is not to overmix. When you fold the dry ingredients into the wet ingredients, do it gently. This keeps the bars soft and chewy. Also, let your butter cool a bit before mixing. If it’s too hot, it can cook the eggs, which isn’t good. Another tip is to check for doneness carefully. You want the edges to be firm, but the center should still be soft. If you bake them too long, they will dry out. Once your brownie bars are done, take them out of the oven. Let them cool in the pan for about 20 minutes. If you like, sprinkle some sea salt on top before they cool fully. This adds a nice touch. Lift the bars out using the parchment paper. Place them on a wire rack to cool completely. Once cooled, cut them into bars. Serve them stacked on a cake stand or a wooden board. You can garnish with extra mini peanut butter cups or a light dusting of powdered sugar for a pretty finish. To get the best texture in your peanut butter cup brownie bars, watch the baking time. Bake them until the edges are set but the center is soft. A toothpick should come out slightly sticky. This means they will be fudgy and not dry. Also, let them cool in the pan for a bit. This helps them set up nicely, making them easier to cut. Avoid overmixing the batter. When you mix too much, you make the brownies tough. Also, do not skip the sea salt if you want a richer flavor. It enhances the sweet and salty mix that makes these bars so good. Lastly, make sure to use fresh ingredients. Old baking powder can ruin the rise and texture. You can boost the flavor of your bars easily. Try adding different types of chocolate chips, like dark chocolate or white chocolate. You can also mix in nuts for a crunchy texture. If you love caramel, swirl it in with the peanut butter. This adds a nice twist to the taste. For a bit of spice, a dash of cinnamon can work wonders too! Pro Tips Use Room Temperature Ingredients: Allow your eggs and peanut butter to come to room temperature for easier mixing and a smoother batter. Don’t Overmix: Once you add the dry ingredients to the wet, mix just until combined to keep your brownies fudgy. Check for Doneness: Use a toothpick to test; it should come out with a few moist crumbs for the perfect brownie texture. Let Them Cool: Allow the brownie bars to cool completely before cutting to achieve clean, neat edges. {{image_2}} You can use many kinds of peanut butter cups. Regular ones are a classic choice. Dark chocolate cups add a rich twist. White chocolate cups bring a creamy flavor. For a fun surprise, try using flavored peanut butter cups, like caramel or mint. Each type gives your brownie bars a new taste. You can dress up your brownie bars with extra toppings. A sprinkle of sea salt adds a nice touch. Chopped nuts like peanuts or almonds give crunch. You can also add a drizzle of melted chocolate on top. For a fruity twist, consider adding sliced strawberries or bananas. These toppings let you customize your dessert and impress your friends. Changing the flavors in your brownie bars can be fun. You can swap regular chocolate for flavored chocolate, like raspberry or espresso. This change can add a delightful surprise. If you like other nut butters, feel free to use them instead of peanut butter. Almond or cashew butter can create a unique taste. These simple swaps can turn your bars into a new treat every time! To keep your Peanut Butter Cup Brownie Bars fresh, store them in an airtight container. Place parchment paper between layers to prevent sticking. Make sure they cool completely before sealing. This helps avoid sogginess and keeps them tasty. These brownie bars can last up to a week at room temperature. If you keep them in the fridge, they may last up to two weeks. Just remember to check for any signs of spoilage, like unusual smells or textures. You can freeze these bars for longer storage. Cut them into squares and wrap each piece tightly in plastic wrap. Then place the wrapped bars in a freezer bag. They will stay fresh for up to three months. When you're ready to enjoy, let them thaw in the fridge overnight or at room temperature for a few hours. Yes, you can make these bars gluten-free. Simply replace all-purpose flour with a gluten-free flour blend. Make sure the blend is suitable for baking. This will keep the texture light and the taste delicious. Always check the labels to ensure all ingredients are gluten-free. To cut brownie bars, first, let them cool completely. Use the parchment paper to lift them from the pan. Place the brownies on a cutting board. Use a sharp knife for clean cuts. Wipe the knife with a damp cloth between cuts. This helps keep the edges neat. To adjust sweetness, you can reduce the sugar in the recipe. Try using half a cup less of granulated and brown sugar. You could also add a touch of salt to balance the sweetness. If you like, use dark chocolate chips instead of milk chocolate for a richer taste. You learned about making delicious peanut butter cup brownie bars. We covered the best ingredients, tasty tips, and key techniques to perfect your bars. Remember the importance of freshness and quality. I shared variations to inspire your creativity and how to store your bars for later enjoyment. If you follow these steps, you will impress everyone with your baking skills. Making these treats is fun and rewarding, so get started and enjoy!

Peanut Butter Cup Brownie Bars Easy and Tasty Treat

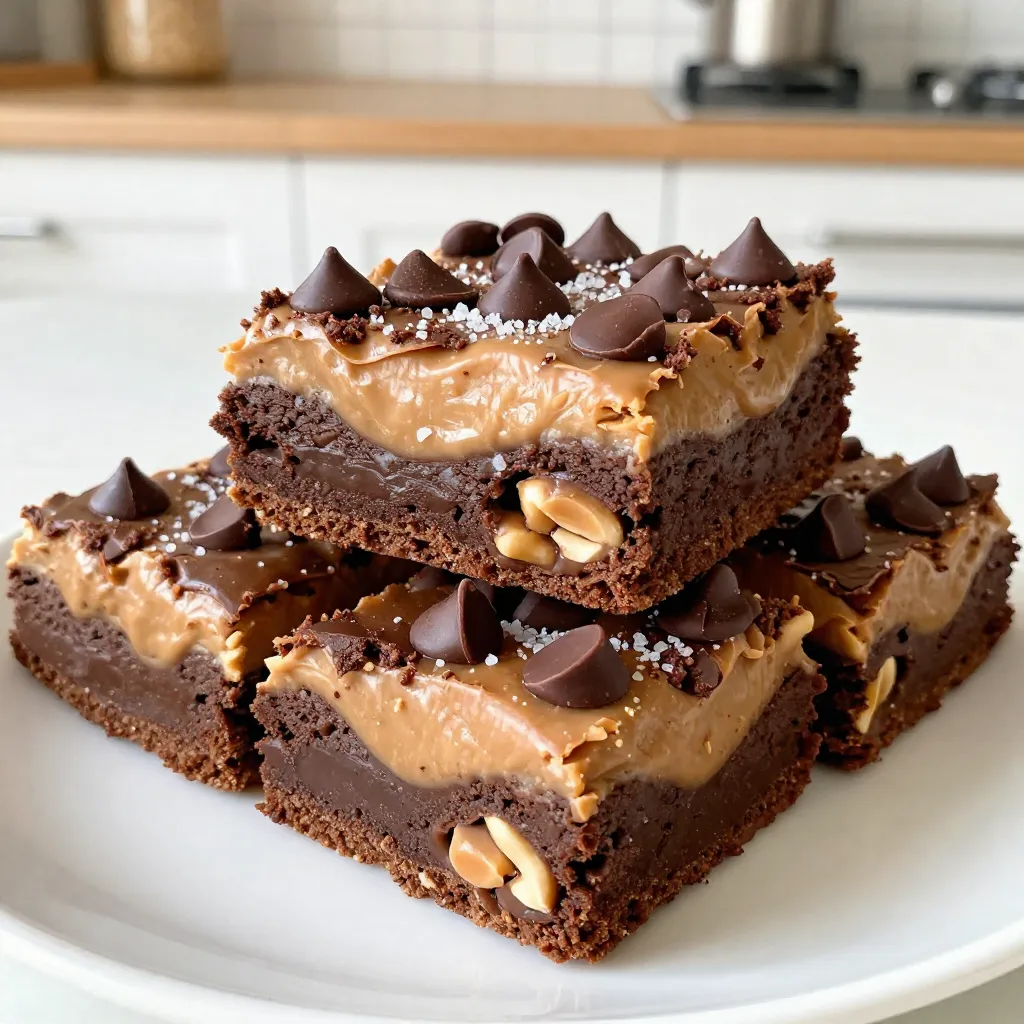
Are you ready to indulge in a sweet treat that combines rich brownies with creamy peanut butter cups? Look no

- 4 large carrots, peeled and cut into fry shapes - 3 tablespoons olive oil - 4 cloves garlic, minced - 1/2 cup grated Parmesan cheese - 1 teaspoon dried oregano - 1/2 teaspoon smoked paprika - Salt and black pepper to taste - Fresh parsley, chopped for garnish You can switch oils if you like. Avocado oil or coconut oil works great. For a different cheese, try nutritional yeast for a vegan twist. You can also use feta or goat cheese. If you want more flavor, add fresh herbs like thyme or rosemary. You can change the spices, too. Chili powder could give a nice kick. Try adding cumin for a warm touch. Using fresh carrots gives the best taste. They are crispy and sweet when baked. Choose firm carrots with no spots. If you use frozen carrots, they may not be as crunchy. Thaw them first, and make sure to dry them well. This helps get rid of extra moisture. If you use fresh carrots, cut them into even shapes. This way, they cook evenly. {{ingredient_image_1}} Start by preheating your oven to 425°F (220°C). This heat makes the fries crispy. Next, take a baking sheet and line it with parchment paper. This helps with cleanup and keeps the fries from sticking. In a large bowl, add your cut carrot fries. Pour in 3 tablespoons of olive oil. Toss the fries well so they are all coated. Then, add 4 cloves of minced garlic and 1/2 cup of grated Parmesan cheese. Sprinkle in 1 teaspoon of dried oregano, 1/2 teaspoon of smoked paprika, and salt and pepper to taste. Mix everything until the carrots are evenly covered. This mix gives the fries their great flavor. Spread the coated carrot fries in a single layer on the baking sheet. Make sure not to overcrowd them. This step is key for crispiness. Bake the fries for 20 to 25 minutes. Flip them halfway through for even cooking. When they are golden brown and crispy, they are done. For a final touch, sprinkle more Parmesan cheese and some fresh parsley on top. Enjoy your tasty and crispy carrot fries! To make your Garlic Parmesan Carrot Fries stand out, focus on seasoning. Start with fresh garlic for the best taste. Minced garlic brings a strong, rich flavor. Use a good-quality Parmesan cheese. This cheese adds saltiness and depth. Adjust the salt as needed, based on your cheese's salt level. You can also add herbs like thyme or rosemary for extra flavor. Don’t forget to taste as you go. Each step can change the taste. Crispiness is key for perfect carrot fries. First, cut the carrots evenly. This helps them cook at the same rate. When you coat them in oil, make sure each fry is well-covered. Spread them out on the baking sheet. If they touch, they will steam instead of crisp. Flip them halfway through baking. This lets all sides get golden brown. Bake at 425°F (220°C) for 20-25 minutes for the best results. Garlic Parmesan Carrot Fries are great on their own, but you can pair them too. Try serving them with a dipping sauce, like ranch or garlic aioli. You can also top them with fresh herbs for color and taste. For a fun twist, add a sprinkle of chili flakes for heat. These fries go well with grilled meats or as a side to a fresh salad. Enjoy them fresh out of the oven for the best flavor! Pro Tips Choose Uniform Carrots: Select carrots of similar size to ensure even cooking and consistent crispiness. Oil and Seasoning: Make sure the carrot fries are evenly coated with olive oil and seasoning for maximum flavor and crispiness. Don't Overcrowd: Spread the fries out on the baking sheet without overlapping to promote better airflow and prevent steaming. Keep an Eye on Baking Time: Ovens vary, so check the fries a few minutes before the suggested time to prevent burning. {{image_2}} You can change up the flavor of your garlic Parmesan carrot fries easily. Here are a few ideas: - Herbs: Try adding fresh thyme or rosemary for a fragrant twist. - Spices: A pinch of cayenne pepper can add a nice kick. - Cheeses: Swap Parmesan for feta or cheddar for a different taste. Mix and match these options to find your favorite flavor. You can even create a blend of different herbs and spices for a unique touch. If you need to make the recipe gluten-free, you are in luck! This dish is naturally gluten-free. Just keep an eye on any seasonings you use. For a dairy-free version, use nutritional yeast instead of Parmesan cheese. It gives a cheesy flavor without any dairy. You can also try dairy-free cheese for a similar taste. If you want to try different cooking methods, an air fryer works great for these fries. Preheat your air fryer to 400°F (200°C) and cook them for about 15 minutes. Check them halfway through for even cooking. For stovetop cooking, heat a non-stick skillet over medium heat. Add the coated carrot fries and cook for about 10-12 minutes, turning often. This method gives you crispy fries with a slightly different texture. To store leftovers, first let them cool down. Place the carrot fries in an airtight container. This keeps the fries fresh and prevents them from drying out. You can store them in the fridge for up to three days. When you’re ready to eat them again, simply reheat in the oven for crispiness. If you want to freeze your carrot fries, start by letting them cool completely. Lay them in a single layer on a baking sheet and freeze for about an hour. After they freeze, transfer the fries into a freezer-safe bag. Be sure to remove as much air as possible. They can last up to three months in the freezer. To reheat, bake them straight from frozen for 25-30 minutes at 425°F (220°C). In the fridge, the carrot fries stay fresh for three days. In the freezer, they can keep well for three months. For the best taste, enjoy them soon after baking. If you store them properly, the flavors and textures remain great! To make carrot fries crispy, start by cutting them into even shapes. This helps them cook evenly. Use enough olive oil to coat the fries well. Spread them out on a baking sheet without crowding. Overcrowding makes them steam instead of crisp. Bake at 425°F (220°C) for 20-25 minutes. Flip them halfway through for even browning. The high heat and proper spacing create that perfect crunch we all love. Yes, you can use baby carrots. They are convenient and save time. However, baby carrots may not get as crispy as large ones. Slice them into fry shapes for better texture. They will bake quicker, so check them often. Adjust the baking time to avoid overcooking them. This way, you can still enjoy a tasty side. Garlic Parmesan carrot fries pair well with many dishes. They make a great side for burgers or grilled chicken. You can also serve them with dips like ranch or garlic aioli. For a light meal, try them with a fresh salad. These fries add a fun twist to any dinner plate. They bring color and flavor that everyone will enjoy. This post covered everything you need to know about making delicious carrot fries. We talked about the right ingredients, baking techniques, and smart tips to get crispy results. I shared ideas for variations and how to store your fries. Remember, fresh carrots work best, but frozen ones can still be tasty. Enjoy experimenting with flavors and serving them in fun ways. Now, grab your carrots and start cooking!

Garlic Parmesan Carrot Fries Flavorful and Crispy Recipe

Are you ready to transform your snack game? My Garlic Parmesan Carrot Fries are not just crispy; they pack a

To make these lemon raspberry cupcakes, gather the following items: - 1 cup all-purpose flour - 1 teaspoon baking powder - 1/2 teaspoon baking soda - 1/4 teaspoon salt - 1/2 cup unsalted butter, softened - 1 cup granulated sugar - 2 large eggs - Zest of 1 lemon - 1/4 cup fresh lemon juice - 1/2 cup buttermilk - 1 cup fresh raspberries (plus extra for decoration) - 1 teaspoon vanilla extract Use high-quality ingredients for the best results. Fresh raspberries offer bright flavor. Choose ripe lemons for zest and juice. Unsalted butter gives better control over salt levels. For the flour, all-purpose works well and keeps the texture light. If you can, use fresh buttermilk. It adds richness and moisture to the batter. Always check the expiration dates on your baking powder and soda. You can make some swaps if needed. For flour, a gluten-free blend can work. Instead of buttermilk, mix regular milk with a teaspoon of vinegar or lemon juice for a quick substitute. If you need a dairy-free option, use coconut oil in place of butter. For eggs, try flaxseed meal mixed with water as a vegan alternative. Just remember, each swap may change the final taste or texture. {{ingredient_image_1}} Start by preheating your oven to 350°F (175°C). This step is key for even baking. While the oven heats, line a muffin tin with cupcake liners. This keeps the cupcakes from sticking and makes for easy removal. In a medium bowl, whisk together the dry ingredients. Combine 1 cup of all-purpose flour, 1 teaspoon of baking powder, 1/2 teaspoon of baking soda, and 1/4 teaspoon of salt. Mixing these ingredients first helps the cupcakes rise well. In a large bowl, use an electric mixer to cream together 1/2 cup of softened butter and 1 cup of granulated sugar. Beat them for about 3 to 4 minutes until the mixture looks light and fluffy. This step adds air to the batter, making the cupcakes soft. In another bowl, mix 1/2 cup of buttermilk with 1/4 cup of fresh lemon juice. Let it sit for a minute. This curdling helps add moisture and tang. Next, add 2 large eggs, the zest of 1 lemon, and 1 teaspoon of vanilla extract to the butter mixture. Beat well after adding each egg. Now, it’s time to combine the mixtures. Gradually add the dry ingredients to the butter mixture, alternating with the buttermilk mix. Start and end with the dry ingredients. Mix until just combined. Then gently fold in 1 cup of fresh raspberries. Be careful not to crush them while mixing. Divide the batter evenly among the cupcake liners, filling each about two-thirds full. Bake for 18 to 20 minutes. Check for doneness by inserting a toothpick into the center. If it comes out clean, your cupcakes are ready. After baking, let them cool in the pan for 5 minutes. Then, transfer them to a wire rack to cool completely. This cooling step is vital for perfect texture. To get the best texture, focus on mixing. Cream the butter and sugar until light and fluffy. This adds air and makes the cupcakes rise. Don't overmix once you add the flour. Mix just until you see no dry spots. This keeps your cupcakes soft and moist. Lemon buttercream is a perfect match for these cupcakes. It adds a creamy tang that pairs well with the tartness of the lemon. You can also try cream cheese frosting for a richer taste. If you want a lighter option, a whipped cream topping works great too. Don’t forget to add a few fresh raspberries on top for a pop of color! Fresh raspberries taste brighter and have a better texture. They hold their shape well in the batter. If you use frozen raspberries, thaw them first and drain excess liquid. This helps prevent a soggy batter. Both options work, but fresh gives you that fresh burst of flavor! Pro Tips Use Room Temperature Ingredients: Ensure that your butter and eggs are at room temperature for better incorporation into the batter, resulting in a lighter texture. Don’t Overmix: When combining the wet and dry ingredients, mix just until combined. Overmixing can lead to dense cupcakes. Let the Cupcakes Cool Completely: Allow the cupcakes to cool completely before frosting. This prevents the frosting from melting and ensures a beautiful presentation. Experiment with Flavor: For an extra zing, consider adding a splash of your favorite liqueur or a hint of ginger to the batter. {{image_2}} For a unique twist, try adding lavender. It gives a floral note that pairs well with lemon and raspberry. Use dried culinary lavender. Add one teaspoon to the dry mix. This small change can brighten your cupcakes. The taste becomes refreshing and aromatic, perfect for spring or summer. Making vegan lemon raspberry cupcakes is easy. Swap the butter for coconut oil or vegan butter. Use flax eggs instead of regular eggs. Mix one tablespoon of ground flaxseed with three tablespoons of water. Let it sit for five minutes to thicken. Use almond milk or oat milk for buttermilk. The result remains moist and flavorful. To make gluten-free lemon raspberry cupcakes, use a gluten-free flour blend. This can replace all-purpose flour in equal amounts. Be sure it contains xanthan gum for better texture. If not, add one teaspoon of xanthan gum to the mix. These cupcakes will still be light and fluffy, just like the classic version. Enjoy the bright flavors without any gluten! To keep your lemon raspberry cupcakes fresh, place them in a cool spot. If you have leftovers, cover them well. Use plastic wrap or a lid. This keeps them moist and tasty. If you want to eat them later, consider the fridge. The cold helps them last longer. But, if you plan to enjoy them soon, room temperature works too! The best container for your cupcakes is an airtight one. An airtight container keeps air out. This helps prevent drying. A cupcake carrier is great too! It protects your treats from bumps. Make sure your cupcakes are cool before you store them. Warm cupcakes can make the container foggy. This can lead to soggy tops! You can freeze lemon raspberry cupcakes for later. Start by letting them cool completely. Wrap each cupcake in plastic wrap. This prevents freezer burn. Then, place them in a freezer-safe bag. Be sure to label the bag with the date. They can stay fresh for up to three months. When you want to eat one, take it out and thaw it at room temperature. This way, they taste just as good as fresh! To make lemon raspberry cupcakes from scratch, start by mixing your dry ingredients. Combine 1 cup of all-purpose flour, 1 teaspoon of baking powder, 1/2 teaspoon of baking soda, and 1/4 teaspoon of salt in a bowl. Next, beat 1/2 cup of softened unsalted butter and 1 cup of sugar until fluffy. Add 2 eggs, lemon zest, and 1 teaspoon of vanilla extract. In another bowl, mix 1/4 cup of fresh lemon juice with 1/2 cup of buttermilk. Alternate adding the dry mix and buttermilk mix into the butter mix. Gently fold in 1 cup of fresh raspberries. Bake at 350°F for 18-20 minutes. Yes, you can add other fruits! Strawberries, blueberries, or blackberries work well. Keep the total fruit amount about the same. This way, the cupcakes stay moist and flavorful. Just remember to fold them gently to avoid crushing. Lemon buttercream frosting is the best choice. It adds a creamy finish that complements the tartness of the lemon. To make it, beat together softened butter, powdered sugar, lemon juice, and zest. You can also use cream cheese frosting for a richer taste. These cupcakes will last about 3 days at room temperature. Keep them in an airtight container to maintain moisture. If you store them in the fridge, they can last up to a week. Just bring them back to room temperature before serving. You can use lemon extract, but fresh lemon juice gives better flavor. If you use extract, use about 1 teaspoon. You may want to adjust the sugar since extract is stronger. Fresh juice adds zest and brightness that enhances the cupcakes. You learned about making delicious lemon raspberry cupcakes from scratch. We covered ingredient choices, baking steps, and how to store them well. I hope you feel ready to try this recipe. Remember to use fresh ingredients for the best taste. Don’t hesitate to experiment with flavors or toppings. Enjoy your baking journey, and share these treats with family and friends. They’ll love them!

Lemon Raspberry Cupcakes Irresistible and Fresh Treat

Craving a treat that bursts with flavor? These Lemon Raspberry Cupcakes combine zesty lemon with sweet raspberries for a fresh

To make these tasty kabobs, you need a few key items: - 1.5 lbs boneless, skinless chicken breasts, cut into 1-inch cubes - 1/4 cup olive oil - Juice and zest of 2 lemons - 3 garlic cloves, minced - 1 tablespoon fresh thyme, chopped (or 1 teaspoon dried) - 1 tablespoon fresh rosemary, chopped (or 1 teaspoon dried) - 1 tablespoon fresh parsley, chopped - 1 teaspoon smoked paprika - Salt and pepper to taste These ingredients make the chicken juicy and full of flavor. The chicken absorbs the marinade, which is key to great taste. The herbs and spices add depth to the kabobs. Each ingredient plays a role: - Thyme gives a fresh, earthy note. - Rosemary adds a piney aroma. - Parsley brightens the dish. - Smoked paprika brings a hint of smokiness. These herbs make the kabobs fragrant and delicious. Their fresh flavors make this dish stand out. You can add colorful veggies for more taste and nutrition. Here are some great options: - 1 red bell pepper, cut into squares - 1 zucchini, sliced into half-moons Adding veggies not only enhances the look but also adds more texture. You can mix and match your favorite vegetables, too! {{ingredient_image_1}} To start, grab a large bowl. In it, whisk together the following: - 1/4 cup olive oil - Juice and zest of 2 lemons - 3 minced garlic cloves - 1 tablespoon chopped fresh thyme - 1 tablespoon chopped fresh rosemary - 1 tablespoon chopped fresh parsley - 1 teaspoon smoked paprika - Salt and pepper to taste Mix these well. You want a smooth blend of flavors. This marinade gives the chicken a bright, zesty taste. Now, add 1.5 pounds of chicken cubes to the bowl. Make sure each piece is covered in the marinade. This step is key for making the chicken juicy and full of flavor. Cover the bowl with plastic wrap. Place it in the fridge for at least 1 hour. For even more taste, let it sit overnight. Next, it's time to prepare your skewers. If you're using wooden skewers, soak them in water for 30 minutes. This helps to prevent burning. Then, take the marinated chicken and thread it onto the skewers. Alternate pieces of chicken with squares of red bell pepper and half-moon slices of zucchini. This adds color and crunch. Before grilling, preheat your grill to medium-high heat. When it's hot, place the kabobs on the grill. Grill them for about 10 to 15 minutes. Turn them occasionally. You want nice grill marks and the chicken to be cooked through. Check that the internal temperature reaches 165°F (75°C). Once done, remove the kabobs from the grill. Let them rest for a couple of minutes before you serve them. Enjoy your bright, flavorful meal! To make your chicken flavorful, marinate it well. Use a mix of olive oil, lemon juice, and herbs. I like to add garlic for a tasty kick. Coat each chicken piece fully in the marinade. Cover the bowl and chill it in the fridge. Marinate for at least one hour, but overnight is best. This time allows the flavors to sink in. Always use fresh herbs when possible; they enhance taste. To get those lovely grill marks, heat your grill to medium-high. Start by placing the kabobs on the grill at a 45-degree angle. This angle helps form nice crosshatch marks. Avoid moving them for the first few minutes. After about five minutes, turn the kabobs a quarter turn. This gives you those beautiful marks. Cook until the chicken is done and has grill lines. When serving, place the kabobs on a big platter. Add fresh herbs like parsley on top for a pop of color. You can also squeeze lemon wedges over the kabobs just before eating. This adds a lovely zing. For a complete meal, serve with rice or a fresh salad. The bright colors and fresh herbs will impress your guests! Pro Tips Marinate Longer for Flavor: Allow the chicken to marinate overnight if possible. This will enhance the flavors and make the chicken more tender. Soak Skewers for Safety: If using wooden skewers, always soak them in water for at least 30 minutes before grilling. This prevents them from burning on the grill. Use an Instant-Read Thermometer: To ensure that the chicken is perfectly cooked, use an instant-read thermometer. The internal temperature should reach 165°F (75°C). Vary Your Vegetables: Feel free to mix in other vegetables such as cherry tomatoes, mushrooms, or red onions for added flavor and color. {{image_2}} You can swap chicken for other proteins. Try shrimp for a quick cook. Beef is great too. Use chunks of steak for a hearty bite. Tofu is a smart choice for a plant-based option. Just make sure to press it well to remove extra water. Vegetables make tasty kabobs too! You can use mushrooms, bell peppers, and onions. Eggplant and cherry tomatoes add great flavor. Cut them into fun shapes for a colorful mix. You can also add marinated tofu for protein. Mix it up with different herbs! Fresh basil or cilantro can change the taste. You might want to add some chili flakes for a spicy kick. Swap lemon juice for lime juice for a twist. Experiment with honey for a sweet touch. Each change can create a new and exciting dish! Store your leftover kabobs in an airtight container. Make sure the kabobs cool down first. You can keep them in the fridge for up to 3 days. If you want to keep them longer, consider freezing. To reheat, use the oven or a stovetop. Preheat your oven to 350°F. Place the kabobs on a baking sheet. Heat for about 10-15 minutes. If using the stovetop, heat a non-stick pan over medium heat. Cook the kabobs for about 5-7 minutes, turning often. This keeps them juicy. You can freeze the kabobs before or after cooking. If freezing raw, place them in a single layer on a baking sheet. Once frozen, transfer to a freezer-safe bag. They will last up to 3 months. For cooked kabobs, let them cool first. Then store them in a container or bag. Chicken kabobs should reach an internal temperature of 165°F (75°C). This ensures the chicken is safe to eat. Use a meat thermometer to check. Insert it into the thickest part of the chicken. If you don’t have a thermometer, make sure the meat is no longer pink. Clear juices also mean it’s ready. Always prioritize food safety when grilling. Yes, you can use various meats for kabobs. Beef, pork, or lamb work well. Each type has a different flavor and texture. Just remember to adjust cooking times. For example, beef can be cooked to 145°F (63°C), while pork should reach 145°F (63°C) too. Skewering vegetables with the meat adds color and taste. Marinate the chicken for at least 1 hour. For more flavor, marinate it overnight. This allows the herbs and spices to soak into the meat. The lemon juice helps tenderize the chicken, too. Make sure each piece is well-coated in the marinade. This step is key to juicy and flavorful kabobs. You can create tasty lemon herb grilled chicken kabobs with simple steps. We covered the best ingredients, marinade techniques, and grilling tips. Remember to choose your favorite veggies and explore different proteins. After grilling, enjoy your kabobs fresh and store any leftovers correctly. With these recipes and tips, you'll impress guests or enjoy them at home. Now, gather your ingredients and start grilling! Your next meal will be a hit.

Lemon Herb Grilled Chicken Kabobs Flavorful Recipe

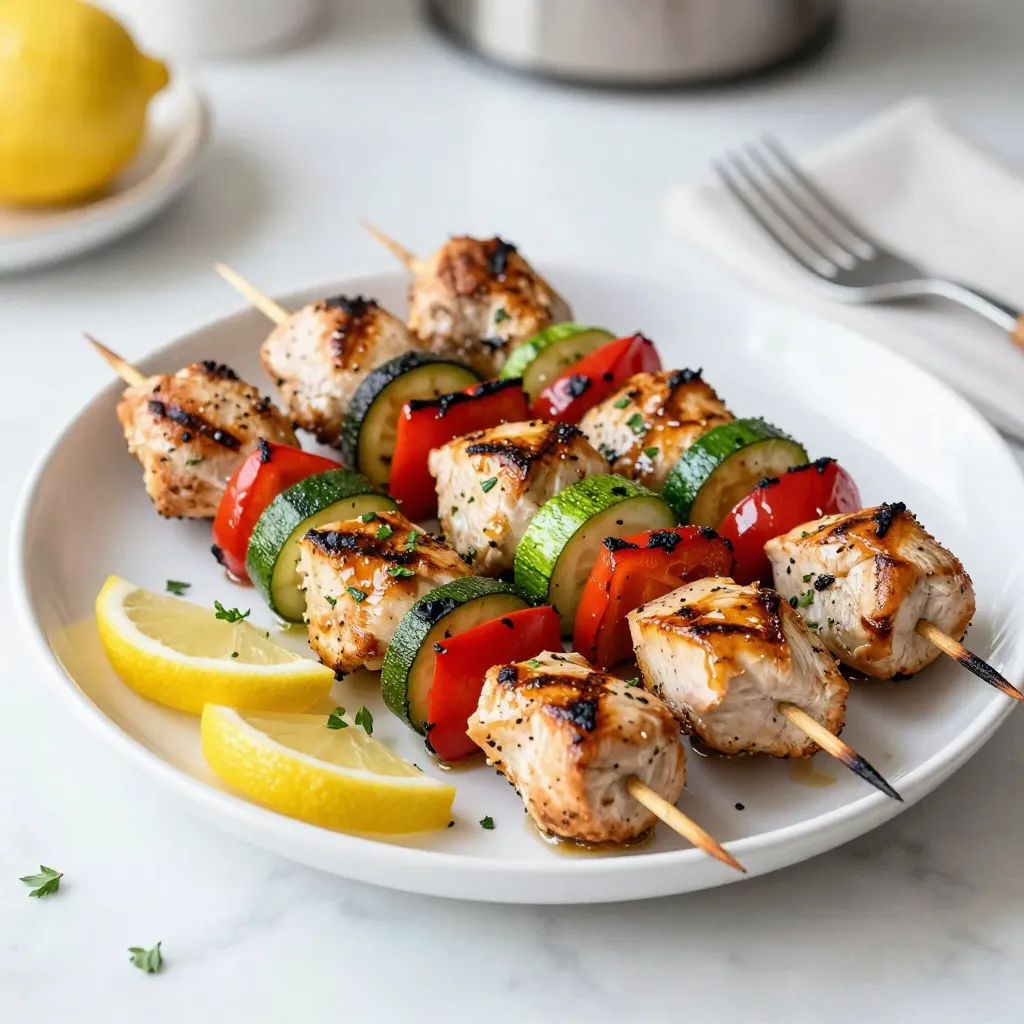
Ready to fire up your grill? With my Lemon Herb Grilled Chicken Kabobs, you’ll impress everyone at your next cookout.

- 8 oz cream cheese - 1/2 cup powdered sugar - 1 teaspoon vanilla extract - 1 cup crushed graham crackers - 1/2 cup dried cranberries, chopped - 1/4 cup white chocolate chips, melted - 1/2 cup dark chocolate, for coating - Optional: crushed pecans or pistachios To make these delightful truffles, you need simple ingredients. Each one adds to the creamy, sweet flavor. Cream cheese is the base. It gives the truffles a rich, smooth texture. Make sure it is softened for easy mixing. Powdered sugar adds sweetness. It mixes well and gives a nice finish. Vanilla extract enhances the flavor. It brings warmth to the truffles. Crushed graham crackers add crunch. They help bind the mixture together. Dried cranberries provide a tart kick. They balance the sweetness and add color. White chocolate chips give a creamy layer. You will melt them for mixing. Dark chocolate coats the truffles. It adds a rich taste and a nice crunch. You can also use crushed pecans or pistachios for garnish. They add extra flavor and texture on top. Gather these ingredients before you start. It makes the process smooth and fun! {{ingredient_image_1}} - In a large mixing bowl, combine 8 oz of softened cream cheese, 1/2 cup powdered sugar, and 1 teaspoon vanilla extract. Use an electric mixer to blend until smooth and creamy. This mixture should feel light and fluffy. - Stir in 1 cup of crushed graham crackers and 1/2 cup of chopped dried cranberries. Mix until everything is well combined. The mixture should be thick enough to hold its shape. - Scoop out small portions of the mixture with your hands. Roll them into balls about 1 inch in diameter. Place the truffles onto a parchment-lined baking sheet. - Freeze the truffles for about 30 minutes, or until they are firm. This step helps the truffles hold their shape when coated. - While the truffles are freezing, melt 1/2 cup of dark chocolate in a microwave-safe bowl. Do this in 30-second intervals, stirring in between, until fully melted and smooth. - Dip each frozen truffle into the melted dark chocolate. Allow excess chocolate to drip off. Return the coated truffles to the parchment-lined baking sheet. - If you like, sprinkle crushed pecans or pistachios on top of the truffles before the chocolate sets. This adds a nice crunch and flavor. - Allow the chocolate to harden fully at room temperature or in the refrigerator. This may take about 20 to 30 minutes. These steps will lead you to delightful cranberry cheesecake truffles that are simple to make and hard to resist! When making cranberry cheesecake truffles, it’s easy to make mistakes. Here are two common ones: - Overmixing or undermixing the ingredients: Mix just until you see no lumps. Overmixing makes the truffles too soft. Undermixing leaves clumps. - Incorrect melting of chocolate: Melt chocolate in short bursts of 30 seconds. Stir after each burst. This helps prevent burning. Getting the right texture is key to great truffles. Here are my tips: - Start with softened cream cheese. This makes it easy to blend. - When adding graham crackers, make sure they are crushed fine. This helps hold the truffles together. - If the mixture feels too wet, add more graham crackers. If too dry, add a splash of cream cheese. Cranberry cheesecake truffles are a treat for any occasion. Here’s how to serve them: - Pair with hot cocoa or coffee. The rich flavors complement each other well. - Arrange them on a festive platter. Add some fresh cranberries or mint leaves for color. - For a fun twist, serve alongside a scoop of vanilla ice cream. It adds a creamy contrast. Pro Tips Chill the Mixture: For easier rolling, chill the cream cheese mixture in the refrigerator for about 10-15 minutes before forming the truffles. Use Quality Chocolate: Opt for high-quality dark chocolate for coating. It makes a significant difference in flavor and texture. Experiment with Flavors: Feel free to add a splash of orange zest or almond extract for a unique twist on the classic cheesecake flavor. Store Properly: Keep the truffles in an airtight container in the refrigerator to maintain their freshness and firmness. {{image_2}} You can change the taste of cranberry cheesecake truffles by swapping some ingredients. Use different cream cheeses, like flavored ones, for a fun twist. Try adding crushed ginger snaps instead of graham crackers. For a unique flavor, mix in spices like cinnamon or nutmeg. You can also add different nuts, such as walnuts or almonds, for a crunchy bite. The goal is to find flavors you love. Making these truffles fit your diet is easy. For a gluten-free option, use gluten-free graham crackers. You can also swap regular chocolate for dairy-free chocolate to make it vegan. Substitute cream cheese with a vegan cream cheese option to keep the flavor but meet dietary needs. This way, everyone can enjoy these tasty treats. You can create holiday-themed versions of these truffles. For Christmas, add peppermint extract for a festive flavor. Roll them in crushed candy canes for a fun touch. Around Thanksgiving, use pumpkin spice to give a warm flavor. During spring, add lemon zest for a fresh taste. These ideas can make your truffles stand out at any event. To keep your cranberry cheesecake truffles fresh, store them in airtight containers. This helps prevent moisture and keeps them tasty. I recommend placing parchment paper between layers of truffles. This way, they won't stick together. Always keep them in the fridge. This will keep the cream cheese from spoiling. Cranberry cheesecake truffles can last up to one week in the fridge. If you want them to last longer, you can freeze them. In the freezer, they can stay good for about three months. Just make sure to wrap them well to avoid freezer burn. Yes, you can refreeze the truffles if they have not been thawed completely. If they are already thawed, it's best to eat them. Refreezing can change their texture, making them less creamy. Always keep an eye on how long they have been out. Enjoy your truffles fresh for the best flavor! Cranberry cheesecake truffles are small, bite-sized treats. They combine rich cream cheese and sweet cranberries. The truffles are easy to make and need no baking. You start with a mix of softened cream cheese, powdered sugar, and vanilla. Then, you add crushed graham crackers and chopped dried cranberries. This mix forms a thick and creamy base. You shape the mixture into small balls and chill them. Finally, you coat these balls in melted dark chocolate. They have a creamy inside and a crunchy chocolate shell. You can use fresh cranberries, but they change the texture. Fresh cranberries are juicy and tart. This can make your truffles more watery. The dried cranberries work better for this recipe. They add sweetness and chewiness without extra moisture. If you want to use fresh cranberries, chop them finely. You may need to adjust the sugar to balance the tartness. To boost flavor, you can add spices or extracts. A pinch of cinnamon or nutmeg can add warmth. You might stir in a splash of orange extract for a fruity twist. Almond extract also pairs well with cream cheese. These small changes can elevate your truffles. Always taste the mixture before shaping the truffles. Adjust the flavors as needed for a delightful finish. You learned how to make delicious cranberry cheesecake truffles. This recipe combines cream cheese, cranberries, and chocolate for a sweet treat. I shared tips to avoid common mistakes and ideas for customizing flavors. Don’t forget the best storage methods to keep them fresh. Now, you can make these tasty truffles for any occasion! Enjoy creating your own version and sharing it with friends. Happy cooking!

Cranberry Cheesecake Truffles Delightful No-Bake Treat

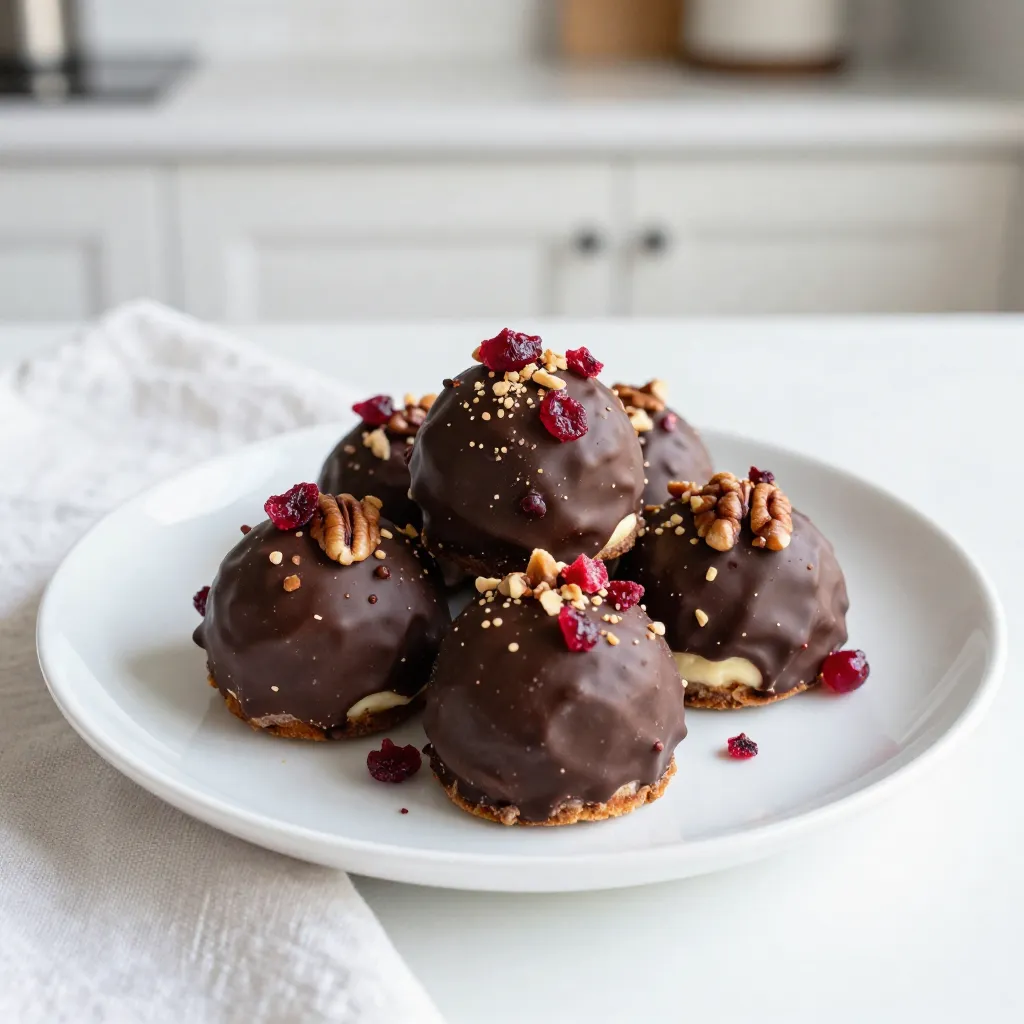
Craving a sweet treat that’s easy to make and delicious? Look no further! These Cranberry Cheesecake Truffles are a perfect,

- 2 cups semi-sweet chocolate chips - 1 can (14 oz) sweetened condensed milk - 1/4 cup unsweetened cocoa powder - 1 teaspoon peppermint extract - 1/2 teaspoon vanilla extract - 1/4 teaspoon salt - 1 1/2 cups powdered sugar - 1/4 cup crushed mint candies (like peppermint candies or Andes mints) Each ingredient plays a key role in making choco-mint fudge. The chocolate chips give richness. Sweetened condensed milk adds creaminess and sweetness. Cocoa powder deepens the chocolate flavor. The peppermint extract gives that cool, minty taste. Vanilla extract balances the flavors. Salt enhances the sweetness. Powdered sugar thickens the fudge. Crushed mint candies add a delightful crunch. You can swap semi-sweet chocolate chips for dark chocolate chips if you prefer a richer taste. If you cannot find sweetened condensed milk, you can use evaporated milk mixed with sugar. For a sugar-free option, you can use a sugar substitute in the same amount. If you want a different mint flavor, try using mint extract instead of peppermint. Always adjust amounts to taste! {{ingredient_image_1}} First, grab an 8x8 inch baking dish. Line it with parchment paper. Let the paper hang over the sides. This helps with easy removal later. Set it aside for now. Next, take a medium saucepan. Put it on low heat. Add 2 cups of semi-sweet chocolate chips and 1 can of sweetened condensed milk. Stir constantly. Keep stirring until it melts into a smooth mix. This step is key for a creamy fudge. Once melted, remove the saucepan from heat. Add 1/4 cup of unsweetened cocoa powder. Pour in 1 teaspoon of peppermint extract, 1/2 teaspoon of vanilla extract, and 1/4 teaspoon of salt. Mix well until everything is combined. This blend gives the fudge its rich flavor. Now it's time for the sugar. Gradually sift in 1 1/2 cups of powdered sugar. Stir as you go. The mixture will get thicker and smoother. This step makes your fudge sweet and delightful. Next, fold in 1/4 cup of crushed mint candies. You can use peppermint candies or Andes mints. These add a nice crunch and burst of mint in every bite. Be gentle so you don’t break them too much. Pour the fudge mixture into the prepared baking dish. Spread it out evenly with a spatula. Make sure the top is smooth. Now, refrigerate for at least 2 hours. This time helps the fudge set completely. After chilling, lift the fudge out of the pan using the parchment paper. Cut it into squares. Each piece should be a perfect bite of chocolate and mint. Enjoy your homemade choco-mint fudge! Start with low heat to melt your chocolate. Using a medium saucepan works great. Stir the mixture constantly. This helps prevent burning. If you notice any lumps, keep stirring until smooth. You can also use a double boiler for better control. Just make sure the bowl does not touch the water. This method heats gently and melts chocolate evenly. To get a creamy texture, add sweetened condensed milk right away. This keeps the chocolate smooth. As you mix in the cocoa powder and extracts, keep stirring. This step is crucial for blending flavors well. When you add powdered sugar, do it gradually. This helps to avoid lumps and makes the fudge thick and luscious. The final texture should be rich and velvety. For a special touch, cut the fudge into neat squares. Place them on a colorful or festive plate. Sprinkle some crushed mint candies on top. This adds a pop of color and extra flavor. Pair the fudge with a warm drink, like tea or coffee. This enhances the minty taste. Serve it at parties or as a sweet treat for guests. Your friends and family will love this delicious delight! Pro Tips Use Quality Chocolate: Opt for high-quality semi-sweet chocolate chips for a richer flavor and smoother texture in your fudge. Let It Cool Gradually: After melting the chocolate, allow it to cool slightly before adding the powdered sugar to prevent clumping. Experiment with Flavors: Feel free to add a pinch of sea salt or a splash of orange extract for a unique twist on the classic chocolate-mint combination. Storage Tips: Store the fudge in an airtight container in the refrigerator to maintain its freshness and texture for up to two weeks. {{image_2}} You can make your choco-mint fudge even better by adding nuts. Chopped walnuts or pecans add crunch and flavor. You can also mix in a bit of espresso powder for a coffee kick. This gives a great depth to the taste. Try adding a pinch of sea salt on top for a sweet and salty twist. If you want a twist on mint, try using spearmint extract instead of peppermint. This gives a milder flavor. You can also use fresh mint leaves. Just chop them finely and mix them in. They add a fresh, bright taste to your fudge. Looking for a healthier version? Use dark chocolate chips instead of semi-sweet. You can also substitute coconut milk for sweetened condensed milk. This makes the fudge dairy-free and adds a nice flavor. Use a sugar substitute like monk fruit or stevia to cut down on sugar. These swaps keep the fudge tasty while making it a bit healthier. To keep your choco-mint fudge fresh, store it in an airtight container. Line the container with parchment paper, if possible. This helps to absorb moisture and keep the fudge from sticking. Place a layer of wax paper between fudge layers to prevent sticking. Make sure to keep the container in a cool, dry place away from sunlight. When stored correctly, choco-mint fudge lasts about two weeks at room temperature. If you refrigerate it, it can stay fresh for up to one month. The cold can make it firmer, but it still tastes great. Just remember to let it sit for a few minutes at room temperature before serving. You can freeze choco-mint fudge for longer storage. Wrap individual squares in plastic wrap, then place them in a freezer bag. This keeps them fresh for up to three months. To thaw, simply take out what you need and let it sit on the counter for about 30 minutes. Enjoy your treat once it's soft again! Yes, you can use dark chocolate. It will make the fudge richer and less sweet. Just keep in mind that the flavor will change. Dark chocolate has a stronger taste, which some may love. You can use coconut milk with sugar. This mix has a creamy texture. Another option is homemade condensed milk made from milk and sugar. It takes a bit more time, but it works well. This recipe is naturally gluten-free. Just check all your ingredients for any gluten content. Most chocolate chips and candies are safe, but it’s best to confirm. You can find pre-made choco-mint fudge at local candy shops or specialty stores. Online retailers also offer it, and you can check sites like Amazon or Etsy. Some popular brands include Hammond's, Fudge Factory, and See's Candies. These brands often have great flavors and quality. You can find them in stores or online. This blog post covered all you need to know about making choco-mint fudge. We explored the key ingredients, how to prepare and store your fudge, and creative variations. With these easy steps, you can make a tasty treat. Keep these tips in mind for the best results. Fudge is fun to make and share. Enjoy your sweet creation!

Choco-Mint Fudge Dreamy and Decadent Treat

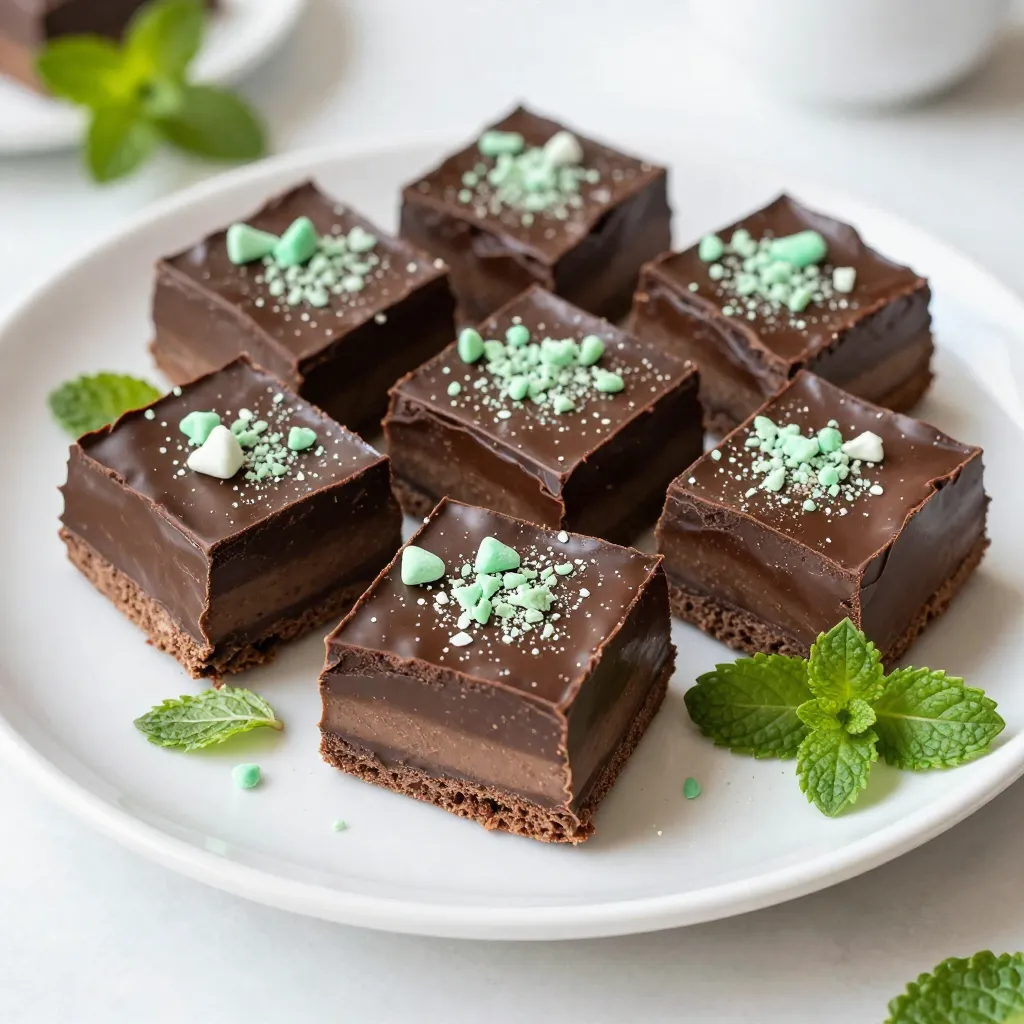
Are you ready to indulge in something truly delightful? Choco-mint fudge is a creamy, sweet treat that melts in your

- 4 medium russet potatoes - 1/2 cup unsalted butter, melted - 4 cloves garlic, minced - 2 tablespoons fresh parsley, chopped - 1 teaspoon fresh rosemary, finely chopped - 1 teaspoon salt - 1/2 teaspoon black pepper - 1/2 cup grated Parmesan cheese - 1/4 teaspoon red pepper flakes (optional) Using fresh ingredients makes a big difference. I choose russet potatoes for their starchy texture. They get crispy on the outside and fluffy inside. For garlic, fresh cloves pack the most flavor. Use unsalted butter to control the salt level. Fresh herbs like parsley and rosemary add brightness. Always opt for high-quality Parmesan cheese for the best melt and taste. If you're vegan, substitute the butter with olive oil or vegan butter. You can skip the cheese or use a vegan alternative to keep it dairy-free. If you're sensitive to garlic, use shallots or chives for a milder flavor. For a gluten-free option, this recipe is naturally gluten-free as it contains no flour or gluten products. 1. First, preheat your oven to 425°F (220°C). This is key for crispy edges. 2. Wash and scrub four medium russet potatoes under cold water. Make sure they are clean. 3. After drying the potatoes with a towel, grab a sharp knife. 4. Carefully cut vertical slits into each potato. Make these cuts about 1/4 inch apart. Stop cutting about 1/2 inch from the bottom. This keeps the potato whole. 5. Place the potatoes on a cutting board. Insert a wooden spoon or chopstick on either side. This helps avoid cutting all the way through. 6. In a small bowl, mix melted butter, minced garlic, chopped parsley, chopped rosemary, salt, black pepper, and red pepper flakes, if you want some heat. 7. Brush the garlic butter mixture over each potato. Be sure to get some into the cuts. Set aside some of the mix for later. 1. Arrange the potatoes on a baking sheet lined with parchment paper. This helps with cleanup. 2. Bake the potatoes in the oven for about 45-55 minutes. Check for tenderness and crispy edges. 3. Halfway through baking, take the reserved garlic butter and brush it on the potatoes. This boosts flavor and crispiness. 4. In the last 10 minutes, sprinkle grated Parmesan cheese over the potatoes. This creates a nice, melted crust. - To check if the potatoes are done, use a fork or knife. If it slides in easily, they are ready. - The edges should be golden brown and crispy. This adds great texture. - If you want them even crispier, leave them in for a few more minutes. Just keep an eye on them. To boost the taste of your Garlic Butter Hasselback Potatoes, use fresh herbs. I love adding parsley and rosemary. They add a bright, fresh flavor. If you want a bit of heat, try using red pepper flakes too. Mix the herbs into your garlic butter. This ensures every bite is full of flavor. You can also experiment with other herbs like thyme or chives. Getting the right texture is key for Hasselback potatoes. You want the outer edges crispy, while the inside stays soft. First, slice the potatoes carefully. The cuts should be deep but not all the way through. This allows heat to reach the inside and makes it tender. Brush the garlic butter mixture generously over each potato. The butter helps create that crispy layer. Halfway through baking, brush on more butter for extra flavor and crunch. One common mistake is cutting the potatoes too deep. Make sure to stop about half an inch from the bottom. This keeps the potato intact while cooking. Another mistake is not using enough butter. The butter adds flavor and helps with crisping. Lastly, don't rush the baking time. If they are not cooked long enough, the potatoes will be hard inside. Trust the process and let them bake until golden brown. {{image_2}} You can use different types of potatoes for Hasselback potatoes. While russet potatoes are great, try Yukon Gold or red potatoes. Yukon Gold adds a creamy texture, while red potatoes offer a sweeter taste. Each type brings a unique flavor to the dish, making it fun to experiment. You can change the flavor by mixing herbs. For a zesty twist, add thyme or oregano to the garlic butter. You can also try adding lemon zest for brightness. If you love spice, mix in more red pepper flakes or some paprika. The choice is yours! If you want a vegan version, swap the butter for olive oil or vegan butter. You can also skip the cheese or use a plant-based cheese alternative. This way, everyone can enjoy the dish, no matter their dietary needs. To store leftover Garlic Butter Hasselback Potatoes, let them cool first. Place them in an airtight container. Make sure to seal it tightly. Store them in the fridge. They will last for about three days. Always check for any signs of spoilage before eating. When you are ready to enjoy the leftovers, preheat your oven to 350°F (175°C). Place the potatoes on a baking tray. Cover them loosely with aluminum foil. This helps keep moisture in. Heat them for about 15-20 minutes, or until warm. You can also use a microwave. Heat on medium power for about 2-3 minutes. If you want to freeze the potatoes, wrap each one tightly in plastic wrap. Then, place them in a freezer-safe bag. Remove as much air as you can. They can stay frozen for about one month. To reheat, let them thaw in the fridge overnight. Then follow the reheating instructions. This will help keep their flavors and textures intact. Yes, you can prepare the potatoes ahead of time. Slice and season them, then store them in the fridge. To keep them fresh, cover them with plastic wrap. When you are ready to bake, just brush with garlic butter and pop them in the oven. This saves time and makes meal prep easy. Hasselback potatoes pair well with many dishes. You can serve them with grilled chicken or steak. They also go great with roasted veggies or a fresh salad. For a fun twist, try them with a creamy dip or sauce on the side. These potatoes add a special touch to any meal. To prevent browning, you can soak the sliced potatoes in cold water. This keeps them from oxidizing. Another tip is to rub lemon juice on the cut surfaces. This adds a bit of flavor and helps keep the color bright. Be sure to bake them soon after cutting for the best results. In this article, we explored the key ingredients for Garlic Butter Hasselback Potatoes and how to choose quality options. I shared step-by-step instructions, tips for checking doneness, and common mistakes to avoid. We also looked at variations, including different potato types and dietary modifications. Finally, I covered storage tips for leftovers. These potatoes are tasty and fun to make. With some practice, you’ll create a dish your friends and family will love. Enjoy experimenting and sharing your delicious results!

Garlic Butter Hasselback Potatoes Flavorful Side Dish

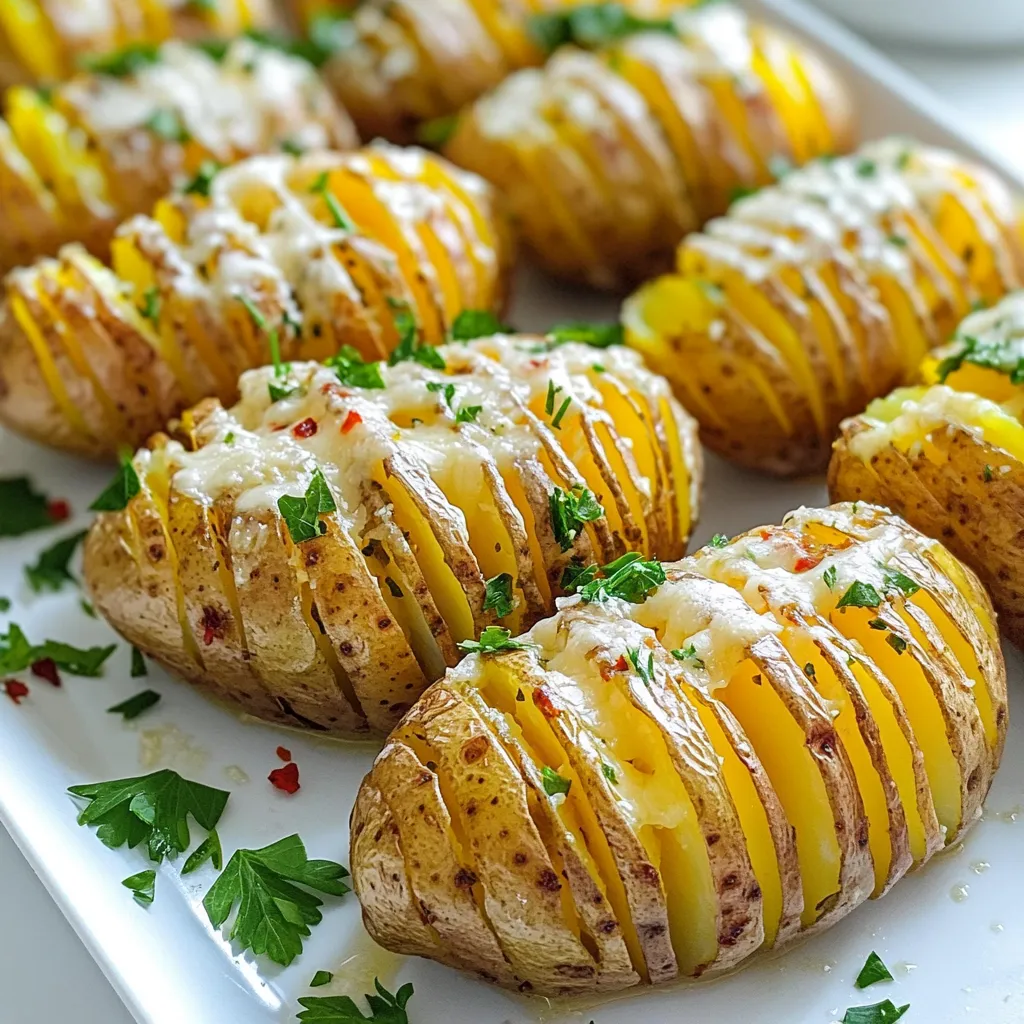
If you’re looking for a side dish that wows, Garlic Butter Hasselback Potatoes are it! These crispy, tender spuds soak

Older posts
Newer posts
← Previous Page1 Page2 Page3 … Page84 Next →

dsad

© 2026 pureeatsnow • Built with GeneratePress

Our Policies

  • Copyright Policy
  • Cookie Policy
  • GDPR Policy
  • Privacy Policy
  • Disclaimer
  • Terms Of Use

More Information

  • Home
  • About
  • Contact
  • Appetizers
  • Dessert
  • Dinner
  • Drinks
©2026, pureeatsnow About Back To Top