Skip to content
DisclaimerTerms Of UseGDPR PolicyCookie Policy

pureeatsnow

  • Home
  • Drinks
  • Appetizers
  • Dinner
  • Dessert
  • About
  • Contact
  • Privacy Policy
DisclaimerTerms Of UseGDPR PolicyCookie Policy

NO-ING-IMG

To make Eggplant Parmesan, gather these simple ingredients: - 2 large eggplants, sliced into 1/2-inch rounds - 1 teaspoon salt - 1 cup all-purpose flour - 3 large eggs, beaten - 2 cups breadcrumbs (preferably Italian-style) - 2 cups marinara sauce (homemade or jarred) - 3 cups fresh mozzarella cheese, sliced - 1 cup grated Parmesan cheese - 1 teaspoon dried oregano - Fresh basil leaves for garnish - Olive oil for frying These ingredients create a rich and tasty dish. Each plays an important role in the flavor and texture. If you don't have an ingredient, here are some swaps: - Use zucchini instead of eggplant for a lighter dish. - Almond flour can replace all-purpose flour for a gluten-free option. - Try using egg substitutes like flaxseed or chia seeds. - For a different flavor, use a spicy marinara sauce. - Use Gouda or provolone cheese instead of mozzarella. These substitutions can help you enjoy this dish with what you have. Eggplant Parmesan shines with these tasty sides: - A fresh green salad with lemon vinaigrette. - Garlic bread for a crunchy side. - Roasted vegetables for added nutrition. For wine, consider a light red like Chianti or a crisp white like Pinot Grigio. These pairings can enhance your meal and elevate your dining experience. For the full Eggplant Parmesan recipe, check out the [Full Recipe]. Start by slicing your eggplants into 1/2-inch rounds. This size helps them cook evenly. Sprinkle salt on the slices and let them sit in a colander for about 30 minutes. The salt draws out moisture and bitterness. After 30 minutes, rinse the slices under cold water. Pat them dry with paper towels until they are not wet. Next, set up your breading station. You need three shallow dishes. Fill one with flour, the second with beaten eggs, and the third with breadcrumbs. Take each eggplant slice and dip it into the flour first. Make sure to shake off any extra flour. Then, dip it in the eggs, ensuring it's fully coated. Finally, press it into the breadcrumbs. This step gives the eggplant a nice crispy layer. Now it’s time to cook! In a large skillet, heat olive oil over medium heat. Fry the breaded eggplant slices in batches. Cook each side for about 3-4 minutes until they turn golden brown. Transfer the fried slices to a paper towel-lined plate to drain excess oil. Preheat your oven to 375°F (190°C). In a baking dish, layer a thin layer of marinara sauce. Add half of the fried eggplant slices, then half the marinara sauce, half of the mozzarella cheese, and half of the Parmesan cheese. Repeat the layers. Bake for 30-35 minutes or until the cheese is bubbly and golden. For more details, check the Full Recipe. To boost flavor, add fresh herbs. Basil and oregano work well. You can also try thyme or parsley for a twist. A pinch of red pepper flakes adds a nice kick. Feel free to mix and match herbs to find your favorite blend. You want each bite to burst with taste. If you want a lighter dish, try baking instead of frying. Brush the eggplant slices with olive oil and bake them until golden. This cuts down on fat and still gives you great flavor. You can also use whole wheat breadcrumbs for added fiber. Another option is to use less cheese, but keep it flavorful with herbs. One common mistake is skipping the salting step. This draws out moisture and bitterness. Always let your eggplants sit with salt before cooking. Also, avoid overcrowding the pan while frying. This can lead to soggy eggplant. Lastly, don't rush the baking time. Let the dish bubble and brown for the best results. For the full recipe, check out Eggplant Paradise Parmesan. {{image_2}} Eggplant Parmesan is already a great vegetarian dish. You can add more veggies for extra flavor. Consider adding layers of zucchini, mushrooms, or spinach. These vegetables complement the eggplant and add more texture. You can also use a plant-based cheese to keep it vegan. To make a gluten-free version, swap the breadcrumbs with gluten-free bread crumbs or crushed nuts. Almonds or walnuts work well for a crunchy texture. You can also use gluten-free flour for breading the eggplants. This way, everyone can enjoy the dish! Get creative with your toppings! You can add fresh herbs like thyme or rosemary for extra flavor. A sprinkle of red pepper flakes can bring some heat. For a richer taste, add a layer of ricotta cheese between the eggplant and sauce. These little tweaks make every bite unique and delightful. For the complete recipe, check out the Full Recipe. After enjoying your Eggplant Parmesan, store leftovers in an airtight container. Let it cool to room temp before sealing. This keeps moisture in and helps maintain flavor. You can store the dish in the fridge for up to three days. If you have more than you can eat, consider freezing some portions for later. When you’re ready to enjoy your leftovers, reheat them carefully. Use an oven set at 350°F (175°C) for the best results. Place the Eggplant Parmesan in a baking dish and cover it with foil. Heat for about 20 minutes. This method helps the cheese melt nicely without drying out the dish. You can also microwave it, but the oven keeps it more tender. If you choose to freeze your Eggplant Parmesan, do so before baking. Wrap it tightly in plastic wrap and then in foil. This helps prevent freezer burn. It can last up to three months in the freezer. When you’re ready to bake it, thaw it overnight in the fridge. Then, bake it as directed in the Full Recipe for a delicious meal again! You can bake the eggplants instead of frying them. First, slice the eggplants and salt them to draw out moisture. After 30 minutes, rinse and dry the slices. Then, brush them lightly with olive oil. Place the slices on a baking sheet lined with parchment paper. Bake them at 400°F (200°C) for 20-25 minutes, flipping halfway through. This method keeps the eggplants tender and reduces oil use. You will still get a nice texture and flavor without the frying. Yes, you can use different cheeses in Eggplant Parmesan. While mozzarella and Parmesan are classic, feel free to switch it up. You might try provolone for a sharper taste or ricotta for creaminess. Mixing cheeses can add depth to the dish. Just remember to use cheeses that melt well for that gooey texture. Eggplant Parmesan pairs well with many sides. A simple green salad with a light vinaigrette complements the richness. Garlic bread is another great choice, adding crunch and flavor. You might also serve it with pasta for a heartier meal. If you want something refreshing, try roasted vegetables or a caprese salad. Each of these options balances the dish perfectly. For more ideas, check out the Full Recipe. This article covered the main elements of making Eggplant Parmesan. We explored the key ingredients, preparation methods, and tips for enhancing flavor. I shared variations to suit different diets and discussed storage best practices. Remember, cooking is about finding what you love. Don’t be afraid to try new things. Enjoy your cooking journey and create a dish that makes you proud.

Eggplant Parmesan Flavorful Comfort Food Recipe

If you crave flavorful comfort food, my Eggplant Parmesan recipe is perfect for you! This dish combines layers of tender

- 4 large bell peppers (any color) - 1 cup quinoa, rinsed and drained - 2 cups vegetable broth - 1 can (15 oz) black beans, rinsed and drained - 1 cup corn kernels (fresh or frozen) - 1 cup diced tomatoes (canned or fresh) - 1 small red onion, diced - 2 cloves garlic, minced - 1 teaspoon ground cumin - 1 teaspoon smoked paprika - 1 tablespoon olive oil - Salt and pepper to taste - Fresh cilantro, chopped (for garnish) - Avocado slices (for topping) - Fresh herbs - Lime wedges Each serving has about 300 calories. You will find 10g protein, 45g carbs, and 8g fat per serving. This meal offers a good balance of nutrients and keeps you full. These ingredients create a dish that bursts with flavor. Each bite gives you a mix of textures and tastes. You can find the full recipe easily for more details and cooking steps. Feel free to mix and match different spices or veggies as you like. Adding lime juice can brighten the dish. Fresh herbs can add lovely notes as well. Experiment to find your perfect combo! - Preheat oven to 375°F (190°C). - Cut the tops off each bell pepper and remove seeds. - Cook quinoa in vegetable broth until fluffy. - Sauté onion and garlic, then add spices and other ingredients. - Fill peppers with the quinoa mixture. - Cover and bake for 25 minutes. - Remove foil and bake for 10 more minutes for a charred finish. Follow these steps to create a dish full of flavor. This recipe is simple and fun. You can find the full recipe to guide you even more. Enjoy the process and the tasty results! To choose fresh bell peppers, look for ones that are firm and shiny. They should feel heavy for their size. Check for any soft spots or wrinkles, as these can show age. Color matters, too! - Green peppers: They taste slightly bitter. - Red peppers: They are sweet and full of flavor. - Yellow and orange peppers: They have a milder, fruity taste. Each color brings a different flavor. Mix colors for a fun dish! To ensure even cooking, cut the tops off the peppers evenly. This helps them cook at the same rate. Place the peppers upright in a baking dish, so they stay steady. For added flavor, consider these tips: - Use fresh herbs like parsley or cilantro. - Add a squeeze of lime for brightness. - Sprinkle some nutritional yeast for a cheesy taste. Experiment with spices to make the dish your own! Vegan stuffed peppers pair well with many sides. Try serving them with a simple green salad or roasted veggies. For sauces, consider these options: - A tangy tomato sauce. - A creamy avocado dressing. - A spicy salsa for some heat. These pairings enhance the meal and make it more enjoyable! {{image_2}} You can change the filling in your stuffed peppers easily. Substitute quinoa with rice or other grains like farro or barley. These grains add unique textures and flavors. You can also mix in different beans or legumes. Try using chickpeas or lentils for a twist. Each choice gives a fresh take on the classic dish. Want more heat? Use spicy peppers inside the mix. Add jalapeños or serrano peppers to bring a nice kick. You can also adjust spices to suit your taste. If you love heat, increase the cumin or sprinkle in some cayenne. Each change lets you create a version that fits your palate perfectly. Think beyond the regular stuffed pepper. You can make mini stuffed peppers for fun appetizers. They are perfect for parties or gatherings. Another idea is turning the stuffing into a casserole. Just layer the filling in a baking dish and top with pepper halves. This style is hearty and easy to serve. To store leftover stuffed peppers, let them cool first. Place them in an airtight container. You can keep them in the fridge for about 3 to 4 days. This way, they stay fresh and safe to eat. If you want to freeze stuffed peppers, wrap each one in plastic wrap. Then, place them in a freezer-safe bag. They can last up to 3 months in the freezer. When it's time to eat, take them out and thaw them in the fridge overnight. You can reheat stuffed peppers in the microwave or oven. If you use the microwave, heat them for about 2-3 minutes. For the oven, preheat it to 350°F (175°C) and cook for about 15 minutes. Reheating in the oven helps keep the peppers' texture and flavor. Yes, you can make these stuffed peppers ahead of time. Start by preparing the filling. Cook the quinoa, sauté the onion and garlic, and mix in the beans and corn. Let everything cool, then fill the peppers. Cover them and store in the fridge for up to a day. When ready to cook, just bake them as instructed in the full recipe. This makes for a quick, easy dinner! If you want to substitute quinoa, you have options. You can use rice, bulgur, or couscous. Each has a different cooking time. For rice, cook it for about 15-20 minutes. Bulgur cooks fast in about 12 minutes. Couscous takes just 5 minutes to prepare. Choose what you like best for your filling! Yes, vegan stuffed peppers can be gluten-free. Just make sure to use gluten-free grains like quinoa or rice. Check the labels on canned goods, like beans and tomatoes, to be safe. Most of these ingredients are naturally gluten-free, making this dish a great option for everyone! In this blog post, I shared how to create delicious vegan stuffed peppers. You learned about the required fresh ingredients and optional garnishes. I provided simple steps for preparation, cooking, and baking. Tips on selecting peppers and enhancing flavors were included. I also shared variations and storage methods. These stuffed peppers are not just tasty; they are healthy and versatile. You can customize them to fit your taste. Enjoy making, sharing, and savoring this dish!

Powerful Vegan Stuffed Peppers Filled with Flavor

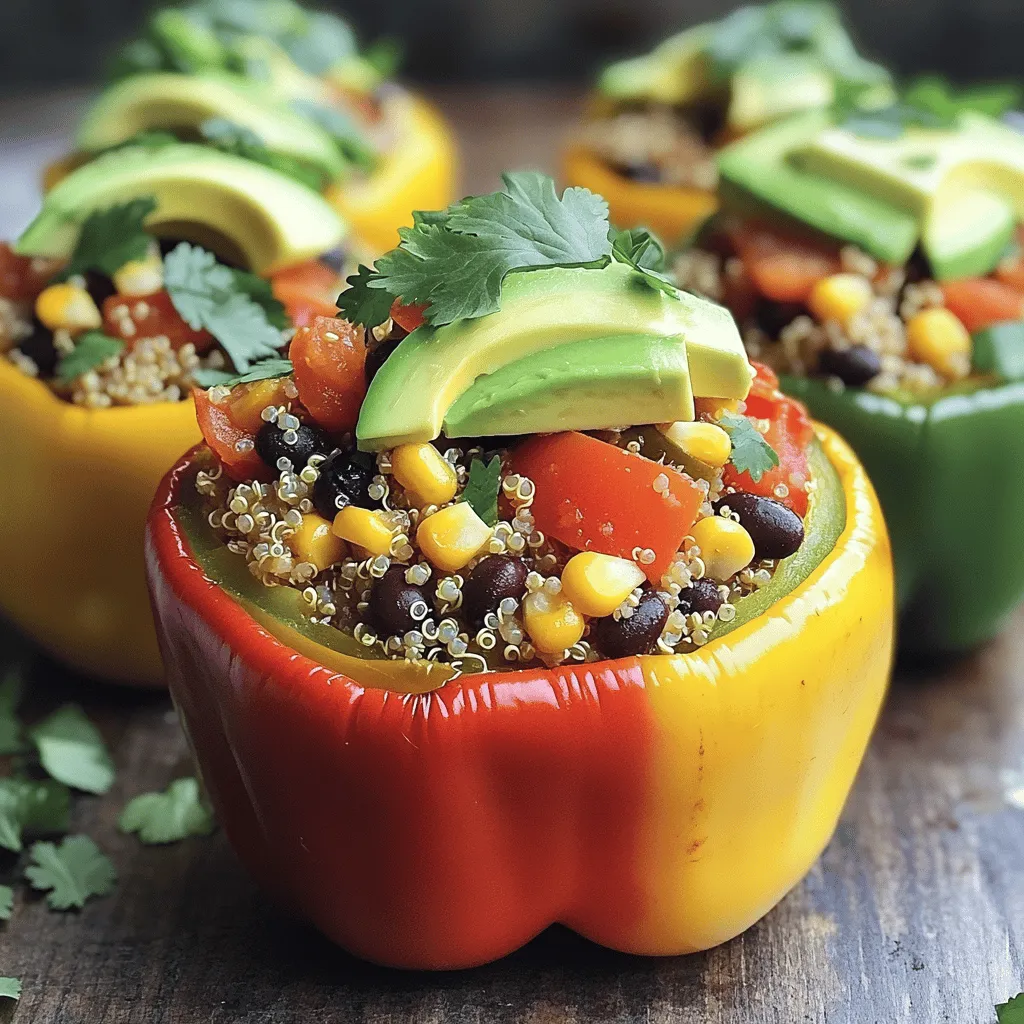
Looking for a tasty and healthy meal that packs a punch? These powerful vegan stuffed peppers are your answer! Filled

This Loaded Breakfast Skillet is a tasty way to start your day. It combines potatoes, veggies, and eggs in one dish. You can customize it to fit your taste. Here’s what you need for this delicious meal: - 4 medium-sized potatoes, diced - 1 tablespoon olive oil - 1 red bell pepper, diced - 1 green bell pepper, diced - 1 small onion, finely chopped - 4 large eggs - 1 cup cherry tomatoes, halved - 1 cup spinach, chopped - 1 teaspoon garlic powder - 1 teaspoon paprika - Salt and pepper to taste - ½ cup shredded cheese (cheddar or your choice) - Fresh herbs for garnish (chives or parsley) These ingredients create layers of flavor and texture. The potatoes give a great base, while the eggs add protein. The peppers and spinach bring color and nutrients. You can add some fun toppings to make your skillet even better: - Sliced avocado for creaminess - Hot sauce for a kick - Sour cream for richness - More fresh herbs for brightness Feel free to mix and match these garnishes. They can take your dish to the next level! This Loaded Breakfast Skillet is not just filling; it looks great too. Serve it hot for a fantastic breakfast treat. Start by washing your potatoes. I like to use medium-sized ones. Dice them into small cubes. This way, they cook evenly. Heat a large skillet over medium heat. Add one tablespoon of olive oil. Once the oil is hot, place the diced potatoes in the skillet. Season them with salt and pepper. Cook for about 10 to 12 minutes. Stir them often. You want them golden brown and tender. Next, add the chopped onion and bell peppers to the skillet. I use both red and green bell peppers for color. Sauté these veggies for about 5 minutes. You want them to soften, but not lose their crunch. Sprinkle in one teaspoon of garlic powder and paprika. Stir to mix the spices in well. Let it cook for about one minute. This will bring out the flavors. Now, add the halved cherry tomatoes and chopped spinach. Cook for another 2 to 3 minutes. You’ll see the spinach wilt and the tomatoes soften. Now it’s time for the eggs! Create small wells in the veggie mixture. Crack an egg into each well. Cover the skillet and let it cook for about 5 to 7 minutes. You can adjust the time based on how you like your eggs. If you want runny yolks, check them early. Once the eggs are cooked, sprinkle ½ cup of shredded cheese on top. Let it melt for about one minute. Then, remove from heat. Garnish with fresh herbs for a pop of color. Enjoy your delicious Loaded Breakfast Skillet! Check out the Full Recipe for more tips. To get the best eggs, crack them into wells. Cover the skillet to trap heat. This helps the eggs cook evenly. If you want runny yolks, check them often. They usually take 5-7 minutes. For firm yolks, leave them a bit longer. You can boost flavor with spices. Try adding more garlic powder or smoked paprika. Fresh herbs like chives or parsley add brightness. For a kick, add hot sauce or red pepper flakes. Mixing in some avocado can also add creaminess. Cooking time may change based on your stove. If your skillet is hot, watch closely. If it’s cooler, you may need extra time. Stir the veggies and potatoes well. This helps them cook evenly and avoid burning. Check the eggs often to avoid overcooking. For the full recipe, you can refer to the earlier sections. {{image_2}} You can have fun with your Loaded Breakfast Skillet by trying different flavors. Here are some tasty options. For a meat-free option, swap out the eggs for plant-based proteins. You can use tofu or chickpeas. Add extra veggies like mushrooms or zucchini for more taste. The key is to keep the colorful bell peppers and onions. They add great flavor and crunch. You can also use a vegan cheese if you like. This version is packed with nutrients and keeps you full. If you love meat, this is the perfect choice. Start with crispy bacon or sausage. Cook them first in the skillet for a smoky flavor. Once the meat is ready, add the potatoes and veggies as usual. For extra protein, toss in some diced ham or cooked ground beef. Finish with a layer of cheese on top. This hearty dish satisfies any meat lover's cravings. Turn up the heat with a spicy twist! Add chopped jalapeños or a dash of hot sauce to the skillet. Use pepper jack cheese instead of cheddar for more kick. You can also spice up the potatoes with cayenne pepper or chili powder. The cherry tomatoes bring a nice balance to the heat. This version is for those who enjoy a fiery start to their day. Each variation brings a new taste to the table. You can find the Full Recipe above to start your loaded breakfast adventure! Store your loaded breakfast skillet in an airtight container. Let it cool for 30 minutes first. This helps keep the flavors locked in. You can keep it in the fridge for up to 3 days. If you want to enjoy it later, make sure to separate the eggs from the veggies. This keeps the eggs from getting rubbery. To reheat, use a skillet on medium heat. Add a splash of water to steam it. Cover the skillet to help it warm evenly. Stir occasionally to heat it through. You can also use a microwave. Heat in 30-second bursts, stirring in between. This helps prevent hot spots and keeps it tasty. Freezing is an option if you have lots of leftovers. First, cool your skillet completely. Then, portion it into freezer-safe containers. Make sure to leave some space for expansion. It can last up to three months in the freezer. When ready to eat, thaw it in the fridge overnight. Reheat as mentioned above for a quick meal. Enjoy your delicious loaded breakfast skillet anytime! For the full recipe, refer to above sections. Yes, you can make this recipe ahead of time. Cook the potatoes and veggies first. Store them in the fridge for up to three days. When you're ready to eat, warm it up in a skillet. Then, add the eggs and cheese. This way, you save time and enjoy a quick breakfast. You can use several options in place of potatoes. Sweet potatoes are a great choice for a sweeter taste. Zucchini works well, too, for a lighter dish. Cauliflower can also be a low-carb option. Just make sure to adjust the cooking time. These substitutes add different flavors and textures. To make this dish healthier, consider using fewer eggs or egg whites. You can add more veggies like mushrooms or kale. Use less cheese or choose a lower-fat option. Try cooking everything in a non-stick skillet with less oil. These changes keep the meal tasty while making it lighter. For the full recipe, check the earlier section. This blog post covered all you need to know about creating a loaded breakfast skillet. We explored the key ingredients, step-by-step cooking, useful tips, and tasty variations. Remember, you can adjust cooking times and flavors to suit your taste. Don't hesitate to experiment with different veggies or proteins. Proper storage extends the life of your meal, letting you enjoy it longer. Now, it's time to try this recipe and make it your own! Happy cooking!

Loaded Breakfast Skillet Flavorful Morning Delight

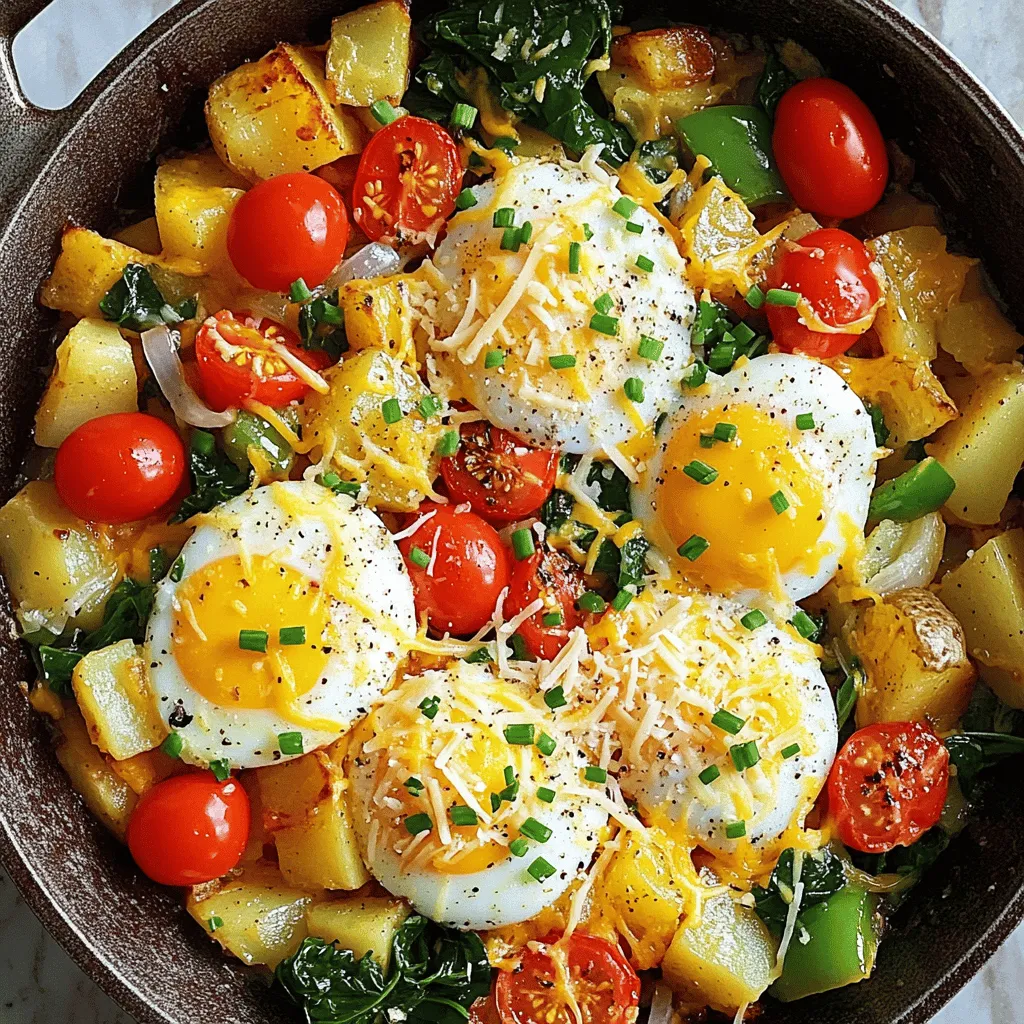
Start your day with the Loaded Breakfast Skillet, a flavorful delight that fuels your morning! This dish combines crispy potatoes,

To make Teriyaki Salmon with Asparagus, you need the following items: - 4 salmon fillets (6 oz each) - 1 cup teriyaki sauce (store-bought or homemade) - 1 tablespoon fresh ginger, grated - 2 cloves garlic, minced - 1 tablespoon honey - 1 pound asparagus, trimmed - 2 tablespoons olive oil - Salt and pepper to taste - Sesame seeds, for garnish - Sliced green onions, for garnish Fresh salmon is key for this dish. It has a rich flavor and tender texture. Frozen salmon can work, but it may lack the same taste. Always choose fresh when you can. Fresh vegetables also enhance the meal's flavor. Use crisp asparagus for the best results. You can add more flavor with these garnishes: - Chopped cilantro - Lemon wedges - Chili flakes for spice If you want to swap out the teriyaki sauce, try soy sauce mixed with honey. You can also use orange juice for a fruity twist. Other vegetables like broccoli or bell peppers pair well with salmon. They add color and nutrients to your plate. For the full recipe, check out the detailed instructions. To make the marinade, start with a mixing bowl. Combine the teriyaki sauce, grated ginger, minced garlic, and honey. Whisk until smooth. This blend brings rich flavors to the salmon. For marination, place the salmon fillets in a shallow dish. Pour the marinade over them. Cover the dish and let it chill in the fridge. Aim for at least 30 minutes. If you have more time, let it marinate for an hour. This step boosts flavor and tenderness. Preheat your oven to 425°F (220°C). This high heat cooks the salmon perfectly. While the oven warms up, line a baking sheet with parchment paper. This makes cleanup easy. In a bowl, toss the asparagus with olive oil, salt, and pepper. Coat them well. Spread the asparagus on one side of the baking sheet. After that, take the salmon out of the marinade. Place it skin-side down on the other side of the sheet. Bake everything for 12 to 15 minutes. Check the salmon; it should flake easily with a fork. Halfway through, baste the salmon with the reserved marinade. This adds extra flavor. Once cooked, take the baking sheet out of the oven. Let the salmon rest for a couple of minutes. This helps keep it juicy. To plate your dish, start with a bed of asparagus. Place the salmon right on top. This creates a lovely contrast. For garnish, sprinkle sesame seeds over the salmon. Add sliced green onions for color and crunch. These small touches make your dish look appealing and inviting. For the full recipe, check out Teriyaki Salmon Delight. To check for salmon doneness, use a fork. Gently press the salmon in the thickest part. If it flakes easily, it's done. You can also use a food thermometer. Aim for 125°F (52°C) for moist salmon. Remember, salmon continues to cook slightly after removing it from the oven. For marinating salmon, 30 minutes is great for flavor. You can marinate for up to an hour for a bolder taste. Ensure the salmon is fully covered in the marinade. This helps the fish absorb all the tasty flavors. Store the salmon in the fridge while it marinates. If you want to add spice or heat, try red pepper flakes. A pinch can make your dish more exciting. You can also drizzle a bit of sriracha on top before serving. This gives a nice kick without overpowering the teriyaki flavor. Sprinkling herbs adds freshness. Chopped cilantro or basil can brighten the dish. You can also use sesame seeds for crunch. They make a lovely garnish and enhance the look of your plate. A common pitfall when baking salmon is cooking it too long. Keep an eye on the time and check for doneness early. Overcooking makes the salmon dry and tough. When cooking asparagus, avoid overcooking it too. It should be bright green and tender-crisp. Bake asparagus for about 10–12 minutes. If you see it turning dark, it may be overdone. Keep it crunchy for the best texture. For the full recipe, check out the entire process in detail. {{image_2}} You can cook teriyaki salmon in different ways. Grilling adds a smoky flavor. Just preheat the grill and cook the salmon for about 5-7 minutes on each side. Baking is easy and keeps the fish moist. Set your oven to 425°F (220°C) and bake for 12-15 minutes. You can also pan-sear the salmon for a crispy outside. Try steaming it too, which makes it tender and juicy. Each method gives a unique taste. To make this dish gluten-free, choose a gluten-free teriyaki sauce. Many brands offer this option, or you can make your own with tamari. If you're vegetarian, try marinating tofu in the same sauce. Bake or grill the tofu as you would the salmon. Cauliflower steaks also work well as a substitute. You’ll still get great flavor and texture without the fish. Experimenting with sauces can change the whole dish. Try adding a spicy chili sauce for heat or a sweet mango sauce for a fruity twist. For texture, add chopped nuts like almonds or cashews. You can also mix in fruits like pineapple or citrus zest in the marinade. These additions will bring fresh flavors and a fun crunch, making your meal even more exciting. For the complete recipe, refer to the Full Recipe above. To keep your teriyaki salmon and asparagus fresh, store them properly. Place the leftovers in airtight containers. Make sure to separate the salmon from the asparagus to keep both tasting great. Refrigerate them within two hours after cooking. They will last for about three days in the fridge. Remember, freshness matters for the best flavor. When you reheat salmon, your goal is to keep it moist. I suggest using the oven. Preheat it to 275°F (135°C). Place the salmon on a baking sheet lined with parchment. Add a splash of water or broth to help retain moisture. Cover the salmon with foil. Heat for about 15 minutes, or until warmed through. For asparagus, a quick method is to use the microwave. Place the asparagus on a microwave-safe plate. Add a few drops of water and cover with a damp paper towel. Heat for 30 seconds to 1 minute. This keeps the asparagus crisp and tasty. Yes, you can freeze teriyaki salmon! Wrap each fillet tightly in plastic wrap. Then, place them in a freezer bag or airtight container. It’s best to freeze them within two hours of cooking. Label the bag with the date. They can last up to three months in the freezer. To thaw the salmon, move it to the fridge overnight. For quick thawing, place the sealed bag in cold water for about an hour. Avoid using a microwave, as it can change the texture. Enjoy your frozen teriyaki salmon as if it was just made! You can serve many sides with teriyaki salmon. Here are some great options: - Steamed rice - Quinoa - Roasted vegetables - Salad with light dressing - Noodles with soy sauce - Miso soup These sides add flavor and balance to the meal. I love how they complement the sweet and savory notes of the salmon. Yes, you can use chicken in this recipe. Just follow these tips: - Use boneless, skinless chicken thighs or breasts. - Marinate the chicken the same way as the salmon. - Bake until the chicken reaches an internal temperature of 165°F (75°C). This swap gives you a new dish to enjoy while keeping the great teriyaki taste. You can store leftovers for up to three days. Here are some storage tips: - Place salmon and asparagus in an airtight container. - Keep the container in the fridge. - Reheat gently in the oven or microwave. Make sure to eat your leftovers within this time for the best taste and safety. You learned how to make Teriyaki Salmon with Asparagus. Fresh ingredients greatly enhance flavor, while marinades add depth. With careful cooking steps, you can create a delicious dish. Remember to check cooking times for the salmon and asparagus. Use these tips to avoid common mistakes. Explore variations and don't hesitate to try new ingredients. Enjoy your meal and share it with others who love good food!

Teriyaki Salmon with Asparagus Tasty and Simple Recipe

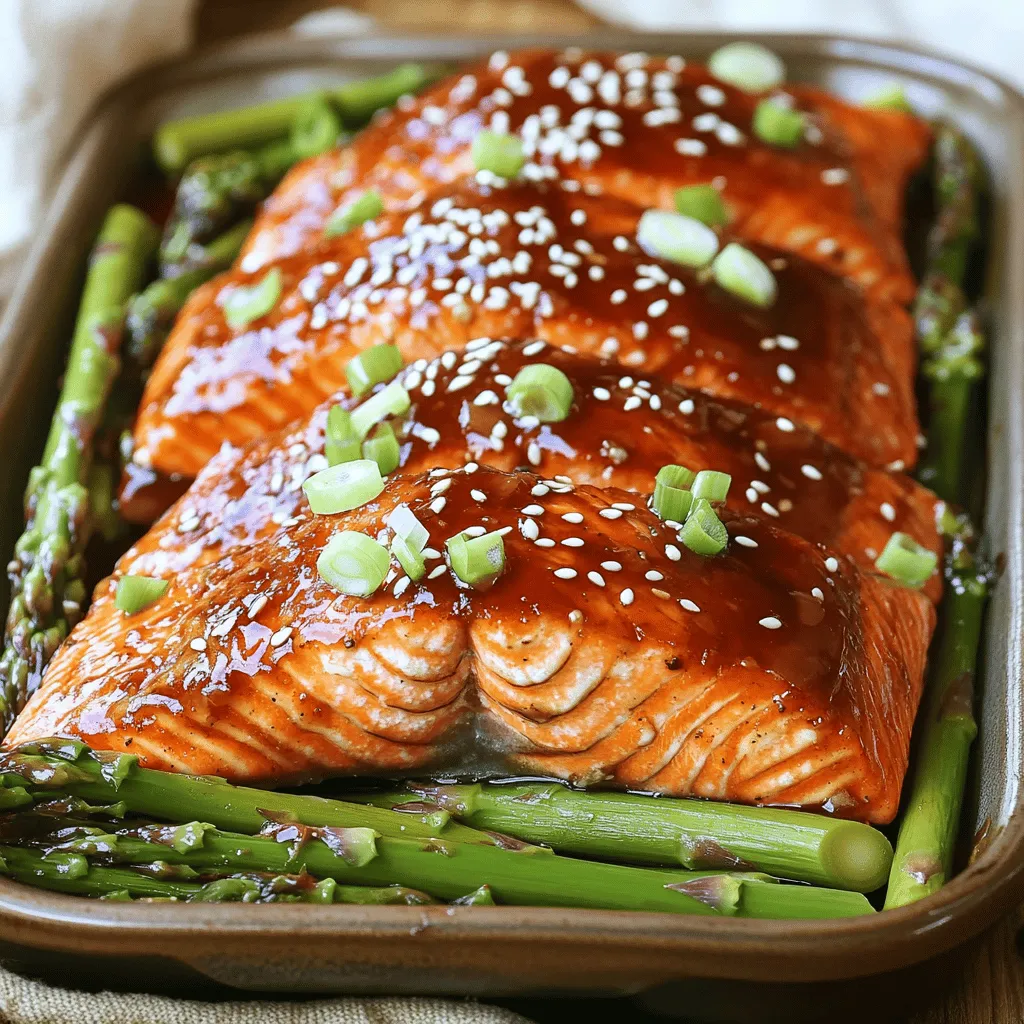
If you’re looking to add a burst of flavor to your dinner, Teriyaki Salmon with Asparagus is a perfect choice.

- 2 medium sweet potatoes, peeled and cubed - 1 can (15 oz) black beans, rinsed and drained - 1 cup corn kernels (fresh or frozen) - 1 small onion, diced - 2 cloves garlic, minced - 1 teaspoon cumin - 1 teaspoon chili powder - Salt and pepper to taste - 8 small corn tortillas - 1 cup enchilada sauce (store-bought or homemade) - 1 cup shredded cheese (cheddar or a Mexican blend) - Fresh cilantro, for garnish - Lime wedges, for serving Sweet potatoes and black beans make a great team in this dish. They bring flavor and nutrition. Sweet potatoes provide vitamins and fiber. Black beans add protein and minerals. Together, they create a filling meal that everyone can enjoy. - Calories per serving: About 350 calories. - Macronutrient breakdown: Each serving has roughly 12g protein, 60g carbs, and 10g fat. - Health benefits of sweet potatoes and black beans: - Sweet potatoes are great for your eyes due to beta-carotene. - Black beans help with digestion and keep your heart healthy. Eating these enchiladas gives you energy and helps you feel full. They are tasty and good for you. If you want to explore this dish fully, check the Full Recipe for all the steps! - Preheat the Oven: Start by preheating your oven to 375°F (190°C). This ensures even cooking. - Cook the Sweet Potatoes: In a pot, bring water to a boil. Add the cubed sweet potatoes and cook for 10-12 minutes, until they are soft. Drain them and set them aside. - Sauté the Filling: In a large skillet, add a splash of olive oil over medium heat. Sauté the diced onion for about 5 minutes. When the onion looks clear, add minced garlic, cumin, and chili powder. Cook for one more minute until it smells great. - Combine Ingredients: Add the cooked sweet potatoes, black beans, and corn to the skillet. Stir everything well until warm. Season with salt and pepper to taste. - Assemble the Enchiladas: Pour a thin layer of enchilada sauce in a 9x13 inch baking dish. Take one tortilla, fill it with about 1/3 cup of the filling, roll it up, and place it seam-side down in the dish. Repeat this step for all tortillas. - Top with Sauce and Cheese: Pour the remaining enchilada sauce over the rolled tortillas. Sprinkle shredded cheese evenly on top. - Bake: Cover the dish with foil and bake for 20 minutes. After that, remove the foil and bake for an extra 10 minutes. The cheese should be bubbly and golden brown. - Serve: Let the enchiladas cool for a few minutes. Garnish with fresh cilantro and serve with lime wedges on the side. Enjoy your savory sweet potato and black bean enchiladas! To get the best texture for the filling, make sure to cook the sweet potatoes until they are soft. Boil them for about 10-12 minutes. Test them with a fork; they should mash easily. This will help create a creamy filling. Seasoning is key for flavor. Use a good amount of salt and pepper. Black beans and corn also need a touch of seasoning. Don’t forget to add cumin and chili powder. These spices add warmth and depth to your filling. Pair your enchiladas with a fresh salad. A simple green salad with lime dressing works great. You can also serve them with rice or quinoa for a complete meal. For toppings, I recommend fresh cilantro and lime wedges. They add a burst of flavor. You can also sprinkle avocado or sour cream on top. These will make your enchiladas even tastier. If your tortillas break, try warming them slightly before filling. Heat them in a pan for a minute on each side. This softens them and makes them less likely to crack. To prevent soggy enchiladas, avoid over-soaking the tortillas in sauce. Just spread a light layer in the pan. This keeps the tortillas firm. Also, make sure to bake them until the cheese is bubbly. This gives a nice texture and keeps them from getting too wet. {{image_2}} You can mix things up with different beans and veggies. Try pinto or kidney beans for a new flavor. If you want more crunch, use bell peppers or spinach instead of corn. For cheese, you can swap cheddar with Monterey Jack or a dairy-free option. If you follow a vegan diet, skip the cheese or use a plant-based version. You can find many tasty vegan cheeses in stores. For gluten-free options, use corn tortillas instead of flour ones. They hold the filling well and taste great. To make your enchiladas pop, add spices like smoked paprika or cayenne for extra heat. You can also mix in a splash of lime juice for zest. For the sauce, try different types of enchilada sauce, like red or green, or even a mole sauce for a unique twist. Check out the Full Recipe for all the details! To keep your sweet potato and black bean enchiladas fresh, follow these steps: - Allow enchiladas to cool completely. - Place them in an airtight container. - Store in the fridge for up to three days. This method locks in flavors and keeps them tasty. You can freeze enchiladas for later meals. Here’s how: - Wrap each enchilada in plastic wrap. - Place them in a freezer-safe bag or container. - Label with the date for easy tracking. For reheating: - Thaw in the fridge overnight. - Preheat your oven to 350°F (175°C) and bake for 25-30 minutes until heated through. This ensures you enjoy warm, flavorful enchiladas. In the fridge, these enchiladas last about three days. If you freeze them correctly, they can last up to three months. Just remember, for best taste, enjoy them sooner rather than later. Can I prepare the enchiladas ahead of time? Yes, you can make these enchiladas ahead. Prepare the filling and assemble them. Cover and store in the fridge overnight. Bake them when you're ready to eat. This saves time and still tastes great! How do I make homemade enchilada sauce? To make enchilada sauce, blend 2 cups of diced tomatoes, 1/4 cup of onion, and 1 clove of garlic. Add 1 teaspoon of cumin and chili powder, then simmer until thick. This sauce adds fresh flavor to your dish! Can I use sweet potatoes without peeling them? You can use unpeeled sweet potatoes, but wash them well first. The skin adds extra nutrients and texture. Some people enjoy the taste, while others prefer the smoothness of peeled sweet potatoes. What are the best cooking methods for sweet potatoes? The best methods include boiling, baking, or roasting. Boiling gives a soft texture, while baking or roasting adds a sweet, caramelized flavor. Choose what fits your dish's needs! How can I make these enchiladas spicier? To spice things up, add jalapeños to the filling or sprinkle chili flakes on top. You could also use a spicier enchilada sauce. Adjust to your heat preference for a perfect kick! How to incorporate enchiladas into a weekly meal plan? Enchiladas are great for meal prep! Make a large batch and store them in the fridge or freezer. Pair with a salad or rice for a complete meal. They make easy lunches or dinners. Best ways to reheat leftover enchiladas for maximum flavor? Reheat enchiladas in the oven for best results. Preheat to 350°F (175°C) and cover with foil. Heat for about 20 minutes until warm. This keeps them from drying out and keeps the flavor intact. For the complete process of making these delicious enchiladas, refer to the Full Recipe. To make sweet potato and black bean enchiladas, follow these simple steps. First, preheat your oven to 375°F (190°C). Next, cook the sweet potatoes until fork-tender, about 10-12 minutes. While they cook, sauté diced onion and garlic with spices in a skillet. Then, mix in the sweet potatoes, black beans, and corn, and season to taste. Now, spread some enchilada sauce on the bottom of a baking dish. Take a corn tortilla, fill it with the mixture, roll it up, and place it seam-side down in the dish. Repeat this for all tortillas. Pour the remaining sauce over the top and sprinkle cheese evenly. Cover with foil and bake for 20 minutes. Remove the foil and bake for another 10 minutes until the cheese is bubbly and golden. Let the enchiladas cool for a few minutes. Garnish with fresh cilantro and serve with lime wedges. Enjoy your tasty meal! Now that you know the steps to make tasty sweet potato and black bean enchiladas, you can enjoy a healthy meal. We covered the ingredients, preparation, cooking, and storing tips. These enchiladas offer great flavor and nutrition. You can modify them to fit your dietary needs or spice them up as desired. Remember, cooking is all about trying new things. Use this recipe as a guide, and get creative. Enjoy your cooking adventure!

Savory Sweet Potato and Black Bean Enchiladas

If you’re craving a delicious and healthy meal, you’ve come to the right place! My Savory Sweet Potato and Black

- 1 lb Brussels sprouts, trimmed and halved - 3 tablespoons olive oil - 2 tablespoons pure maple syrup - 1 tablespoon Dijon mustard - 1 tablespoon whole grain mustard - 2 cloves garlic, minced The main ingredients bring together sweet and tangy flavors. The Brussels sprouts are the star. Their earthy taste contrasts well with the sweetness of maple syrup and the sharpness of mustard. When you roast them, they caramelize beautifully, becoming tender and flavorful. - ¼ cup grated Parmesan cheese - Chopped fresh parsley for garnish Adding Parmesan cheese brings a creamy touch to the dish. Fresh parsley adds a pop of color and brightness. You can skip them if you prefer a lighter version. - Salt and pepper to taste Seasoning is key to enhancing the flavors. A pinch of salt brings out the natural taste. Freshly cracked pepper adds a mild heat that lifts the dish. You can find the full recipe to create this delightful dish. Enjoy the rich taste and texture of these roasted Brussels sprouts! - Preheat your oven to 400°F (200°C). - In a large bowl, combine the olive oil, maple syrup, Dijon mustard, whole grain mustard, minced garlic, salt, and pepper. Whisk until well combined. - Toss the Brussels sprouts in the maple mustard mixture. - Spread them on a baking sheet lined with parchment paper. - Roast for 20-25 minutes, or until the Brussels sprouts are tender and caramelized. Toss them occasionally for even cooking. - If you'd like, sprinkle grated Parmesan cheese over the Brussels sprouts in the last 5 minutes of roasting for a creamy finish. - Once done, remove them from the oven and transfer to a serving dish. Garnish with freshly chopped parsley. These steps will help you create a delightful dish with rich flavors. For the complete recipe, check out the Full Recipe. To make your Brussels sprouts perfect, cut them evenly. Halve each sprout so they cook at the same rate. This helps them roast evenly and get that sweet caramelization. For great caramelization, use high heat and space the sprouts out on the baking sheet. If they are too close, they will steam instead of roast. These Maple Mustard Roasted Brussels sprouts pair well with roasted meats and grains. Try serving them with chicken, pork, or quinoa for a balanced meal. You can also toss them into salads for a warm touch. They add a nice crunch and flavor to any dish. Want to spice things up? Add smoked paprika or chili flakes for a kick. If you like mustard, try different types like spicy brown or honey mustard. Each will change the flavor in a fun way. You can also mix in nuts like walnuts for extra crunch and taste. For the full recipe, refer to the earlier section. {{image_2}} You can switch up the taste of your Maple Mustard Roasted Brussels Sprouts in fun ways. For a tangy kick, try adding a balsamic glaze. Just drizzle it over the sprouts before serving. It adds a sweet, rich flavor that pairs perfectly with the mustard. Another great idea is to add nuts for crunch. Walnuts or pecans work well. Just toss them with the sprouts before roasting. They give a delightful texture and nutty taste. If you follow a vegan diet, you can easily modify this recipe. Simply skip the Parmesan cheese or use a vegan cheese alternative. For gluten-free options, the ingredients are mostly safe. Just make sure your mustard is gluten-free. This way, everyone can enjoy the dish without worries. Using seasonal vegetables can make this dish even better. In the fall, mix in some diced butternut squash or sweet potatoes. They roast well and add a sweet flavor. For the holidays, consider adding cranberries or pomegranate seeds. They add a pop of color and tartness. These tasty twists keep your Maple Mustard Roasted Brussels Sprouts fresh and exciting all year round! Check out the Full Recipe for more ideas. To keep your Maple Mustard Roasted Brussels Sprouts fresh, store them in the fridge. Place the sprouts in an airtight container. This helps prevent moisture loss. You can use glass or plastic containers with tight lids. Don’t forget to let them cool first before sealing. For reheating, I recommend using the oven to maintain crispness. Preheat the oven to 350°F (175°C). Spread the sprouts on a baking sheet and heat for 10-15 minutes. This method keeps them nice and crispy. If you use a microwave, they may become soggy quickly. So, avoid that if you want the best texture. Can you freeze Maple Mustard Roasted Brussels Sprouts? Yes, you can! First, let them cool completely. Then, place them in a freezer-safe bag or container. Remove as much air as possible to prevent freezer burn. For best taste, use them within three months. When you’re ready to eat, thaw in the fridge overnight before reheating. Can I use frozen Brussels sprouts? Yes, you can use frozen Brussels sprouts. However, fresh sprouts give the best taste and texture. Frozen ones may be softer after roasting. If using frozen, adjust cooking time to ensure they roast well. What can I substitute for maple syrup? You can use honey or agave syrup as a substitute for maple syrup. They add sweetness but change the flavor slightly. You can also use brown sugar mixed with water for a similar taste. Why are my Brussels sprouts bitter? Bitter Brussels sprouts can be due to overcooking. Ensure you roast them just right. Also, using old or poorly stored sprouts can lead to bitterness. Try to select fresh ones for the best flavor. What to do if they are not crispy? If your Brussels sprouts are not crispy, spread them out more on the baking sheet. Make sure they have room to roast evenly. Toss them halfway through cooking to help them crisp up. Caloric content per serving One serving of Maple Mustard Roasted Brussels Sprouts has about 150 calories. This includes the addition of Parmesan cheese. Nutritional benefits of Brussels sprouts Brussels sprouts are packed with vitamins and minerals. They are high in fiber, which helps digestion. They also contain vitamin K, vitamin C, and antioxidants, making them a healthy choice. Maple Mustard Roasted Brussels Sprouts are simple and tasty. We started with fresh ingredients, like olive oil and garlic, for flavor. The roasting brings out a sweet and savory taste that pairs well with many dishes. Remember to cut the sprouts evenly for the best results. Try variations and enhancements to make it your own. This recipe is great for any season, and storing leftovers is easy. Enjoy your cooking adventures!

Maple Mustard Roasted Brussels Sprouts Flavorful Dish

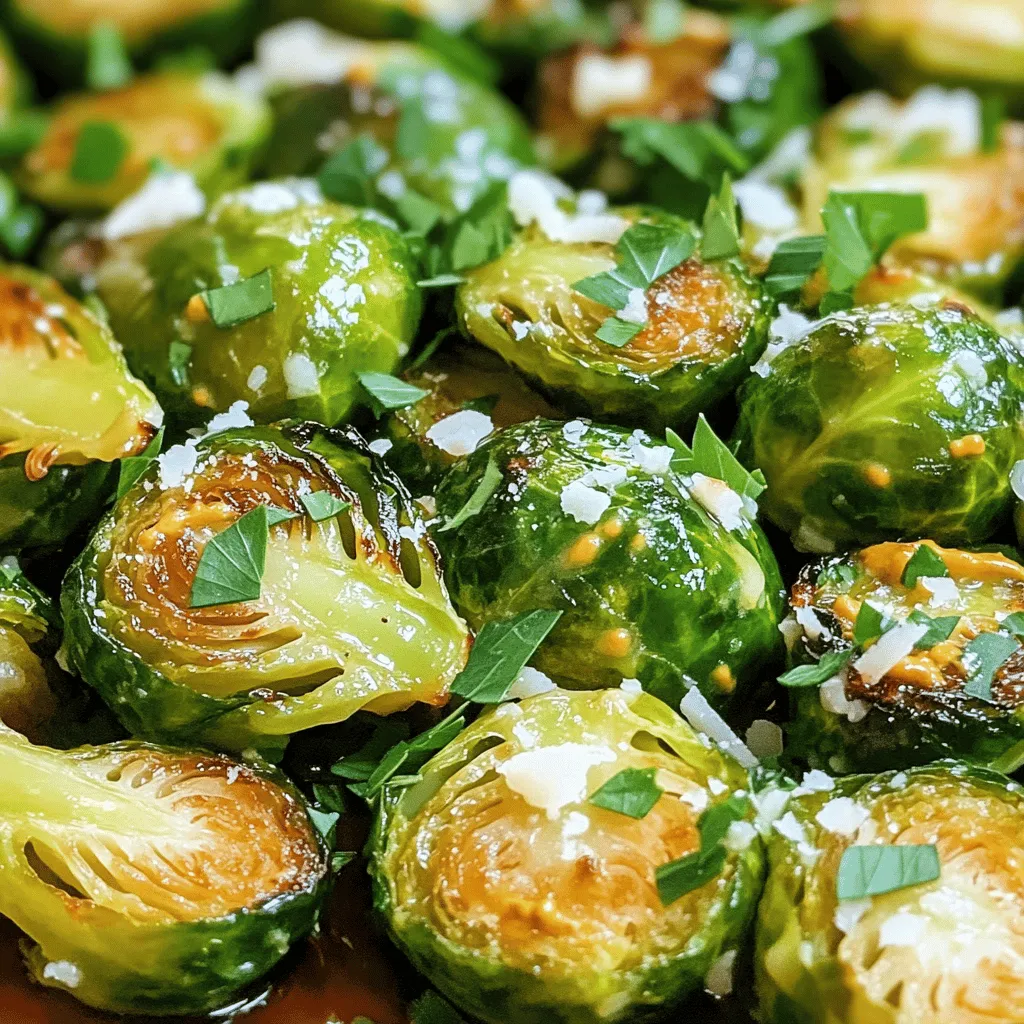
Looking for a delicious way to enjoy Brussels sprouts? Try my Maple Mustard Roasted Brussels Sprouts recipe! This dish combines

- 2 cups fresh basil leaves - 2 garlic cloves, minced - Juice and zest of 1 lemon - 1/4 cup pine nuts (toasted) - 1/2 cup grated Parmesan cheese - 1/2 cup extra virgin olive oil - 12 oz pasta (spaghetti or your choice) - Cherry tomatoes, halved (for garnish) - Fresh basil leaves (for garnish) When making Lemon Basil Pesto Pasta, fresh ingredients are key. The basil leaves add vibrant flavor. Garlic gives it a nice kick. Lemon juice and zest brighten the dish. For pantry staples, toasted pine nuts bring a nutty taste. Grated Parmesan cheese adds depth and creaminess. Extra virgin olive oil helps bind everything together and adds richness. I like to use spaghetti for this dish, but you can pick your favorite pasta. Cherry tomatoes add color and a sweet burst. Fresh basil leaves for garnish make it look pretty and fresh. You’ll find all the ingredients you need in the [Full Recipe]. This way, you can create a dish that is fresh and flavorful, perfect for any meal. To make the pesto, gather your ingredients. In a food processor, combine: - 2 cups fresh basil leaves - 1/4 cup toasted pine nuts - 1/2 cup grated Parmesan cheese - 2 garlic cloves, minced Pulse these until they are finely chopped. Next, add the lemon juice and zest. Drizzle in 1/2 cup of extra virgin olive oil while blending. Blend until smooth. Taste and add salt and pepper as needed. Fill a large pot with water and add salt. Bring the water to a boil. Add 12 oz of spaghetti or your favorite pasta. Cook until al dente, following the package directions. Before you drain, reserve about 1/2 cup of the pasta water. Drain the pasta in a colander. Return the drained pasta to the pot. Add the pesto you just made. Mix well, ensuring the pasta is coated. If the pesto is too thick, add a little reserved pasta water to thin it. Plate the pasta and garnish with halved cherry tomatoes and fresh basil leaves. This adds a bright touch to your dish. Enjoy your Lemon Basil Pesto Pasta! For the complete process, check the Full Recipe. For lemon basil pesto, spaghetti or fettuccine works best. These shapes hold pesto well. You can also try penne or fusilli for a fun twist. To cook pasta perfectly, bring a pot of salted water to a boil. Add pasta and stir occasionally. Cook until al dente, which means firm but not hard. This usually takes about 8 to 10 minutes. Do not forget to reserve some pasta water. It helps adjust the pesto later. If your pesto is too thick, add a bit of reserved pasta water. This helps it mix better with the pasta. You can also use a bit more olive oil for a smoother texture. To boost flavor, consider adding nuts or more garlic. You can even mix in a few sun-dried tomatoes. They add a nice depth to the pesto. To plate your pasta, twirl it into a nest shape on the plate. This makes it look fancy. Use a large fork or tongs for this. Then, sprinkle some extra Parmesan on top. For color, add halved cherry tomatoes and fresh basil leaves. They make the dish pop. You can also drizzle a little olive oil around the plate for a touch of elegance. {{image_2}} You can turn Lemon Basil Pesto Pasta into a hearty meal by adding protein. Chicken, shrimp, or tofu all work well. For chicken, grill or sauté it first. Slice it thin and mix it in with the pasta. For shrimp, just sauté them in olive oil until they turn pink. Tofu can be cubed and pan-fried until golden. This adds great texture and flavor. If you want a vegan version, skip the Parmesan cheese. Use nutritional yeast instead. It gives a cheesy taste without dairy. For those needing gluten-free options, there are many pasta types made from rice or chickpeas. They cook well and taste great, too. Seasonal veggies can make the dish more colorful and nutritious. Try adding cherry tomatoes, spinach, or bell peppers. You can roast or sauté these veggies before mixing them in. Also, don’t be afraid to experiment with nuts or cheeses. Swap pine nuts for walnuts or pecans. Replace Parmesan with a vegan cheese for a different twist. For the full recipe, check out the complete guide. To keep your lemon basil pesto fresh in the fridge, use an airtight container. Make sure to cover the surface with a thin layer of olive oil. This oil barrier helps stop air from getting in. Store the pesto for up to one week. For pasta, let it cool before storing. Place it in a sealed container. It will stay good for three to five days. Freezing pesto is a great way to keep it longer. Start by spooning the pesto into ice cube trays. This method lets you take out just what you need. After the pesto is frozen, pop the cubes into a freezer bag. Label the bag with the date. You can keep it for up to six months. Use BPA-free plastic containers or glass jars for larger portions. To reheat your pasta, use a pan on low heat. Add a splash of water or olive oil to keep it moist. Stir gently to avoid sticking. If your pasta seems dry, add a bit more pesto or reserved pasta water. For added flavor, sprinkle in some fresh herbs or extra cheese while reheating. This will bring your dish back to life. Enjoy your meal like it's freshly made! Homemade pesto lasts about one week in the fridge. Store it in an airtight container. If you see mold or an off smell, it is time to throw it away. You can also freeze pesto for up to three months. Just use ice cube trays for easy portions. You can use dried basil, but the flavor will change. Fresh basil offers a bright, vibrant taste. Dried basil has a more muted flavor. If you use dried, use less because it is stronger. A good rule is to use one teaspoon of dried for every tablespoon of fresh. There are many ways to use leftover pesto! Spread it on sandwiches or toast for a burst of flavor. Mix it into scrambled eggs or use it as a dip for veggies. You can also stir it into soups or drizzle it over grilled meats and fish. Lemon Basil Pesto Pasta offers healthy fats from olive oil and nuts. The fresh basil adds vitamins and antioxidants. The pasta provides carbs for energy. To make it even healthier, add veggies like spinach or zucchini. You can also use whole grain or gluten-free pasta for more fiber. Check the [Full Recipe] for detailed ingredients and instructions. This blog post covered how to make Lemon Basil Pesto Pasta. Fresh ingredients like basil, garlic, and lemon create a bright flavor. Pantry staples like pine nuts and Parmesan add richness. Cooking al dente pasta lets the pesto shine. Incorporate tips for protein options and dietary adjustments to personalize your dish. Store leftovers correctly to enjoy later. Experiment with flavors and garnishes for visual appeal. Cook, taste, and make it your own. Enjoy your delicious creation!

Lemon Basil Pesto Pasta Fresh and Flavorful Dish

Craving a dish that’s fresh, bright, and full of flavor? Look no further than Lemon Basil Pesto Pasta! This easy

- 2 cans black beans - 1 cup cooked quinoa - 1/2 cup breadcrumbs The base of these burgers is simple but full of flavor. Black beans are rich in protein and fiber. They give the burger a nice texture. Quinoa adds a nutty taste and extra nutrients. Breadcrumbs help bind everything together. You can use gluten-free breadcrumbs if needed. - Chipotle peppers in adobo sauce - Fresh vegetables (lettuce, avocado, tomato) - Preferred sauce for serving For a smoky kick, add chipotle peppers. They pack a lot of flavor. Fresh vegetables like lettuce, avocado, and tomato brighten the dish. Choose your favorite sauce to complement the burger. Mayo or a spicy sauce works well. - Mixing bowl - Fork or potato masher - Non-stick skillet You only need a few pieces of equipment. A mixing bowl is essential for combining ingredients. Use a fork or potato masher to mash the black beans. A non-stick skillet makes cooking easy. This setup keeps your cooking smooth and fun. For the full recipe, check out the detailed steps. Enjoy making these Smoky Chipotle Black Bean Burgers! - First, mash the black beans in a mixing bowl. Use a fork or potato masher. You want a mix of smooth and chunky textures. - Next, combine all the ingredients for the burger mixture. Add cooked quinoa, breadcrumbs, and the chopped red onion. Don't forget the minced garlic and chipotle peppers. Add the adobo sauce, cumin, smoked paprika, salt, and pepper. Mix well until all ingredients are combined. If the mixture feels too wet, add more breadcrumbs. - Now it’s time to form the burger mixture into patties. Aim for about 1/2 inch thick. This thickness helps with even cooking. You should get around 6 patties from this mixture. - To make sure the patties cook evenly, keep them the same size. Use a measuring cup or your hands to help shape them. - Heat a non-stick skillet on medium heat and add olive oil. Let it get hot; this helps the patties get crispy. - Cook the patties in the skillet for about 4-5 minutes on each side. Look for a golden brown color. This means they are cooked through and ready to enjoy. Feel free to check the Full Recipe for more details! To make these Smoky Chipotle Black Bean Burgers great, you need the right texture. If your mixture feels too wet, add extra breadcrumbs. This helps the patties hold their shape when you cook them. Aim for a firm yet moist texture. When it comes to spices, taste is key. Start with the recommended amounts, then adjust based on what you like. If you want it spicier, add more chipotle peppers. If you prefer less heat, use fewer peppers. Always trust your taste buds! Pan-frying is a fantastic way to cook these burgers. Use medium heat to get that perfect golden-brown crust. If the heat is too high, the outer layer may cook too fast, leaving the inside cold. To achieve that smoky flavor, don't skip the smoked paprika. It adds depth to your burgers. You can also consider adding a dash of liquid smoke for an extra kick. Presentation matters, even for burgers! Serve your patties on toasted buns. You can use rustic wooden boards or colorful plates for a fun look. Garnish with fresh herbs like cilantro or parsley. They add color and a fresh taste. Other great toppings include avocado slices, lettuce, and tomato. You can even drizzle some chipotle mayo on top for a tasty twist. For the full recipe, check out the details above. Enjoy your cooking! {{image_2}} For a gluten-free option, replace regular breadcrumbs with crushed cornflakes or almond flour. These alternatives keep the texture while making the burgers suitable for all diets. You can also use ground oats as a binder. For sauces, try vegan mayo or tahini. These plant-based options add a creamy touch without dairy. To elevate the taste, mix in spices like chili powder or paprika. Fresh herbs like cilantro or parsley add brightness too. You can also add finely chopped bell peppers or zucchini to the mix. This not only boosts flavor but also adds nutrients. Experiment with different combinations to find your perfect blend. Serve your burgers with sweet potato fries for a delightful crunch. You can also create a burger platter with assorted toppings. Include sliced avocados, fresh lettuce, and juicy tomatoes. Offer a variety of sauces, like chipotle mayo or barbecue sauce, for added flavor. This makes your meal fun and customizable. Check out the Full Recipe for more details on this delicious dish! To keep your Smoky Chipotle Black Bean Burgers fresh, store leftovers in the fridge. Place them in an airtight container. This helps prevent them from drying out. Make sure to eat them within 3 to 5 days for the best taste. If you want to save some burgers for later, freezing is easy. Start by shaping uncooked patties. Place them on a baking sheet lined with parchment paper. Freeze them for about an hour. Once frozen, transfer the patties to a freezer bag. This saves space and keeps them fresh. To reheat, cook them directly from frozen. Use a skillet over medium heat for about 5-7 minutes on each side. This ensures they are hot and tasty. Understanding how long your ingredients last is key. Canned black beans can stay good for 3-5 years. Quinoa lasts about 2-3 years when stored dry. Always check your ingredients for signs of spoilage. Look for bad smells, discoloration, or mold. If you see any of these, do not eat them. Your health is important! For the full recipe, visit the Smoky Chipotle Black Bean Burgers section. Black beans offer many health benefits. They are packed with protein and fiber. This helps keep you full and satisfied. Black beans also provide important nutrients like iron and magnesium. They support heart health and help with digestion. When you add black beans to burgers, you get a tasty dish that is good for you. Yes, you can use dried black beans. First, soak them in water overnight. This softens them and cuts cooking time. Drain and rinse the beans once soaked. Then, boil them in fresh water for about 1 to 1.5 hours. Check for tenderness before using them in your burger recipe. It takes longer than canned beans, but the flavor is worth it. To spice things up, add more chipotle peppers. You can also mix in cayenne pepper or hot sauce. Start with small amounts, and taste as you go. For extra heat, serve your burgers with spicy sauces. Try chipotle mayo or a zesty salsa. These additions will enhance the flavor and kick of your burgers. For the full recipe, check out the Smoky Chipotle Black Bean Burgers. These smoky chipotle black bean burgers are easy and fun to make. You learned about the main ingredients, cooking steps, and tips for perfecting the taste. I shared ideas for storage and how to keep leftovers fresh. You can customize these burgers with different flavors and toppings. Whether you prefer vegetarian or vegan options, there's something for everyone. Enjoy experimenting with your favorite sides and sauces to make these burgers your own!

Smoky Chipotle Black Bean Burgers Flavorful Delight

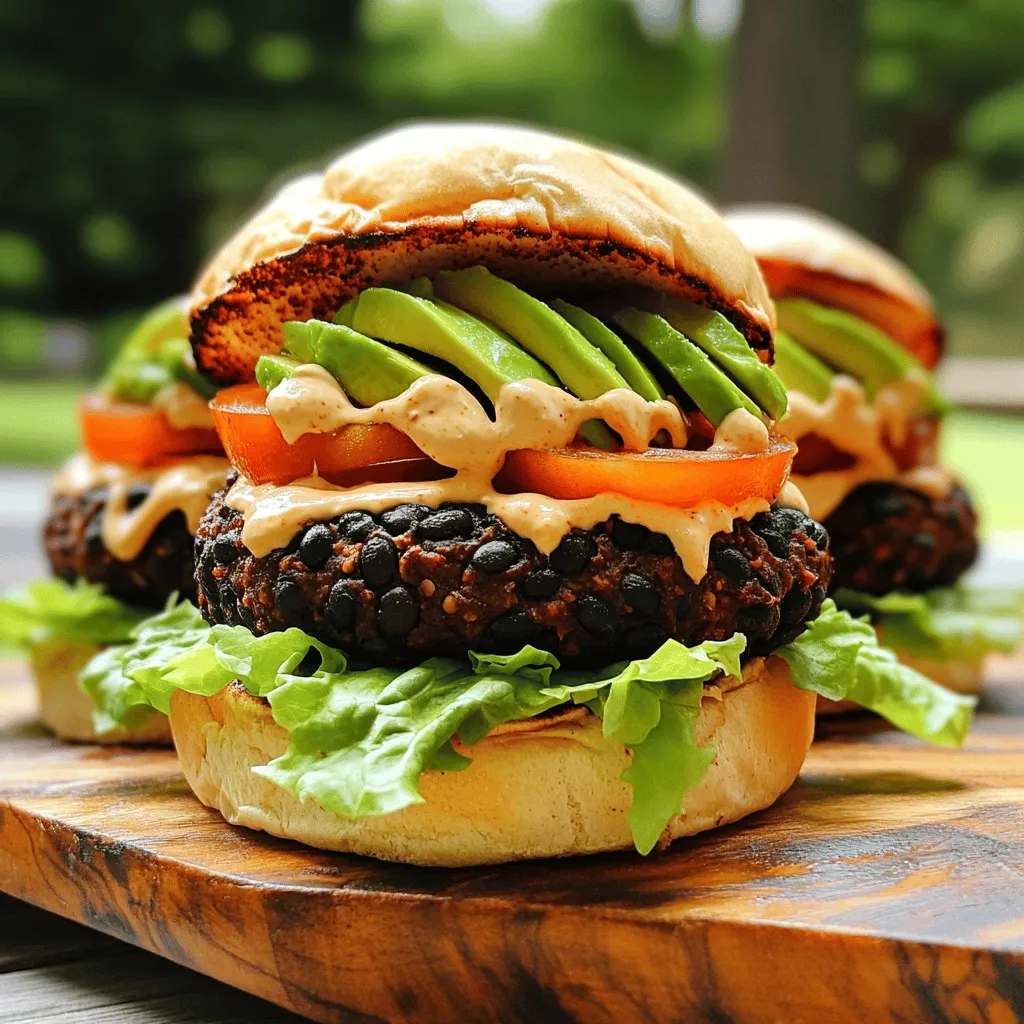
Looking for a tasty, healthy burger idea? Smoky Chipotle Black Bean Burgers are packed with flavor, fiber, and protein. Made

- 4 medium zucchinis, sliced into 1/4-inch rounds - 1 cup breadcrumbs (preferably whole wheat) - 1 cup grated Parmesan cheese - 2 cups marinara sauce - 1 teaspoon Italian seasoning - 1 teaspoon garlic powder - Salt and pepper to taste - 2 tablespoons olive oil - Fresh basil leaves, for garnish When I make Baked Zucchini Parmesan, I love starting with fresh zucchinis. They bring a nice crunch and flavor. You can find them at most grocery stores or farmers' markets. Slice them evenly to get a good bake. For the breadcrumb coating, I prefer whole wheat. It adds a nutty taste and a better texture. Mixing it with grated Parmesan cheese gives the dish a rich flavor. I also add Italian seasoning and garlic powder for extra zest. These spices make the dish pop! I like to lightly coat the zucchini in olive oil. This helps the breadcrumbs stick better. Don't forget to season them with salt and pepper. This step adds depth to the flavor. Finally, for garnishing, fresh basil leaves are a must. They add color and a fresh taste. You can chop them up or leave them whole for a lovely touch. These ingredients combine to create a tasty dish. If you're ready to try it, check out the Full Recipe! - Preheat your oven to 375°F (190°C). - Lightly coat the zucchini slices with olive oil and season with salt and pepper. Start by getting your oven ready. Preheating is key for that crispy finish. Next, take your zucchini and slice it into nice, even rounds. A quarter-inch thickness works best. This size helps them cook evenly. Coat each slice with a bit of olive oil. This adds flavor and helps the coating stick. Sprinkle some salt and pepper on them for taste. - In a mixing bowl, combine breadcrumbs, half of the Parmesan cheese, Italian seasoning, garlic powder, salt, and pepper. - Dip each zucchini slice into the breadcrumb mixture and place them on a baking sheet. Now it's time to mix the dry ingredients. Grab a bowl and add breadcrumbs, half of the Parmesan cheese, Italian seasoning, garlic powder, salt, and pepper. Stir well to combine everything. This mix is what gives your zucchini that tasty crunch. Take each slice of zucchini and dip it into the breadcrumb mixture. Make sure to press it lightly. This helps the coating stick. Place the coated slices on a baking sheet lined with parchment paper. - Bake for about 20-25 minutes until golden brown and crispy. - Spoon marinara sauce over the zucchini and sprinkle with remaining Parmesan. - Return to oven for an additional 5-7 minutes until cheese is melted and bubbly. Pop the baking sheet into your preheated oven. Bake those zucchini slices for about 20 to 25 minutes. Look for a golden brown color, which means they're crispy and ready. While they bake, warm your marinara sauce in a small pot. When the zucchini is done, take it out of the oven. Spoon some marinara sauce over each slice. Then, sprinkle the rest of the Parmesan cheese on top. Put the baking sheet back in the oven for another 5 to 7 minutes. This will melt the cheese and make it bubbly. To get that perfect crunch, focus on the breadcrumb coating. Use whole wheat breadcrumbs for added flavor and texture. Make sure to press the breadcrumbs onto each zucchini slice. This helps the coating stick well. You can also try mixing in some grated cheese with the breadcrumbs. This adds even more crunch and flavor. Don't be afraid to experiment with seasonings. You can add smoked paprika for a hint of smokiness or even some chili flakes for heat. Try mixing in dried herbs like oregano or thyme. Each combination offers a unique taste that can elevate your dish. When it comes to marinara, you have options. Homemade marinara gives a fresh taste. Store-bought sauces are quick and easy. If you're short on time, go for a high-quality jarred marinara. Look for brands with simple ingredients for the best flavor. You can also try different sauces with baked zucchini. A creamy alfredo pairs well for a rich dish. Pesto adds a fresh and herby flavor. Warm up some tomato sauce with garlic and basil for a classic twist. For a complete meal, serve baked zucchini parmesan with a salad. A crisp green salad with lemon vinaigrette works well. You can also add some garlic bread for a hearty touch. Presentation matters too! Arrange the baked zucchini nicely on a platter. Garnish with fresh basil leaves for a pop of color. Drizzle some extra marinara around the dish for an appealing look. For the full recipe, check the details above. {{image_2}} You can change the cheese for great taste. Mozzarella adds a nice melt. Cheddar brings sharpness. Romano gives a salty kick. You can mix these cheeses too. Try half mozzarella and half Parmesan for a creamy texture. This mix keeps the dish flavorful and fun. Want to make this dish heartier? You can add cooked chicken or turkey on top. Just shred the meat and place it over the zucchini. For a veggie option, try beans or lentils. They add protein and keep it filling. Both options make this dish a meal on its own. If you need a gluten-free dish, it’s easy to adapt. Use gluten-free breadcrumbs instead of regular ones. Always check labels to ensure all ingredients are gluten-free. This way, everyone can enjoy this tasty meal. You won’t lose flavor or texture with these swaps. For the full recipe, check out the steps and ingredients in the earlier sections. To store baked zucchini parmesan, let it cool first. Place it in an airtight container. This helps keep it fresh. You can store it in the fridge for up to three days. Make sure to separate layers with parchment paper to avoid sogginess. For the best results, reheat in the oven. Preheat the oven to 350°F (175°C). Place the zucchini on a baking sheet and heat for about 10 minutes. This keeps it crispy. You can use a microwave, but it may get soggy. If you use the microwave, heat it in 30-second intervals until warm. Yes, you can freeze baked zucchini parmesan. First, let it cool completely. Wrap each piece in plastic wrap and then place in a freezer bag. It can last up to three months in the freezer. To thaw, move it to the fridge overnight. Reheat in the oven or microwave before serving. For the full recipe, check out the [Full Recipe]. The prep time is 15 minutes. This means you can quickly gather your ingredients, slice the zucchini, and mix the coatings. You’ll be ready to bake in no time! This recipe makes a total of 4 servings. It’s perfect for a small family meal or a cozy dinner with friends. You can easily adjust the recipe if you need more servings. Yes, you can use other vegetables! Try eggplant, yellow squash, or even sliced bell peppers. Each will bring its own tasty twist to the dish. Just remember to adjust the baking time, as different veggies may cook faster or slower than zucchini. Baked zucchini Parmesan is a tasty and simple dish. You learned about the main ingredients, step-by-step instructions, and tips for a great result. There are also fun variations and storage tips to keep your leftovers fresh. This dish is an easy way to enjoy more veggies. Try it with different cheeses or proteins to make it your own. Enjoy your cooking adventure and make your meals exciting and fun!

Baked Zucchini Parmesan Flavorful and Crispy Dish

If you love crispy, cheesy dishes, you’ll adore Baked Zucchini Parmesan! This dish combines fresh zucchini with crispy breadcrumbs and

To make Thai Coconut Curry Soup, gather these fresh ingredients: - 1 tablespoon coconut oil - 1 medium onion, chopped - 4 cloves garlic, minced - 1 tablespoon fresh ginger, grated - 2 tablespoons red curry paste - 1 can (14 oz) coconut milk - 4 cups vegetable broth - 1 cup carrots, thinly sliced - 1 cup bell peppers, sliced (red and yellow for color) - 1 cup snap peas - 1 tablespoon soy sauce (or tamari for gluten-free) - 1 tablespoon lime juice - Salt and pepper to taste - Fresh cilantro, for garnish - Lime wedges, for serving These ingredients create a rich, warm flavor. Each one plays a key role in the soup. The coconut oil gives a nice base. The onion, garlic, and ginger add depth and warmth. Red curry paste brings spice and flavor. Coconut milk makes it creamy and rich. Fresh veggies like carrots, bell peppers, and snap peas add color and crunch. Finally, lime juice and cilantro provide brightness and freshness. You will love how these flavors blend together. For the complete recipe, check out the Full Recipe. Start by gathering your ingredients. Here’s what you need to do: - Chop 1 medium onion into small pieces. - Mince 4 cloves of garlic finely. - Grate 1 tablespoon of fresh ginger. - Slice 1 cup of carrots thinly. - Slice 1 cup of bell peppers, using red and yellow for color. - Trim 1 cup of snap peas. Make sure your cutting board and knife are clean. This helps keep your soup fresh and tasty. Now, let’s cook your soup. Follow these steps closely: 1. Heat 1 tablespoon of coconut oil in a large pot over medium heat. 2. Add the chopped onion and sauté for 3-4 minutes until it softens. 3. Stir in the minced garlic and grated ginger. Cook for 1-2 minutes until it smells great. 4. Mix in 2 tablespoons of red curry paste. Stir well and cook for another 2 minutes. 5. Pour in 1 can of coconut milk and 4 cups of vegetable broth. Stir to combine. 6. Add the sliced carrots, bell peppers, and snap peas. 7. Bring the soup to a simmer. Reduce the heat and keep it simmering for about 10-15 minutes until the veggies are tender. 8. Stir in 1 tablespoon of soy sauce and 1 tablespoon of lime juice. Taste and adjust with salt and pepper if needed. 9. Remove the pot from the heat. Let it sit for 2-3 minutes. This cooking process melds all the flavors perfectly. For the best presentation, serve your soup hot. Here are some tips to make it shine: - Garnish with fresh cilantro on top. - Serve lime wedges on the side for a zesty kick. These small touches make your Thai coconut curry soup look and taste amazing. For the full recipe, check the earlier section. Enjoy your cooking! To make your Thai Coconut Curry Soup shine, balance is key. You want a mix of spice, sweetness, and acidity. Start with the red curry paste for heat. Use just enough to wake up your taste buds. Next, add coconut milk for creaminess. This will also add a touch of sweetness. Finally, finish with lime juice for that zesty kick. A squeeze of lime at the end brightens the whole dish. Taste as you go, and adjust to your liking. This way, you’ll create a soup that is perfectly balanced and delicious. Sautéing and simmering are two main techniques for this soup. First, heat the coconut oil in your pot. Add chopped onion and cook until soft. This builds your base flavor. Next, add garlic and ginger. Both add depth and aroma. Stir them for a minute, just until fragrant. After that, mix in the red curry paste. This step helps release its full flavor. Now, pour in the coconut milk and broth. Bring this to a simmer. Let the veggies cook gently in the broth. This will keep them tender and bright. Be careful not to overcook your veggies. They should be tender but still crisp. If you cook them too long, they can turn mushy. Also, pay attention to seasoning. Taste your soup before serving. Sometimes, it needs more salt, pepper, or lime juice. Adjust as needed to get the right flavor. These simple steps can make a big difference in your dish. {{image_2}} You can change the vegetables or proteins in this soup. If you want a new taste, try different options. For example, swap snap peas for zucchini or add broccoli. You can use chickpeas instead of meat for a protein boost. Feel free to mix and match based on what you like or have at home. If you need gluten-free options, use tamari instead of soy sauce. For a vegan version, ensure you choose vegetable broth and skip any animal products. This soup is flexible. You can make it fit your diet while keeping it tasty. To make this soup unique, add fresh herbs or spices. Try basil or mint for a fresh taste. A sprinkle of chili flakes can add heat. You can also add a squeeze of lemon for extra zing. These small changes can create a whole new experience in every bowl. For the full recipe, check out the link provided! To store your Thai coconut curry soup, let it cool first. Pour leftovers into an airtight container. This helps keep the soup fresh and tasty. Place it in the fridge right away. It will stay good for about 3 to 4 days. When you want to eat it again, just reheat on the stove or in the microwave. If you want to freeze your soup, use a freezer-safe container. Leave some space at the top, as soup expands when frozen. The soup can last in the freezer for up to 2 to 3 months. To reheat, thaw it overnight in the fridge. Heat it gently on the stove. Stir well to make sure it warms evenly. When stored properly, your Thai coconut curry soup lasts about 3 to 4 days in the fridge. If you freeze it, aim to eat it within 2 to 3 months for the best taste. Always check for any off smells or changes in color before eating. Enjoy your delicious soup at its best! To make Thai Coconut Curry Soup vegetarian, swap the vegetable broth for a vegan option. Ensure the red curry paste is free of fish sauce or meat-based ingredients. Use fresh veggies like bell peppers, carrots, and snap peas for a colorful mix. You can also add tofu for extra protein. This keeps it tasty and filling. Yes, you can substitute coconut milk with another ingredient. Almond milk or cashew cream can work well, but they change the flavor. If you want a creamy texture, use heavy cream or a dairy substitute. Remember, these options may alter the soup's taste and richness, so adjust the seasonings accordingly. To adjust spice levels, taste the soup as you cook. If it's too spicy, add more coconut milk or broth to mellow the heat. You can also add sugar or lime juice to balance the spice. If it's not spicy enough, mix in more red curry paste. Start with small amounts and increase as needed. Yes, this soup is freezable. Let it cool completely before placing it in airtight containers. It can be frozen for up to three months. When ready to eat, thaw it in the fridge overnight and reheat gently on the stove. Stir well to combine the flavors again. This blog post offers a full guide on making Thai Coconut Curry Soup. We explored key ingredients, preparation steps, and cooking techniques. You learned tips to enhance flavors and avoid common mistakes. We also discussed variations to suit different diets and preferences. Finally, I provided storage tips to keep your soup fresh. Now, you are ready to create your own delicious bowl of soup, impressing yourself and others. Enjoy the cooking process and make it your own!

Thai Coconut Curry Soup Flavorful and Easy Recipe

Are you craving a warm, comforting bowl of Thai Coconut Curry Soup? This easy recipe brings together rich coconut milk,

Older posts
Newer posts
← Previous Page1 … Page82 Page83 Page84 Next →

dsad

© 2026 pureeatsnow • Built with GeneratePress

Our Policies

  • Copyright Policy
  • Cookie Policy
  • GDPR Policy
  • Privacy Policy
  • Disclaimer
  • Terms Of Use

More Information

  • Home
  • About
  • Contact
  • Appetizers
  • Dessert
  • Dinner
  • Drinks
©2026, pureeatsnow About Back To Top